Audi Q7: Front Center Armrest
Overview - Front Center Armrest
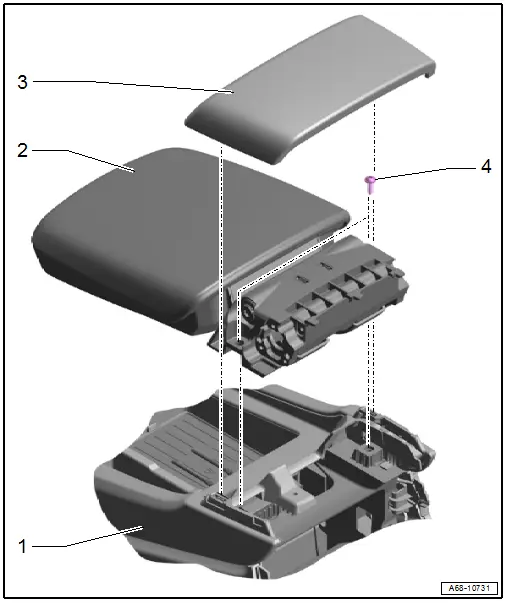
1 - Center Console
2 - Front Center Armrest
- Removing and installing. Refer to
→ Chapter "Front Center Armrest, Removing and Installing".
3 - Cover
- Replace damaged or deformed clips
- Removing and installing. Refer to
→ Chapter "Center Console Rear Trim, Removing and Installing".
- Press on until it engages audibly
4 - Bolt
Front Center Armrest, Removing and Installing
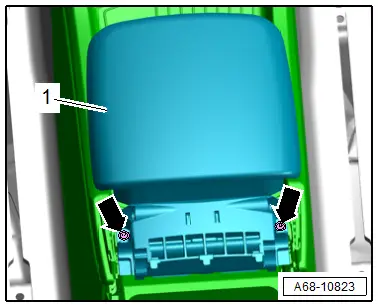
Removing
- Remove the center console rear trim. Refer to
→ Chapter "Center Console Rear Trim, Removing and Installing".
- Remove the bolts -arrows-.
- Remove the front center armrest -1-.
Installing
Install in reverse order of removal.
Installation notes, for example tightening specifications,
replacing components. Refer to
→ Chapter "Overview - Front Center Armrest".
READ NEXT:
1 - Front Cover
For the mirror base
Press on until it engages audibly
2 - Clip
For the interior rearview mirror
There are different versions. Refer to the Parts Catalog fo
Special tools and workshop equipment
required
Angled Screwdriver -VAS6416-
Caution
This procedure contains mandatory replaceable parts.
Refer to component overview prior to starting proc
- By briefly pressing the button -2-
(less than three seconds), the automatic dimming function is
switched on or off automatically.
Automatic dimming "ON": the lamp in the display
-1- turns on.
SEE MORE:
Overview - Luggage Compartment Floor, Vehicles without High-Voltage System
1 - Trim Panel
Removing and installing. Refer to
→ Chapter "Spare Wheel Well Trim, Removing and Installing".
2 - Collapsible Tire Filling Piece
Equipped on some models
3 - Spare T
Overview - Bumper Cover, Vehicles without High-Voltage System
1 - Bumper Cover Lower Section
There are different versions. Refer to the Parts Catalog .
Removing and Installing. Refer to
→ Chapter "Bumper Cover Lower Section, Removing and Installing".
Bumper cover mount. Refer

