Audi Q7: Torque Converter
Overview - Torque Converter
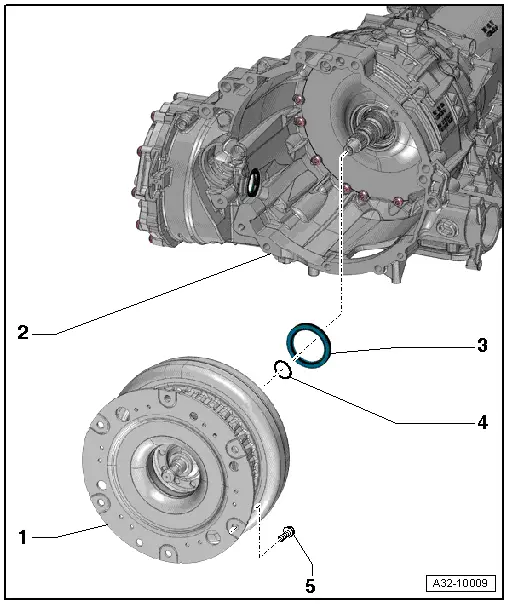
1 - Torque Converter
- Refer to the Parts Catalog for the allocation to the transmission.
- Removing and installing. Refer to → Chapter "Torque Converter, Removing and Installing".
2 - Transmission Housing
3 - Seal
- For the torque converter
- Replacing. Refer to → Chapter "Torque Converter Seal, Removing and Installing".
4 - O-Ring
- Replacing
5 - Bolt
- 60 Nm
- Replacing
- Quantity: 6
- Procedure for tightening.
Torque Converter, Removing and Installing
Special tools and workshop equipment required
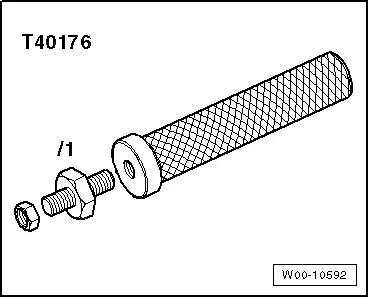
- Puller - Clutch Module -T40176-
- Depth Gauge -VAS6082-
- Grease for Clutch Disc Shaft Splines -G 000 100-
- Sealing Grease -G 052 128 A1-
 Caution
This procedure contains mandatory replaceable parts. Refer to component overview prior to starting procedure.
Mandatory Replacement Parts
- Seal - Torque converter
- O-ring - Torque converter
Removing
- Transmission removed. Refer to → Chapter "Transmission, Removing and Installing".
- Remove the left flange shaft. Refer to → Chapter "Left Flange Shaft, Removing and Installing".
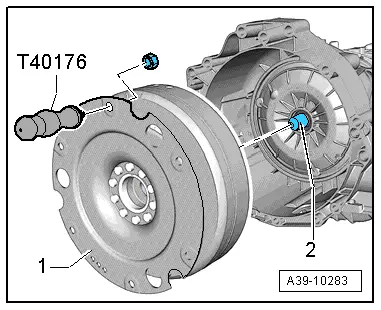
- Secure the Puller - Clutch Module -T40176- to the torque converter -A- with the nut -B-.
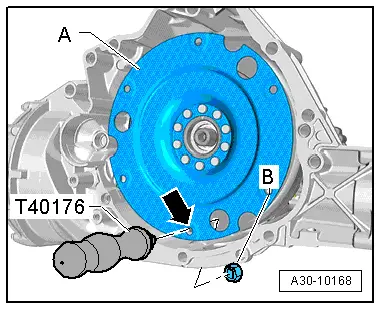
- Turn the Puller - Clutch Module -T40176- upward.
 Note
Note
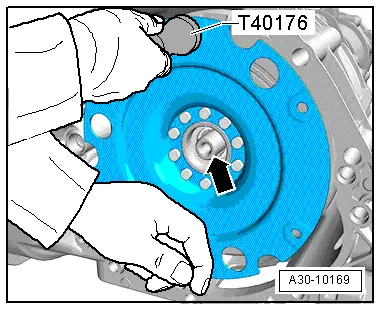
To prevent the torque converter from tilting, counterhold it underneath as shown.
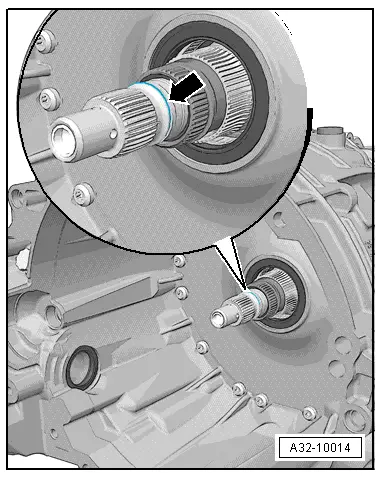
- Remove the torque converter without tilting from the input shaft -arrow- at the same time pay attention to the vent line.
- Set the torque converter down carefully, for example on the workbench.
Installing
Install in the reverse order of removal while noting the following:
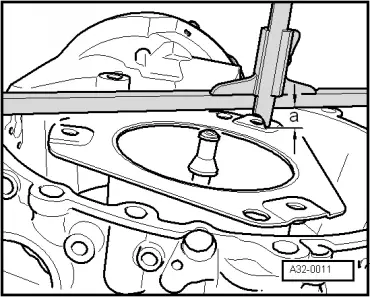
- Thoroughly clean the torque converter bell housing in the area where the differential is accessed -arrow A- and the gasket -arrow B-.
 Note
Note
A damaged seal between the differential and the transmission housing -arrow B- must be replaced. Refer to → Chapter "Overview - Final Drive".
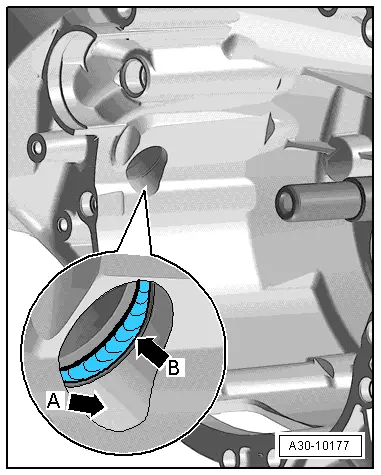
- Fill the space between the sealing/dust lip -arrow- halfway with Sealing Grease -G 052 128 A1-.

- Replace the O-ring -arrow- on the input shaft.
- Check the torque converter. Refer to → Chapter "Torque Converter, Checking".
- Check the torque converter gasket seal for damage and replace it if necessary. Refer to → Chapter "Torque Converter Seal, Removing and Installing".
- Secure the Puller - Clutch Module -T40176- to the torque converter with a nut.
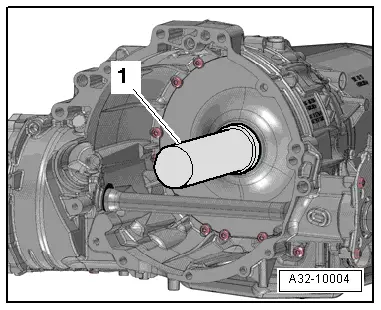
- Push the torque converter carefully all the way onto the input shaft -2- without tilting it using the Puller - Clutch Module -T40176-.
- Using light pressure, turn the torque converter toward the inside until the splines engage into the input hub for the ATF pump and the torque converter noticeably slides toward the inside.
 Caution
Risk of damaging the drive hub on the ATF pump by installing the torque converter incorrectly.
Check the position of the torque converter.
If the converter is installed correctly, the space -a- between the surface of the securing eyes and the surface of the torque converter bell housing will be the following values:
- Dimension -a- = minimum 16 mm
- Remove the Puller - Clutch Module -T40176- from the torque converter -A-.
- Remove the nut -B-.
- Install the left flange shaft. Refer to → Chapter "Left Flange Shaft, Removing and Installing".

Torque Converter, Discharging
Special tools and workshop equipment required
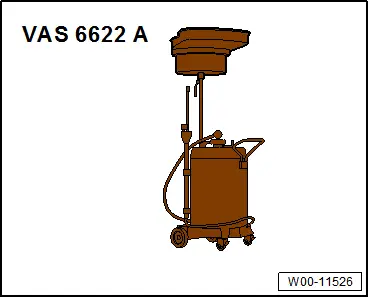
- Used Oil Collection and Extraction Unit -SMN372500-
Procedure
If the ATF becomes dirty due to shavings or during a major transmission overhaul, then the torque converter must be drained.
- Syphon ATF from the torque converter using Used Oil Collection and Extraction Unit -SMN272500- or -VAG1782-.

Torque Converter, Checking
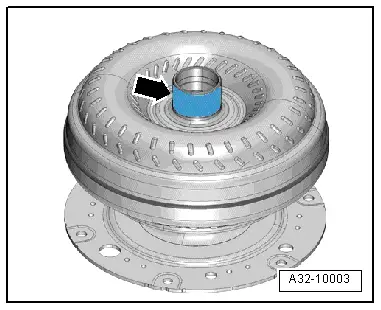
- Check the torque converter hub -arrow- for wear grooves.
 Note
Note
The torque converter must be replaced if it is damaged or faulty.
Torque Converter Seal, Removing and Installing
Special tools and workshop equipment required
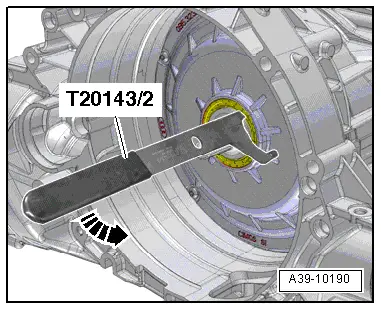
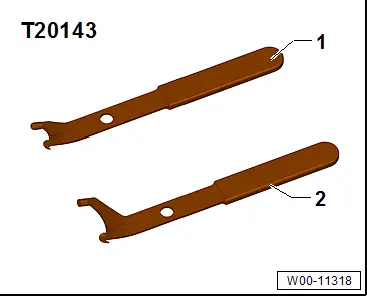
- Puller - Crankshaft/Power Steering Seal -T20143/2-
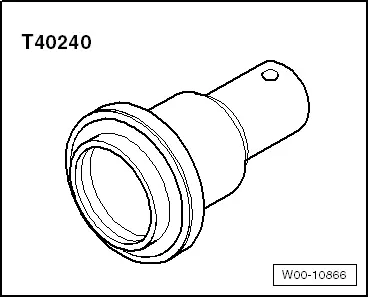
- Seal Installer - Input Shaft -T40240-
Procedure
- Remove the torque converter. Refer to → Chapter "Torque Converter, Removing and Installing".
- Pry out the torque converter gasket with the Puller - Crankshaft/Power Steering Seal -T20143/2-
- Coat the outer edge of the oil seal and the sealing lips with ATF.
- Installation position: open side of the seal faces the transmission.
- Install the torque converter gasket all the way in the Seal Installer - Input Shaft -T40240--1-.
- Install the torque converter. Refer to → Chapter "Torque Converter, Removing and Installing".
Special Tools
Special tools and workshop equipment required
- Used Oil Collection and Extraction Unit -SMN372500-
- Puller - Crankshaft/Power Steering Seal -T20143/2-
- Puller - Clutch Module -T40176-
- Seal Installer - Input Shaft -T40240-
- Depth Gauge -VAS6082-
- Grease for Clutch Disc Shaft Splines -G 000 100-
- Sealing Grease -G 052 128 A1-


