Audi Q7: Acceptable Tread Depth Variance
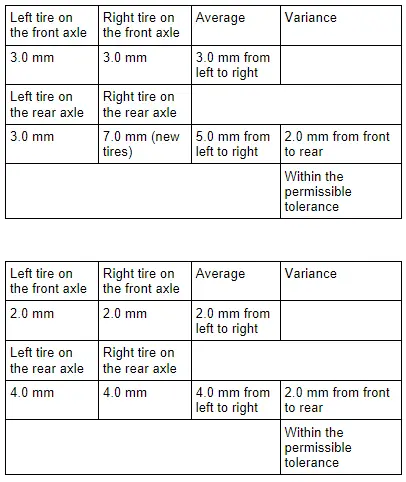
Model with Longitudinally Installed Engine
Tread variance for models with a longitudinally installed engine, such as A4, A5, A6, A7, A8, Q5, Q7, ...
The variance between the front and rear axle in this case may not be more then 2 mm
 Note
Note
The technical background of the limitations are thermal pressure for the transmission oil due to a large difference in the rolling circumference of the tires.
- For all four wheels use only tires of the same construction type and tread.
- Always use tires with the deepest tread depth on the front axle.
- It is possible to change tires individually. However, Audi recommends changing tires on both sides.
- With sport differential on the rear axle, Audi recommends always replacing the tires on both sides of the rear axle.
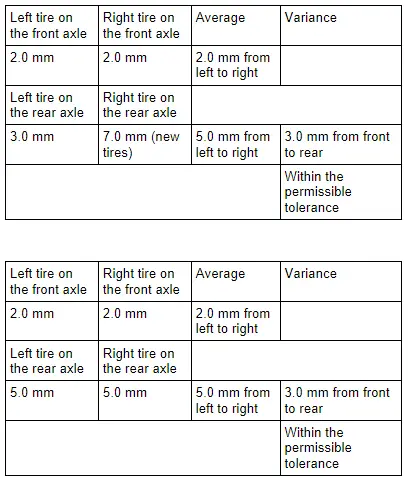
Models with Transverse Installed Engine
 Note
Note
- Tread depth variance for models with crossways installed engine, such as A3, TT, Q3, A1, ...
- The variance between the front and rear axle in this case may not be more then 3 mm
 Note
Note
The technical background of the limitations are thermal pressure for the transmission oil due to a large difference in the rolling circumference of the tires.
- For all four wheels use only tires of the same construction type and tread.
- Always use tires with the deepest tread depth on the front axle.
- It is possible to change tires individually. However, Audi recommends changing tires on both sides.
- With sport differential on the rear axle, Audi recommends always replacing the tires on both sides of the rear axle.
Recommended Snow Chains
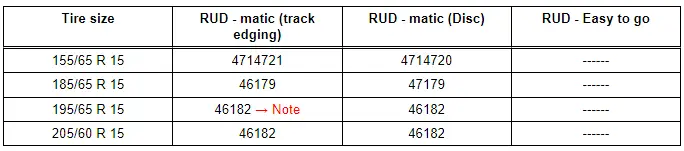
Recommended Snow Chains - RUD
Recommended Snow Chains - RUD - 14 Inches

Recommended Snow Chains - RUD - 15 Inches
1) and Avant RS 4 (Type 8E)
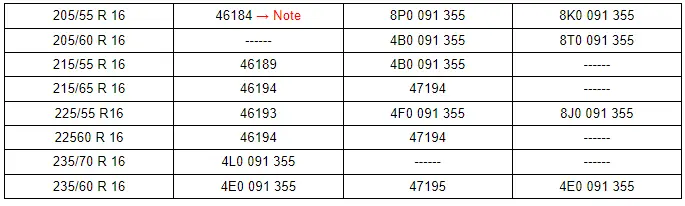
Recommended Snow Chains - RUD - 16 Inches
1) and Avant RS 2
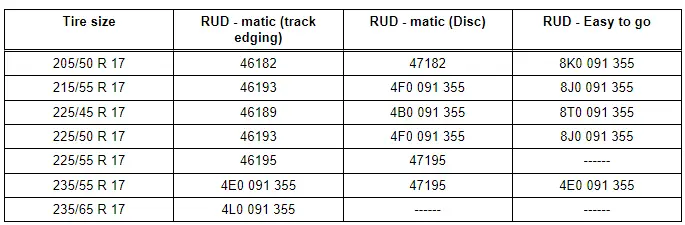
Recommended Snow Chains - RUD - 17 Inches
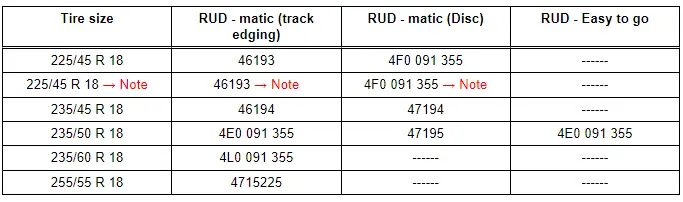
Recommended Snow Chains - RUD - 18 Inches
1) and A4 (Type 8K and 8T)
Recommended Snow Chains - RUD - 19 Inches

1) R8 rear axle
2) and RS 4 (type 8E)
Recommended Snow Chains - RUD - 20 Inches

1) Q7 12-cylinder rear axle
Recommended Snow Chains - König (King)
Recommended Snow Chains - König (King) - 14 Inches

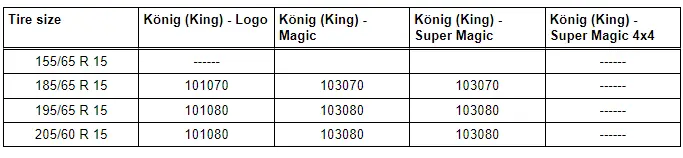
Recommended Snow Chains - König (King) - 15 Inches
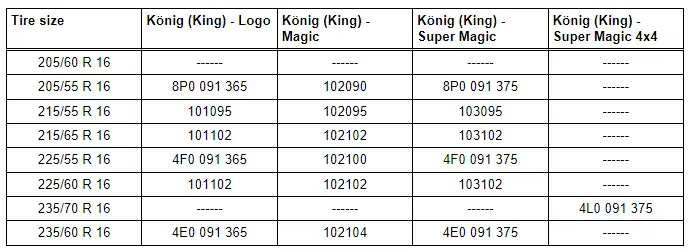
Recommended Snow Chains - König (King) - 16 Inches
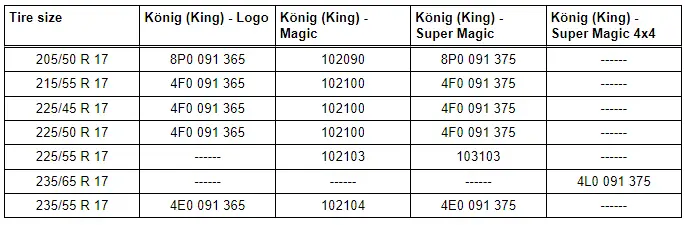
Recommended Snow Chains - König (King) - 17 Inches
Recommended Snow Chains - König (King) - 18 Inches

Recommended Snow Chains - König (King) - 19 Inches


