Audi Q7: Light Switch -E1-, Removing and Installing
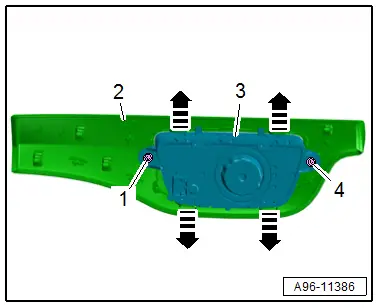
Removing
- Turn the light switch to position "0".
- Remove the light switch trim. Refer to → Body Interior; Rep. Gr.70; Instrument Panel; Light Switch Trim, Removing and Installing.
- If equipped, remove the bolts -1 and 4-.
- Release the retainers in the direction of -arrows-.
- Remove the light switch -3- from the light switch trim -2-.
Installing
Install in reverse order of removal.
Tightening Specifications
- Refer to → Fig. " Light Switch -E1- Tightening Specification"
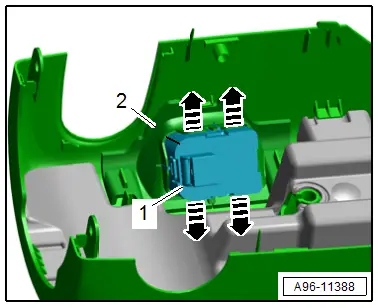
Steering Column Adjustment Switch -E167-, Removing and Installing
Removing
- Remove the lower steering column trim panel. Refer to → Body Interior; Rep. Gr.68; Storage Compartments and Covers; Lower Steering Column Trim Panel, Removing and Installing.
- Release the retainers in direction of -arrows-.
- Remove the steering column adjustment switch -1- from the lower steering column trim panel -2-.
Installing
Install in reverse order of removal.
Buttons in Instrument Panel, Removing and Installing
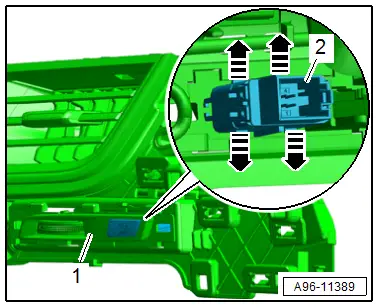
Driver Side Ionizer Button -E830-, Removing and Installing
Removing
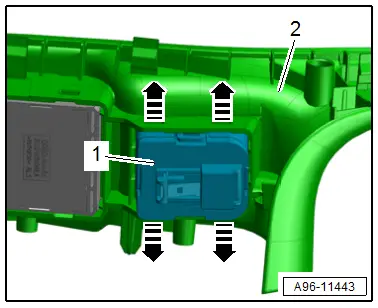
- Remove the driver side vents in the instrument panel. Refer to → Body Interior; Rep. Gr.70; Instrument Panel; Instrument Panel Vent, Removing and Installing.
- Release the retainers in direction of -arrows-.
- Remove the driver side ionizer button -2- from the instrument panel vent mount -1-.
Installing
Install in reverse order of removal.
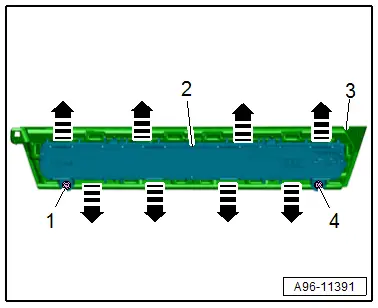
Buttons in Instrument Panel, Removing and Installing, Control Unit 1 for Driving and Convenience Functions -E791-
Removing
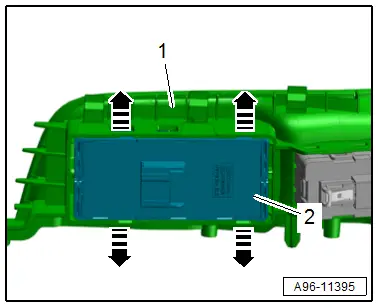
- Remove the instrument panel decorative trim. Refer to → Body Interior; Rep. Gr.70; Instrument Panel; Instrument Panel, Removing and Installing.
- If equipped, remove the bolts -1 and 4-.
- Release the retainers in the direction of -arrows-.
- Remove the button -2- from the decorative trim - 3-.
Installing
Install in reverse order of removal.
Tightening Specifications
- Refer to → Fig. " Control Unit 1 for Driving and Convenience Functions -E791- Tightening Specification"
Buttons in Instrument Panel, Removing and Installing, Instrument Cluster Operation Button -E493-
Removing
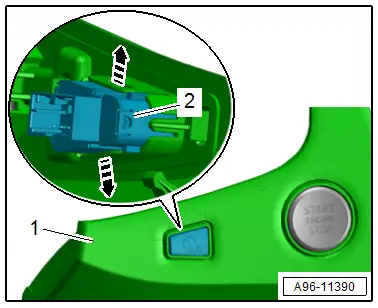
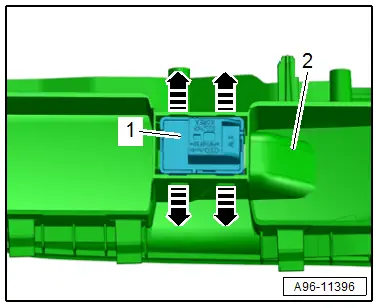
- Remove the access/start authorization switch trim. Refer to → Body Interior; Rep. Gr.70; Instrument Panel; Access/Start Authorization Switch Trim, Removing and Installing.
- Release the retainers -arrows-.
- Remove the button -2- from the mount in the access/start authorization switch trim -1-.
Installing
Install in reverse order of removal.
Instrument Panel Vent Button -E815-, Removing and Installing
Removing
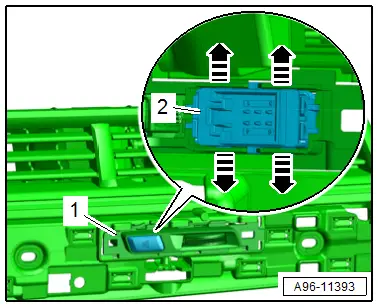
- Remove the front passenger side vents in the instrument panel. Refer to → Body Interior; Rep. Gr.70; Instrument Panel; Instrument Panel Vent, Removing and Installing.
- Release the retainers -arrows-.
- Remove the button -2- from the instrument panel vent mount -1-.
Installing
Install in reverse order of removal.
Glove Compartment Lamp Switch -E26-, Removing and Installing
Removing
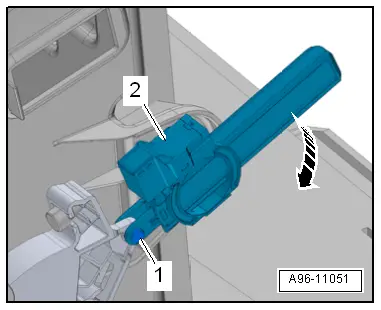
- Remove the glove compartment. Refer to → Body Interior; Rep. Gr.68; Storage Compartments and Covers; Glove Compartment, Removing and Installing.
- Remove the hinge pins -1-.
- Turn the switch -2- counter-clockwise -arrow- and remove it.
Installing
Install in reverse order of removal.
Mirror Adjusting Switches -E43-/-E168-, Removing and Installing
Removing
- Remove the switch mount. Refer to → Body Interior; Rep. Gr.70; Front Door Trim Panels; Front Pull Handle, Removing and Installing.
- Carefully release the retainers using a small screwdriver in direction of -arrows-.
- Remove the mirror adjustment switch -1- from the switch mount -2-.
Installing
Install in reverse order of removal.
Power Window Control Head in Driver Door -E512-, Removing and Installing
Removing
- Remove the switch mount. Refer to → Body Interior; Rep. Gr.70; Front Door Trim Panels; Front Pull Handle, Removing and Installing.
- Carefully release the retainers using a small screwdriver in direction of -arrows-.
- Remove the power window switch -2- from the switch mount -1-.
Installing
Install in reverse order of removal.
Front Passenger Door Window Regulator Switch -E107-, Removing and Installing
Removing
- Remove the switch mount. Refer to → Body Interior; Rep. Gr.70; Front Door Trim Panels; Front Pull Handle, Removing and Installing.
- Carefully release the retainers using a small screwdriver -arrows-.
- Press the power window switch -1- out of the switch mount -2-.
Installing
Install in reverse order of removal.

