Audi Q7: Child Seat Anchors
Overview - Front Child Seat Anchors
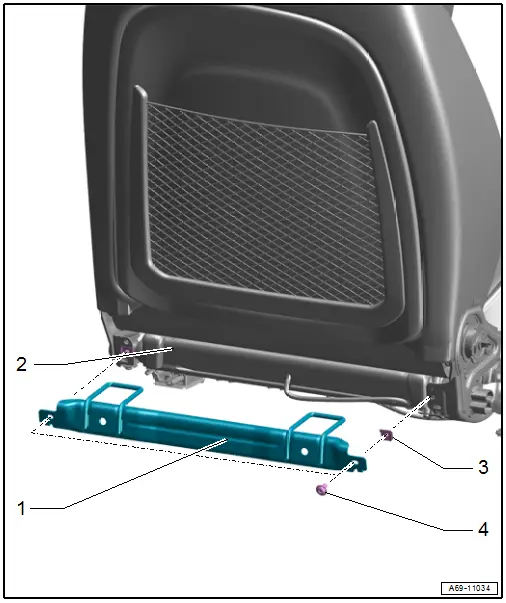
1 - Child Seat Anchor
- Passenger seat only
- Bolted with the seat pan
- Check after an accident. Refer to → Chapter "Child Seat Anchors, Checking After Collision".
- Replace damaged or deformed child seat anchor
- Removing and installing. Refer to → Chapter "Front Child Seat Anchor, Removing and Installing".
2 - Front Passenger Seat
3 - Spring Nut
- Quantity: 2
- Attached in the seat pan
- Replace any damaged or deformed spring nuts
4 - Bolt
- 8 Nm
- Replace after removing
- Quantity: 2
Overview - Rear Child Seat Anchors

1 - Lower Child Seat Anchor, Second Row
- Welded to the seat frame
2 - Upper Child Seat Anchor, Second and Third Row
- Welded to the backrest frame.
3 - Cover
- For the upper child seat anchor
- Removing and installing. Refer to → Chapter "Upper Child Seat Anchor Cover, Removing and Installing, Second and Third Row".
- Insert in the anchor and press on it until it engages audibly
- Can only be pushed in one position in the rear seat backrest
4 - Cap
- 4 a piece
- Removing and installing. Refer to → Chapter "Lower Child Seat Anchor Guide, Removing and Installing, Second and Third Row".
- Must be secure on the anchor
5 - Lower Child Seat Anchor, Third Row
- Welded to the seat frame
6 - Guide
- For the lower child seat anchor
- 4 a piece
- Removing and installing. Refer to → Chapter "Lower Child Seat Anchor Guide, Removing and Installing, Second and Third Row".
- Must be secure on the anchor
Front Child Seat Anchor, Removing and Installing
Mandatory Replacement Parts
- Bolts - Front Child Seat Anchor
Removing
- Remove the front passenger seat. Refer to → Chapter "Front Seat, Removing and Installing".
- Remove the tunnel-side seat side trim. Refer to → Chapter "Seat Side Trim on Tunnel Side, Removing and Installing".
- Remove the seat side trim on the side sill side. Refer to → Chapter "Seat Side Trim On Side Sill Side, Removing and Installing".
- Remove the backrest cover. Refer to → Chapter "Backrest Cover, Removing and Installing".
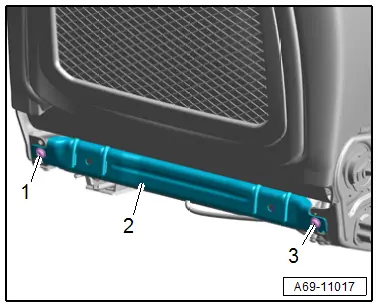
- Remove the bolts -1 and 3-.
- Remove the child seat anchor -2- toward the rear from the front seat.
Installing
Install in reverse order of removal.
Installation instructions: for example tightening specifications, replacing components. Refer to → Chapter "Overview - Front Child Seat Anchors".
Rear Child Seat Anchor, Removing and Installing
Lower Child Seat Anchor Guide, Removing and Installing, Second and Third Row
Removing
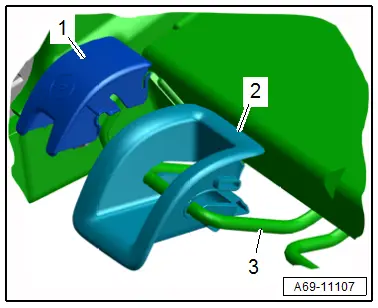
- Unclip the child seat anchor cap -1- from the anchor.
- Push the guide -2-, corresponding to the opening, downward and disengage it from the child seat anchor -3-.
- Remove the guide forward.
Installing
Install in reverse order of removal.
Installation notes, for example tightening specifications, replacing components. Refer to → Chapter "Overview - Rear Child Seat Anchors".
Upper Child Seat Anchor Cover, Removing and Installing, Second and Third Row
Special tools and workshop equipment required
- Wedge Set -T10383-
Removing
- Fold the rear seat backrest forward.
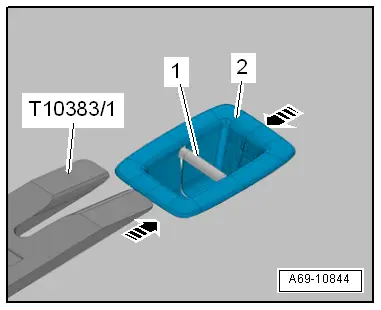
- Release the tabs using the -T10383/1- in direction of -arrows- and pry the cover -2- upward from the rear seat backrest.
- Carefully pull and remove the cover from the child seat anchor -1-.
Installing
Install in reverse order of removal.
Installation notes, for example tightening specifications, replacing components. Refer to → Chapter "Overview - Rear Child Seat Anchors".

