Audi Q7: Instrument Panel Side Cover, Removing and Installing
Special tools and workshop equipment required
- Trim Removal Wedge -3409-
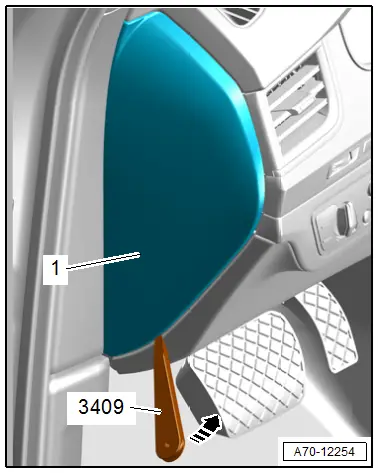
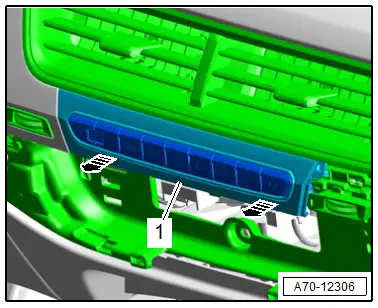
Removing
- Pry the instrument panel side cover -1- off using the -3409--arrow- and remove it.
Installing
Install in reverse order of removal.
Installation notes, for example tightening specifications, replacing components. Refer to → Chapter "Overview - Instrument Panel".
Instrument Panel Decorative Trim, Removing and Installing
Instrument Panel Decorative Trim, Removing and Installing, Driver Side
Special tools and workshop equipment required
- Wedge Set -T10383-
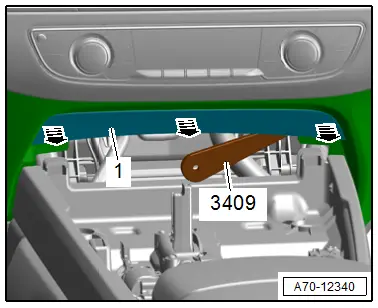
Removing
- Remove the driver side instrument panel side cover. Refer to → Chapter "Instrument Panel Side Cover, Removing and Installing".
- Move the steering wheel as far down as possible to do this use the full steering column adjustment range.
- Unclip the gap cover -1- for the instrument cluster by hand from the instrument cluster trim in direction of -arrows-.
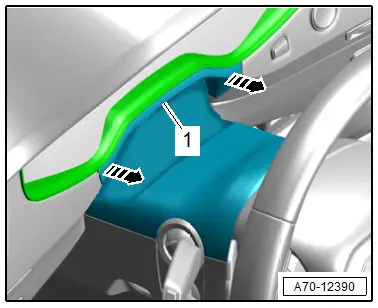
- Unclip the trim molding -1- using the -T10383/1--arrows-.
Installing
Install in reverse order of removal.
Installation notes, for example tightening specifications, replacing components. Refer to → Chapter "Overview - Instrument Panel".
Instrument Panel Decorative Trim, Removing and Installing, Front Passenger Side
Special tools and workshop equipment required
- Wedge Set -T10383-
Removing
- Remove the front passenger side instrument panel side cover. Refer to → Chapter "Instrument Panel Side Cover, Removing and Installing".
- Remove A/C display control head trim. Refer to → Chapter "Display Control Head Trim, Removing and Installing".
- Remove the bolt -1-.
- Unclip the trim molding -2- using the -T10383/1- in direction of -arrows-.
Installing
Install in reverse order of removal.
Installation notes, for example tightening specifications, replacing components. Refer to → Chapter "Overview - Instrument Panel".
Instrument Panel Decorative Trim, Removing and Installing, Center
Special tools and workshop equipment required
- Wedge Set -T10383-
Removing
- Remove the instrument panel decorative trim on the front passenger side. Refer to → Chapter "Instrument Panel Decorative Trim, Removing and Installing, Front Passenger Side".
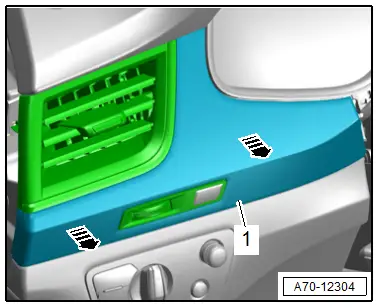
- Unclip the decorative trim -1- with the switch module using the -T10383/1--arrows-.
- Disconnect the connectors and remove the decorative trim with the switch module.
Installing
Install in reverse order of removal.
Installation notes, for example tightening specifications, replacing components. Refer to → Chapter "Overview - Instrument Panel".
Instrument Panel Trim, Removing and Installing
Special tools and workshop equipment required
- Trim Removal Wedge -3409-
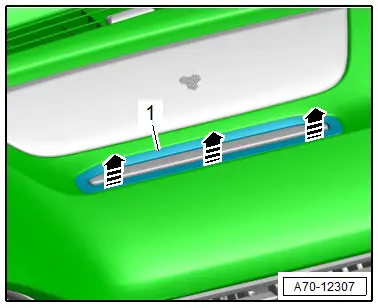
Removing
- Remove the center console insert. Refer to → Chapter "Center Console Insert, Removing and Installing".
- Unclip the instrument panel trim -1- using the -3409- in direction of -arrows- and remove it.
Installing
Install in reverse order of removal.
Installation notes, for example tightening specifications, replacing components. Refer to → Chapter "Overview - Instrument Panel".
MMI Screen Cover, Removing and Installing
Special tools and workshop equipment required
- Wedge Set -T10383-
Removing
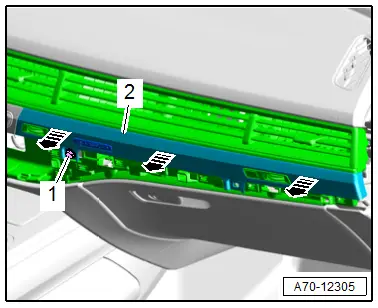
- Unclip the MMI screen cover -1- using the -T10383/1--arrows-.
- Disengage the MMI screen cover from the instrument panel and remove it.
Installing
Install in reverse order of removal.
Installation notes, for example tightening specifications, replacing components. Refer to → Chapter "Overview - Instrument Panel".
Instrument Cluster Trim, Removing and Installing
Special tools and workshop equipment required
- Trim Removal Wedge -3409-
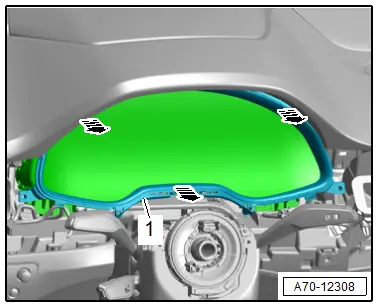
Removing
- Move the steering wheel as far down as possible to do this use the full steering column adjustment range.
- Remove the instrument panel vent on the driver side. Refer to → Chapter "Driver Side Instrument Panel Vent, Removing and Installing".
- Remove front passenger side instrument panel vent. Refer to → Chapter "Passenger Side Instrument Panel Vent, Removing and Installing".
- Unclip the instrument cluster trim -1- using the -3409- in direction of -arrows-.
Installing
Install in reverse order of removal.
Installation notes, for example tightening specifications, replacing components. Refer to → Chapter "Overview - Instrument Panel".

