Audi Q7: Front Center Console Storage Compartment, Removing and Installing
Front Storage Compartment, Removing and Installing
Special tools and workshop equipment required
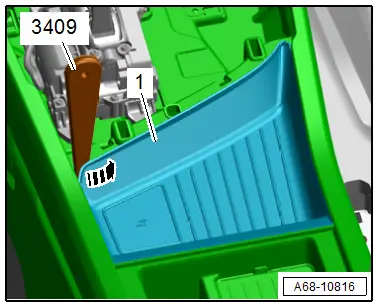
- Trim Removal Wedge -3409-
Removing
- Remove the center console insert. Refer to → Chapter "Center Console Insert, Removing and Installing".
- Pry out the edge of the storage compartment from the center console in the direction of -arrow-, starting at the left front corner using the -3409-
- Remove the whole left side from the center console, pull out the storage compartment -1- from the center console and remove it.
Installing
Install in reverse order of removal.
Installation notes, for example tightening specifications, replacing components. Refer to → Chapter "Overview - Center Console, Storage Compartment".
Multimedia Devices Storage Compartment, Removing and Installing
Removing
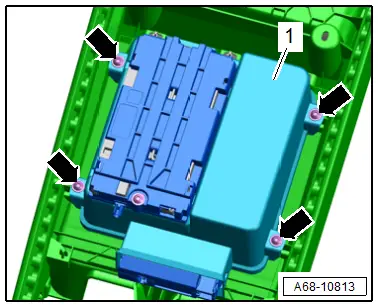
- Remove the center console. Refer to → Chapter "Center Console, Removing and Installing".
- Place the center console on a soft surface.
- Remove the bolts -arrows-.
- Remove the storage compartment -1-.
- Remove the telephone baseplate. Refer to → Communication; Rep. Gr.91; Telephone System; Telephone BaseplateR126, Removing and Installing.
Installing
Install in reverse order of removal.
Installation notes, for example tightening specifications, replacing components. Refer to → Chapter "Overview - Center Console, Storage Compartment".
Storage Compartment/Folding Compartment Socket, Removing and Installing
Removing
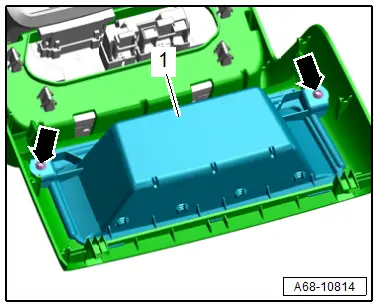
- Remove the center console rear trim. Refer to → Chapter "Center Console Rear Trim, Removing and Installing".
- Place the trim on a soft surface.
- Remove the bolts -arrows-.
- Remove the storage compartment/folding compartment socket -1-.
Installing
Install in reverse order of removal.
Installation notes, for example tightening specifications, replacing components. Refer to → Chapter "Overview - Center Console, Rear Trim".

