Audi Q7: Front Door Ambient Lighting, Removing and Installing
Left Front Door Contour Illumination Lamp, Removing and Installing
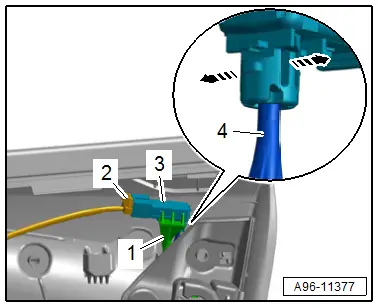
Removing
- Remove the front door trim panel. Refer to → Body Interior; Rep. Gr.70; Front Door Trim Panels; Front Door Trim Panel, Removing and Installing.
- Disengage the upper insulation.
- Disconnect the connector -2-.
- Dismount the lamp -3- from the mount -1-.
- Release the catches in direction of -arrows- and remove the lamps from the lighting strip -4-.
Installing
Install in reverse order of removal.
Ambient Lighting Lamp 1, Removing and Installing
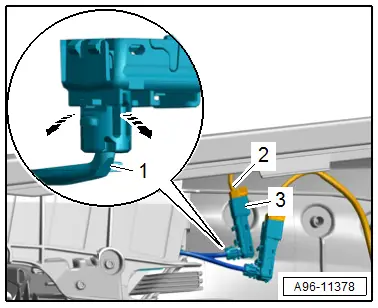
Removing
- Remove the front door trim panel. Refer to → Body Interior; Rep. Gr.70; Front Door Trim Panels; Front Door Trim Panel, Removing and Installing.
- Disengage the upper insulation.
- Disconnect the connector -2-.
- Release the catches in direction of -arrows- and remove the lamps -3- from the lighting strip -1-.
Installing
Install in reverse order of removal.
Door Ambient Illumination Lamp 2, Removing and Installing
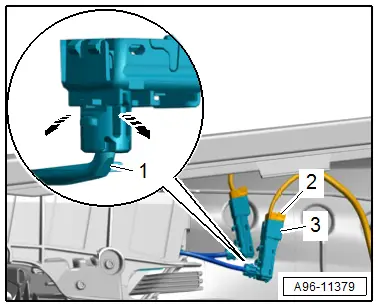
Removing
- Remove the front door trim panel. Refer to → Body Interior; Rep. Gr.70; Front Door Trim Panels; Front Door Trim Panel, Removing and Installing.
- Disengage the upper insulation.
- Disconnect the connector -2-.
- Release the catches -arrows- and remove the lamps -3- from the lighting strip -1-.
Installing
Install in reverse order of removal.
Door Storage Compartment Illumination Lamp, Removing and Installing
Door Storage Compartment Illumination Lamp, Removing and Installing
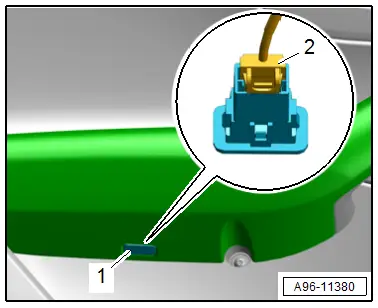
Removing
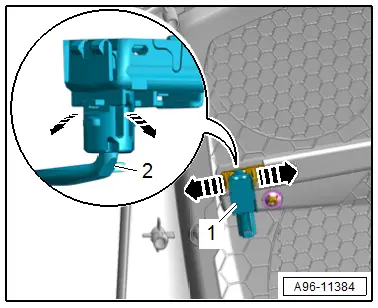
- Pry out the door storage compartment illumination bulb -1- from the armrest.
- Disconnect the connector -2-.
Installing
Install in reverse order of removal.
Left and Right Front Door Storage Compartment Illumination Control Module -J1039-/-J1040-, Removing and Installing
Removing
- Remove the front door trim panel. Refer to → Body Interior; Rep. Gr.70; Front Door Trim Panels; Front Door Trim Panel, Removing and Installing.
- Disengage and remove the insulation.
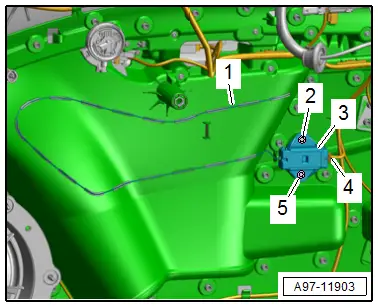
- Free up the antenna -1-.
- Disconnect the connector -4-.
- Pry up the lock washers -2 and 5-.
- Remove the control module -3-.
Installing
Install in reverse order of removal.
Lamp for Driver and Passenger Side Door Speaker Trim -L223-/-L224-, Removing and Installing
Removing
- Remove the front door trim panel. Refer to → Body Interior; Rep. Gr.70; Front Door Trim Panels; Front Door Trim Panel, Removing and Installing.
- Disengage the upper insulation.
- Disconnect the connector.
- Pry up the clips -arrows-.
- Remove the lighting strip -2- slightly from the speaker trim -1-.
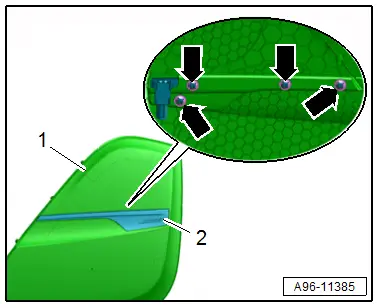
- Release the catches in direction of -arrows- and remove the lamps -3- from the lighting strip -2-.
- Remove the lighting strip.
Installing
Install in the reverse order of removal while noting the following:
- The clips must be pushed on all the way.

