Audi Q7: Light Alloy Wheels, Care and Maintenance
To maintain the decorative appearance of light alloy wheels for a long time, regular care is necessary.
In particular, road salt and dust from brake abrasion must be thoroughly washed off every two weeks. Otherwise, the paint of the light alloy wheel will be attacked.
The following are appropriate cleaning agents:
- Water or water and soft soap.
- Water and vinegar essence.
- Light alloy wheel cleaning agents without acids or harsh solvents.
Do not exceed the soaking time of the cleaning agent.
The shorter the specified soaking time is, the stronger and more aggressive the cleaning solution is.
If the paint is damaged, for example by impact from a stone, the paint damage must be repaired immediately.
Remove adhesive residue from light alloy rim adhesive balancing weights:
- Harsh solvents and acids attack the paint on light alloy wheels and the surface of the wheel becomes matte and milky. These agents therefore must not be used.
- To remove adhesive residue on light alloy wheels, use light alloy cleansers or benzene-based cleanser. Do not exceed the soaking time of the cleaning agent.
- After cleaning or removing adhesive residue on the tires, they must be rinsed again with water.
Wheels, rotating:
- Vehicles with front-wheel drive experience more tread wear on the front wheels due to the increased stress on them.
- In order for all four wheels on the vehicle to have the same service life, it is recommended to rotate the front and rear wheels.
- Be sure not to mix up tires, which have the direction of rotation marked on them.
- The longer the tire runs at one position, the more it wears at certain points, therefore, it is recommended to rotate the wheels at short intervals. Refer to Maintenance Intervals.
- Diagonal rotation is possible only with non-directional tires. This wheel rotation is especially advantageous for heel-and-toe wear. Heel-and-toe wear. Refer to → Chapter "Heel and Toe Wear".
- If heel-and-toe wear has already progressed very far and the tread is more than 50% worn, only slight improvement can be achieved and rotation is no longer recommended. The elasticity of the tread blocks declines and the heel-and-toe wear does not progress.
Tires with Rim Protector
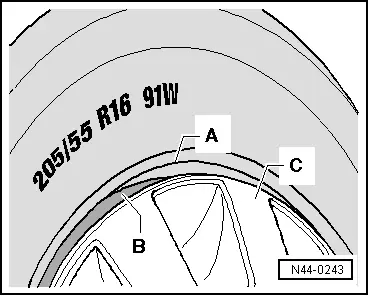
The tire industry produces tires with rim protector for light alloy wheels (rim protector). The rim protector prevents damage to the light alloy wheels caused by contact with curbs.
Using tires with rim protector on steel wheels with wheel covers may lead to the loss of the wheel cover while driving. The cover separates from its secure seating due to the flexing of the tire.
 WARNING
When installing tires on steel rims, ensure only tires without rim protector are mounted.
The illustration shows the non-permissible combination of steel rim, wheel cover and tire with rim protector.

A - Rim protector
B - Rim flange of a steel rim
C - Wheel cover
 WARNING
This combination must not be mounted!

