Audi Q7: Overview - Driver Side Instrument Panel Cover
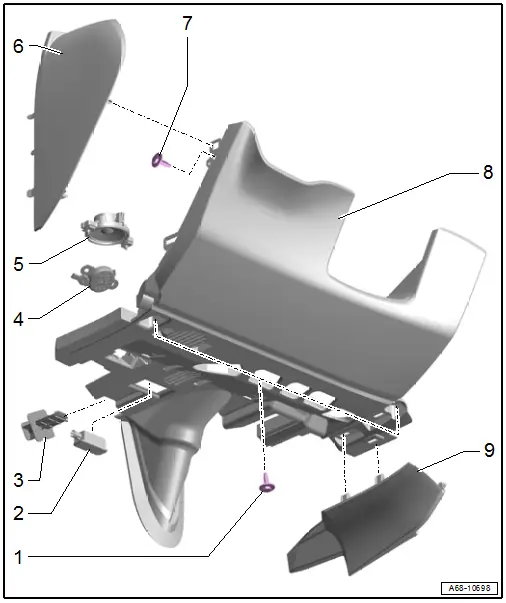
1 - Bolt
- 3 Nm
- Quantity: 2
2 - Left Front Footwell Illumination Bulb -L151-
- Equipped on some models
- Component location overview. Refer to → Electrical Equipment; Rep. Gr.96; Lamps; Overview - Component Location Instrument Panel Lamps.
3 - Mount
- For the instrument panel cover
4 - Front Parking Aid Warning Buzzer - H22-
- Removing and installing. Refer to → Electrical Equipment; Rep. Gr.94; Parking Aid; Front Parking Aid Warning BuzzerH22, Removing and Installing.
5 - Emergency Call Speaker
6 - Side Cover
- For the instrument panel
- Removing and installing. Refer to → Chapter "Instrument Panel Side Cover, Removing and Installing".
7 - Bolt
- 3 Nm
8 - Driver Side Instrument Panel Cover
- Removing and installing. Refer to → Chapter "Driver Side Instrument Panel Cover, Removing and Installing".
9 - Inner Driver Side Cover
- For the instrument panel
- Removing and installing. Refer to → Chapter "Driver Side Instrument Panel Cover, Removing and Installing".
Overview - Steering Column Trim Panel
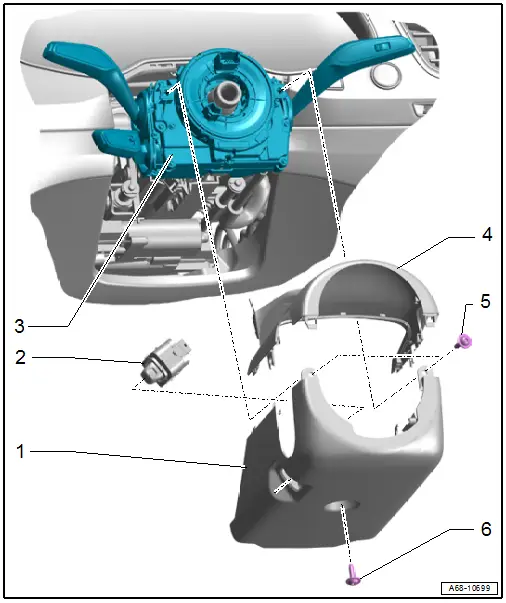
1 - Lower Steering Column Trim Panel
- Removing and installing. Refer to → Chapter "Lower Steering Column Trim Panel, Removing and Installing".
2 - Steering Column Adjustment Switch -E167-
- Equipped on some models
- Removing and installing. Refer to → Electrical Equipment; Rep. Gr.96; Controls; Component Location Overview - Instrument Panel Controls.
3 - Steering Column Switch Module
- Overview. Refer to → Electrical Equipment; Rep. Gr.94; Steering Column Switch Module; Overview - Steering Column Switch Module.
4 - Upper Steering Column Trim Panel
- Removing and installing. Refer to → Chapter "Upper Steering Column Trim Panel, Removing and Installing".
- Press on until it engages audibly.
5 - Bolt
- 1.5 Nm
- Quantity: 2
6 - Bolt
- 1.5 Nm
Overview - Glove Compartment
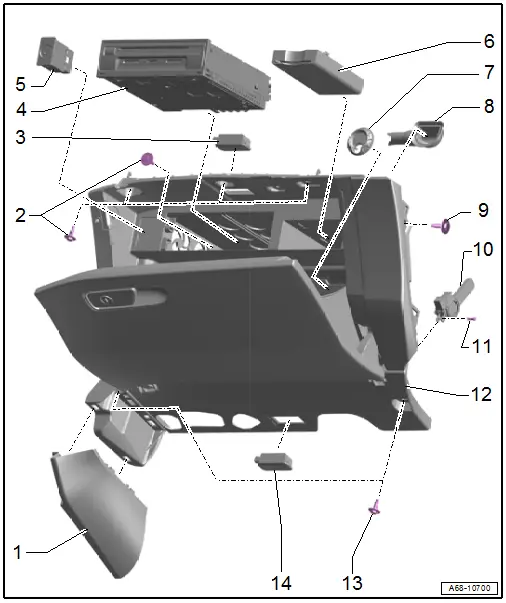
1 - Inner Front Passenger Side Cover
- For the instrument panel
- Removing and installing. Refer to → Chapter "Glove Compartment, Removing and Installing".
2 - Bolt
- 3 Nm
- Quantity: 3 or 4, depending on the version
3 - Glove Compartment Lamp -W6-
- Component location overview. Refer to → Electrical Equipment; Rep. Gr.96; Lamps; Overview - Component Location Instrument Panel Lamps.
4 - Information Electronics Control Module 1 -J794-
- Overview. Refer to → Communication; Rep. Gr.91; Infotainment System; Component Location Overview - Infotainment System.
5 - Front Passenger Airbag Deactivation Key Switch -E224-
- Not for North American market.
6 - Chip Card Reader Control Module -J676-
- Market-Specific Version
- Component location overview. Refer to → Communication; Rep. Gr.91; Navigation System; Component Location Overview - Navigation System.
7 - Vent for Glove Compartment Cooling
- Equipped on some models
- Blind cover for vehicles without glove compartment cooling
8 - Connection for Glove Compartment Cooling
- Equipped on some models
9 - Bolt
- 3 Nm
10 - Dampening Mechanism
- For the glove compartment lid
- With Glove Compartment Lamp Switch -E26-
- Removing and installing. Refer to → Chapter "Glove Compartment Lid Dampening Mechanism, Removing and Installing".
11 - Hinge Pin
- For the dampening mechanism
12 - Glove Compartment
- Removing and Installing. Refer to → Chapter "Glove Compartment, Removing and Installing".
- Glove Compartment Handle, Removing and Installing. Refer to → Chapter "Glove Compartment Handle, Removing and Installing".
- Lock Cylinder, Removing and Installing. Refer to → Chapter "Glove Compartment Handle Lock Cylinder, Removing and Installing".
13 - Bolt
- 3 Nm
- Quantity: 2
14 - Right Front Footwell Illumination Bulb -L152-
- Component location overview. Refer to → Electrical Equipment; Rep. Gr.96; Lamps; Overview - Component Location Instrument Panel Lamps.

