Audi Q7: Antenna Amplifier, Removing and Installing
Top Antenna Amplifiers -R24-/-R111-/- R82-, Removing and Installing
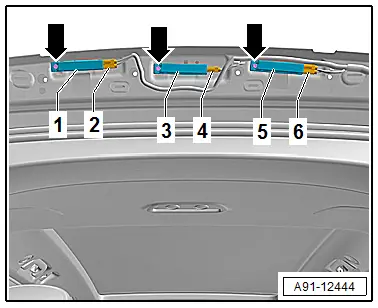
The Antenna Amplifier -R24-/TV Antenna Amplifier 1 -R82-/Antenna Amplifier 2 -R111- are located in the top of the rear lid.
Removing and installing is identical.
Removing
- Turn off the ignition and all electrical equipment and remove the ignition key.
- Remove the upper rear lid trim panel. Refer to → Body Interior; Rep. Gr.70; Luggage Compartment Trim Panels; Rear Lid Upper Trim Panel, Removing and Installing.
- Release and disconnect the connectors -2, 4, and 6- on the antenna amplifier.
- Release and disconnect the connectors from the rear window antennas.
- Remove the bolts -arrows- and remove the antenna amplifier from the rear lid.
Installing
- Install in reverse order of removal.
Tightening Specifications
- Refer to → Chapter "Component Location Overview - Antenna Systems, Europe and Rest of World"
- Refer to → Chapter "Component Location Overview - Antenna Systems, USA"
Antenna Amplifier 3 -R112-, Removing and Installing
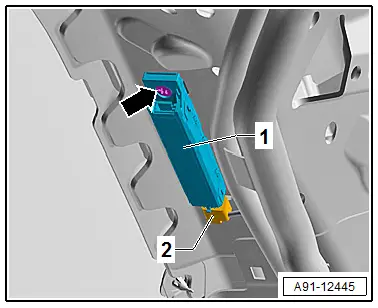
The Antenna Amplifier 3 -R112- is located on the right D-pillar.
Removing and installing is identical.
Removing
- Turn off the ignition and all electrical equipment and remove the ignition key.
- Remove the D-pillar trim panel. Refer to → Body Interior; Rep. Gr.70; Vehicle Interior Trim Panels; D-Pillar Trim Panel, Removing and Installing.
- Release and disconnect the connector -2- and the connector to the window antenna on the Antenna Amplifier 3 -R112--1-.
- Remove bolt -arrow- and remove the Antenna Amplifier 3 -R112--1- from the D-pillar.
Installing
- Install in reverse order of removal.
Tightening Specifications
- Refer to → Chapter "Component Location Overview - Antenna Systems, Europe and Rest of World"
Windshield Antenna Suppression Filter, Removing and Installing
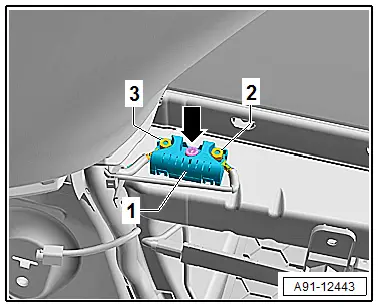
The Windshield Antenna Suppression Filter -C18- is located behind the left luggage compartment side trim panel.
Removing
- Turn off the ignition and all electrical equipment and remove the ignition key.
- Remove the left luggage compartment side trim panel. Refer to → Body Interior; Rep. Gr.70; Luggage Compartment Trim Panels; Luggage Compartment Side Trim Panel, Removing and Installing.
- Remove the nuts -2 and 3- from the Windshield Antenna Suppression Filter -C18--1-.
- Disconnect the wires on the Windshield Antenna Suppression Filter -C18--1-.
- Remove the nut -arrow- and the Windshield Antenna Suppression Filter -C18--1-.
Installing
- Install in reverse order of removal.
Tightening Specifications
- Refer to → Chapter "Component Location Overview - Antenna Systems, Europe and Rest of World"
- Refer to → Chapter "Component Location Overview - Antenna Systems, USA"
Traffic Data Antenna, Removing and Installing
The Traffic Data Antenna -R173- is located at the top of the windshield on the left side.
Removing
- Turn off the ignition and all electrical equipment and remove the ignition key.
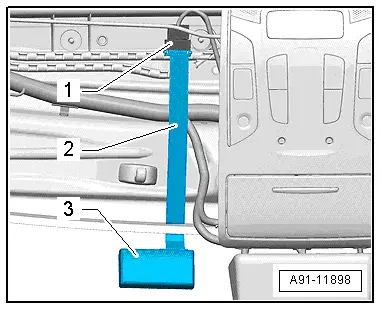
The connectors -1- for the Traffic Data Antenna -R173- are located on the roof crossmember, behind the left sun visor. The flat band cable -2- is routed on the roof crossmember. The headliner must be removed in order to remove the flat band cable.

- Remove the headliner. Refer to → Body Interior; Rep. Gr.70; Roof Trim Panels; Headliner, Removing and Installing.
- Disconnect the connector -1-.
Traffic Data Antenna -R173- removal:
A safety piece -2- secures the Traffic Data Antenna -R173--1- to its bracket -3-. The bracket is glued to the windshield -3-.
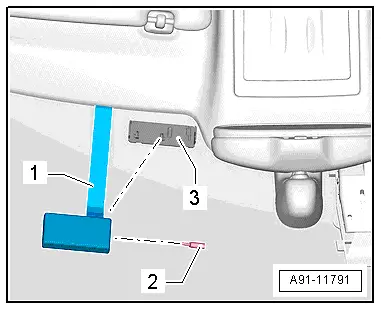
- Remove the safety piece -2- with a small screwdriver.
- Remove the Traffic Data Antenna -R173--1- from the bracket -3-.

Installing
- Install in reverse order of removal.
Close Range Communication Antenna, Removing and Installing
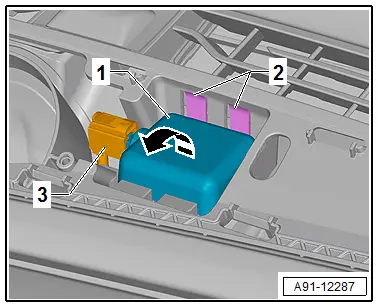
The Close Range Communication Antenna -R269- is located in the center of the instrument panel.
- Turn off the ignition and all electrical equipment and remove the ignition key.
Removing
- Remove the center speaker trim in the instrument panel. Refer to → Body Interior; Rep. Gr.70; Instrument Panel; Speaker Trim, Removing and Installing.
- Release the catches -2- for the Close Range Communication Antenna -R269--1-.
- Tilt the Close Range Communication Antenna -R269--1- in direction of -arrow- out of the holder in the instrument panel.
- Release and disconnect the connector -3- from the Close Range Communication Antenna -R269--1-.
- Remove the Close Range Communication Antenna -R269-.
Installing
- Install in reverse order of removal.

