Audi Q7: Overview - Seat Pan
Overview - Seat Pan, Trim Panels
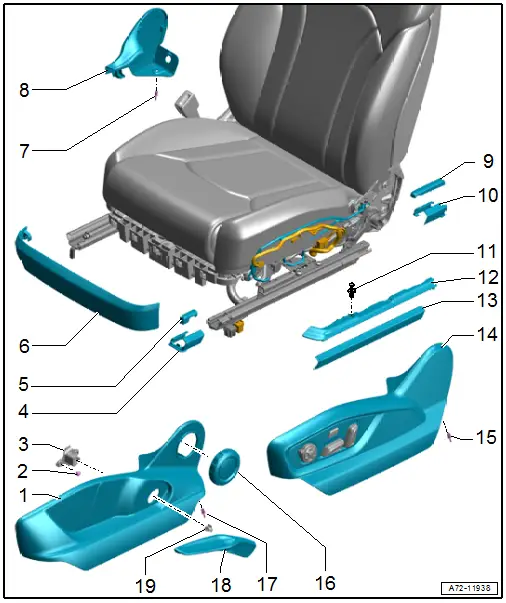
1 - Seat Side Trim on Side Sill
- For manual seat
- Removing and installing. Refer to → Chapter "Seat Side Trim On Side Sill Side, Removing and Installing".
- Press on until it clicks into place on the bracket and on the front trim
2 - Bolt
- 2.5 Nm
- Quantity: 2
3 - Adapter
- For the manual seat height adjustment lever
4 - Front Cover
- For the seat rail
- Quantity: 2
- Removing and installing. Refer to → Chapter "Front and Rear Seat Rail Cover, Removing and Installing".
- Slide on carefully until it clicks into place
5 - Spindle Cover
- For the seat rail
- Quantity: 2
- Carefully push onto the spindle until it engages audibly
6 - Seat Trim in Front
- Removing and installing. Refer to → Chapter "Front Seat Trim, Removing and Installing".
- Press on until it engages audibly
7 - Expanding Clip
8 - Tunnel Side Seat Side Trim
- Removing and installing. Refer to → Chapter "Seat Side Trim on Tunnel Side, Removing and Installing".
9 - Spindle Cover
- For the seat rail
- Quantity: 2
- Slide on carefully until it clicks into place
10 - Rear Cover
- For the seat rail
- Quantity: 2
- Removing and installing. Refer to → Chapter "Front and Rear Seat Rail Cover, Removing and Installing".
- Slide on carefully until it clicks into place
11 - Expanding Clip
12 - Upper Center Cover
- For the seat rail
- Removing and installing. Refer to → Chapter "Upper Center Seat Rail Cover, Removing and Installing".
13 - Lower Center Cover
- For the seat rail
- Removing and installing. Refer to → Chapter "Lower Center Seat Rail Cover, Removing and Installing".
14 - Seat Side Trim on Side Sill
- For the power seat
- Removing and installing. Refer to → Chapter "Seat Side Trim On Side Sill Side, Removing and Installing".
- Press on until it clicks into place on the bracket and on the front trim
15 - Expanding Clip
16 - Hand Wheel
- For manual backrest adjustment
- Removing and installing. Refer to → Chapter "Backrest Adjustment Hand Wheel, Removing and Installing".
- Press on until it engages audibly.
17 - Expanding Clip
18 - Lever
- For manual seat height adjustment
- Removing and installing. Refer to → Chapter "Seat Height Adjuster, Removing and Installing, Seat Height Adjustment Handle".
- Before pressing on, check if the spring in inserted in the shaft for seat height adjustment
19 - Spring
- For the manual seat height adjustment lever
Overview - Seat Pan, Seat without Seat Depth Adjuster
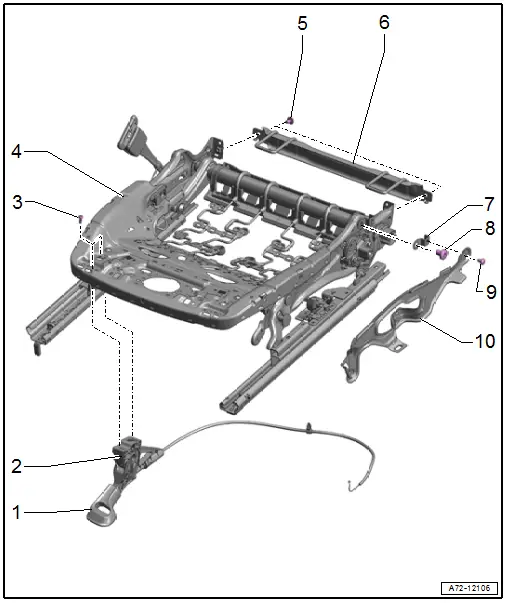
1 - Handle
- For manual seat forward/back adjustment
- Removing and installing. Refer to → Chapter "Seat Forward/Back Adjuster, Removing and Installing, Seat Forward/Back Adjustment Handle".
2 - Release Cable
- For manual seat forward/back adjustment
- Unit with bracket
- Removing and installing. Refer to → Chapter "Seat Forward/Back Adjuster, Removing and Installing, Seat Forward/Back Adjuster Release Cable".
3 - Bolt
- 3.5 Nm
- Quantity: 2
4 - Seat Pan
- Upper and lower frame cannot be separated
- Install all electrical and electronic components and wires in the new upper frame.
5 - Bolt
- Quantity: 2
- Tightening specification -item 4-
6 - Child Seat Anchor
- Passenger seat only
- Overview. Refer to → Chapter "Overview - Front Child Seat Anchors".
7 - Threaded Plate
8 - Bolt
- Tightening specification -item 13-.
9 - Bolt
- 6.5 Nm
- Quantity: 3
10 - Bracket
- For seat side trim on side sill side
- Removing and installing. Refer to → Chapter "Seat Side Trim On Side Sill Side, Removing and Installing".
Overview - Seat Pan, Seat with Seat Depth Adjuster
1 - Bolt
- 6.5 Nm
- Quantity: 2
2 - Bracket
- For seat trim at the front
- Removing and installing. Refer to → Chapter "Front Seat Trim Bracket, Removing and Installing".
3 - Seat Depth Adjuster
- With integrated motor for the depth adjuster
- Driver side: Driver Seat Depth Adjustment Motor -V256-
- Front passenger side: Front Passenger Seat Depth Adjustment Motor -V257-
- The depth adjuster motor cannot be replaced separately. Replace the seat depth adjuster if faulty
- Removing and installing. Refer to → Chapter "Seat Depth Adjuster, Removing and Installing".
4 - Tunnel-Side Trim
- For the seat depth adjustment
- Pull forward to remove
5 - Cover
- For the seat depth adjustment
6 - Seat Pan
7 - Retaining Wire
- For cover
- Quantity: 2
8 - Spring Nut
- Quantity: 2
- Attached in the seat pan
- Replace any damaged or deformed spring nuts
9 - Bolt
- Quantity: 2
- Tightening specification -item 4-
10 - Child Seat Anchor
- Passenger seat only
- Bolted with the seat pan
- Check after an accident. Refer to → Chapter "Child Seat Anchors, Checking After Collision".
- Replace damaged or deformed child seat anchor
- Removing and installing. Refer to → Chapter "Front Child Seat Anchor, Removing and Installing".
11 - Threaded Plate
12 - Bolt
- 6.5 Nm
- Quantity: 3
13 - Bracket
- For seat side trim on side sill side
- Removing and installing. Refer to → Chapter "Seat Side Trim On Side Sill Side, Removing and Installing".
14 - Side Sill Side Trim
- For the seat depth adjustment
- Pull forward to remove
15 - Bolt
- 3.5 Nm
- Quantity: 4
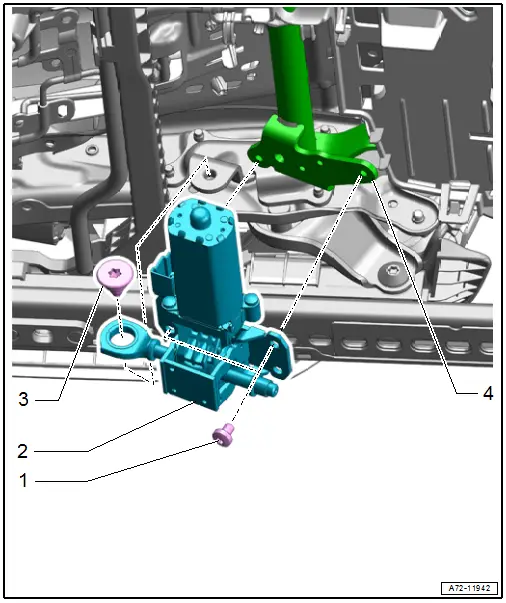
Overview - Seat Pan, Fire Extinguisher

1 - Fire Extinguisher
- There are different versions.
2 - Bolt
- Quantity: 2
- For 1 kg fire extinguisher: 4.5 Nm
- For 2 kg fire extinguisher: 8 Nm
3 - Fire Extinguisher Mount
- There are different versions.
4 - Seat Trim in Front
- For fire extinguisher mount
5 - Bolt
- 6.5 Nm
- Quantity: 3
6 - Bracket
7 - Bracket
8 - Bracket
- For seat trim at the front
- Removing and installing. Refer to → Chapter "Front Seat Trim Bracket, Removing and Installing".
9 - Bolt
- Quantity: 2
- Tightening specification -item 1-
10 - Bolt
- 6.5 Nm
- Quantity: 2
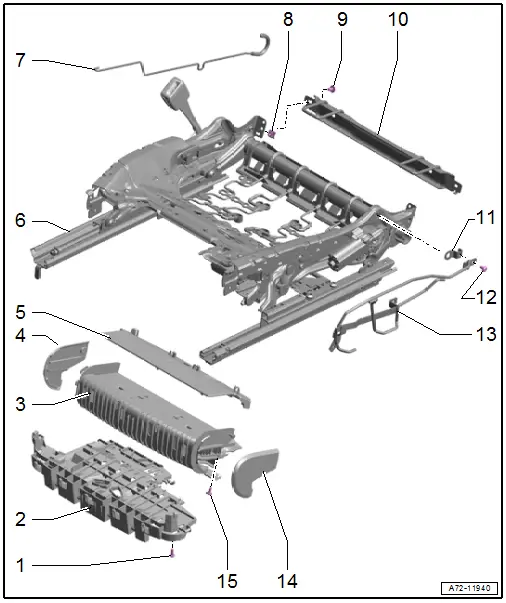
Overview - Seat Pan, Seat Forward/Back and Height Adjustment
1 - Bolts
- 22 Nm
- Self-locking
- Replace after removing
- Clean the threaded hole for the bolt with for example a thread tap.
2 - Seat Pan Lower Frame
- Driver side: with Driver Seat Forward/Back Adjustment Motor -V28-
- Front passenger side: with Front Passenger Seat Forward/Back Adjustment Motor -V31-
- Removing and Installing. Refer to → Chapter "Lower Frame, Removing and Installing, Seat Forward/Back Adjustment Motor".
3 - Seat Pan Upper Frame
- Driver side: with Driver Seat Height Adjustment Motor -V245-
- Front passenger side: with Front Passenger Seat Height Adjustment Motor -V246-
- Install all electrical and electronic components and wires in the new upper frame.
- Removing and Installing. Refer to → Chapter "Upper Frame, Removing and Installing, Seat Height Adjustment Motor".
4 - Bushing
 Caution
Risk of damaging the bushing in the bearing point (adjusting spindle/seat pan threaded connection).
- The bushing cannot be replaced with workshop materials.
- If the bushing is damaged, the corresponding parts must be replaced.
5 - Bolts
- 22 Nm
- Self-locking
- Replace after removing
- Clean the threaded hole for the bolt with for example a thread tap.
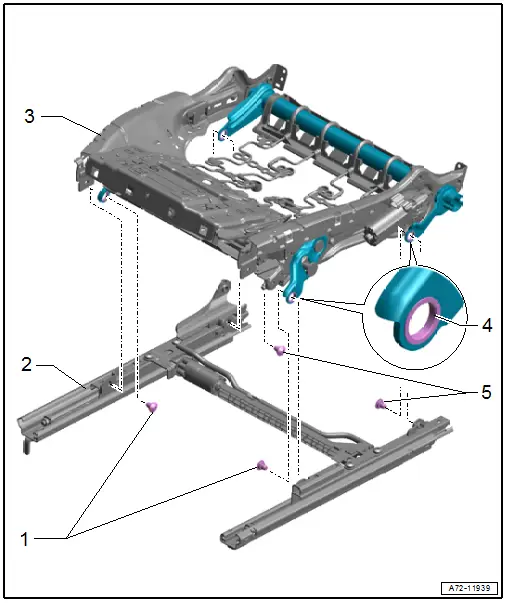
Overview - Seat Pan, Seat Angle Adjuster
1 - Bolt
- 10 Nm
- Quantity: 2
- Self-locking
- Replace after removing
- Threaded holes for the bolts must be cleaned, for example, with a thread tap
2 - Driver Seat Angle Adjustment Motor -V243-
- Front passenger side: Front Passenger Seat Angle Adjustment Motor -V224-
- Removing and installing. Refer to → Chapter "Seat Angle Adjuster, Removing and Installing".
3 - Bolt
- 20 Nm
- Self-locking
- Replace after removing
- Clean the threaded hole for the bolt with for example a thread tap.
4 - Adjustment Shaft
Overview - Seat Pan, Power Seat Adjustment Actuator/Switch
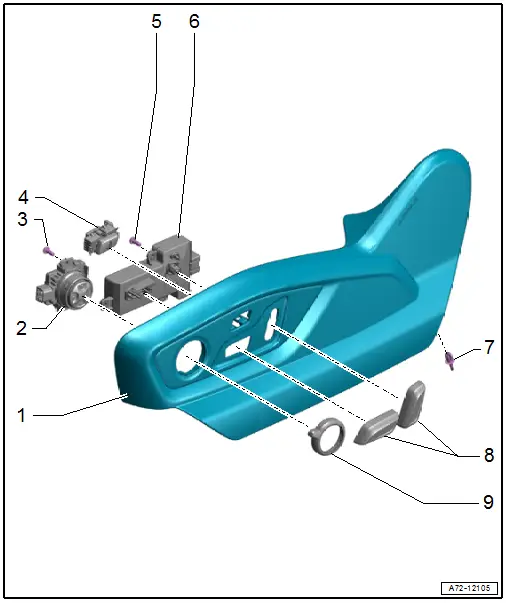
1 - Seat Side Trim on Side Sill
- Removing and installing. Refer to → Chapter "Seat Side Trim On Side Sill Side, Removing and Installing".
2 - Lumbar Support Adjustment Switch
- Removing and installing. Refer to → Chapter "Driver and Front Passenger Seat Lumbar Support Adjustment Switch -E176-/-E177-, Removing and Installing".
3 - Bolt
- 1.8 Nm
- Quantity: 2
4 - Driver Side Massage Function Button
- Removing and installing. Refer to → Chapter "Driver Side Massage Function Button -E670-/ Front Passenger Massage Function Button -E671-, Removing and Installing".
- Press on until it engages audibly.
5 - Bolt
- 1.8 Nm
- Quantity: 3
6 - Driver Seat Adjustment Control Head
- Removing and installing. Refer to → Chapter "Driver and Front Passenger Seat Adjustment Control Head -E470-/-E471-, Removing and Installing".
7 - Expanding Clip
8 - Actuator
- For seat and backrest adjuster
- Clipped on
- Removing and installing. Refer to → Chapter "Driver and Front Passenger Seat Adjustment Control Head -E470-/-E471-, Removing and Installing".
- Press on until it engages audibly.
9 - Rocker Switch
- For lumbar support adjustment switch
- Clipped on
- Removing and installing. Refer to → Chapter "Driver and Front Passenger Seat Lumbar Support Adjustment Switch -E176-/-E177-, Removing and Installing".

