Audi Q7: Overview - Third Row Three-Point Seat Belt
Audi Q7 (4M) 2016-2025 Workshop Manual / Body / Body Interior / Passenger Protection, Airbags, Seat Belts / Overview - Third Row Three-Point Seat Belt
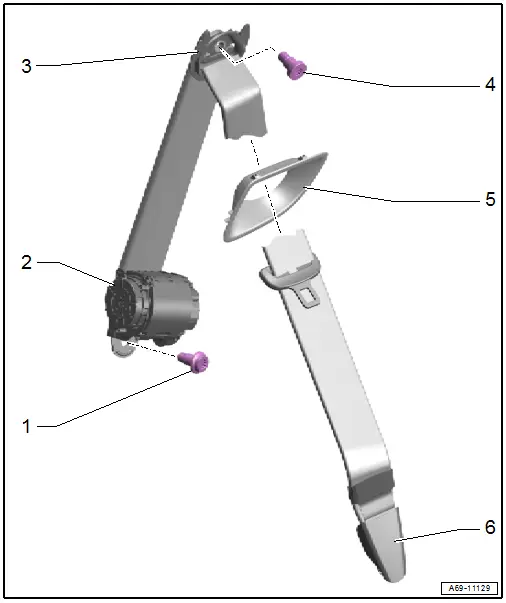
1 - Bolt
- 40 Nm
- Replace the bolt if it was removed because of an accident when the seat belt was buckled.
2 - Automatic Belt Retractor
- Driver side: with Driver Side Third Row Seat Belt Tensioner Igniter -N668-
- Front passenger side: with Front Passenger Side Third Row Seat Belt Tensioner Igniter -N669-
- Removing and installing. Refer to → Chapter "Third Row Rear Three-Point Seat Belt, Removing and Installing".
3 - Seat Belt Guide
4 - Bolt
- 40 Nm
- Replace the bolt if it was removed because of an accident when the seat belt was buckled.
5 - Seat Belt Guide
- Replace the entire seat belt guide if damaged.
- Removing and installing. Refer to → Chapter "Rear Seat Belt Guide, Removing and Installing".
- Press on until it engages audibly
6 - Belt End Fitting
- Removing and installing. Refer to → Chapter "Third Row Rear Belt End Fitting, Removing and Installing".
Overview - Front Seat Belt Latch
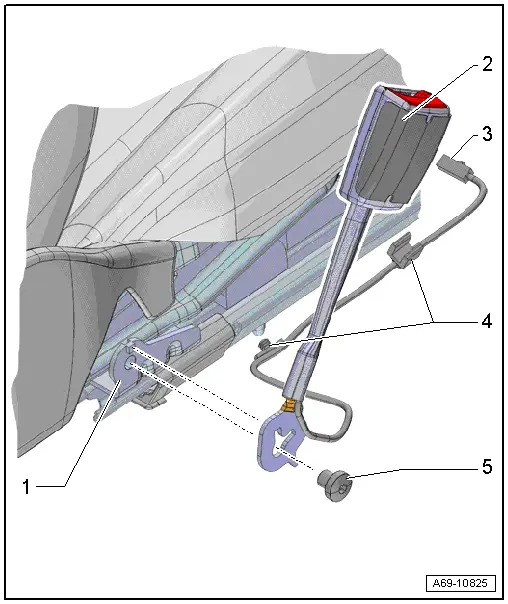
1 - Front Seat
2 - Front Seat Belt Latch
- Driver side: with Driver Seat Belt Switch -E24-
- Front passenger side: with Front Passenger Seat Belt Switch -E25-
- Removing and installing. Refer to → Chapter "Front Seat Belt Latch, Removing and Installing".
- Replace the seat belt latch if the belt tensioner has deployed with the belt buckled
3 - Connector
- For the seat belt switch
4 - Cable Holder
- Clipped in the seat frame.
5 - Bolt
- 40 Nm
- Replace the bolt if it was removed because of an accident when the seat belt was buckled.
Overview - Rear Seat Belt Latch
Overview - Rear Seat Belt Latch, Second Row
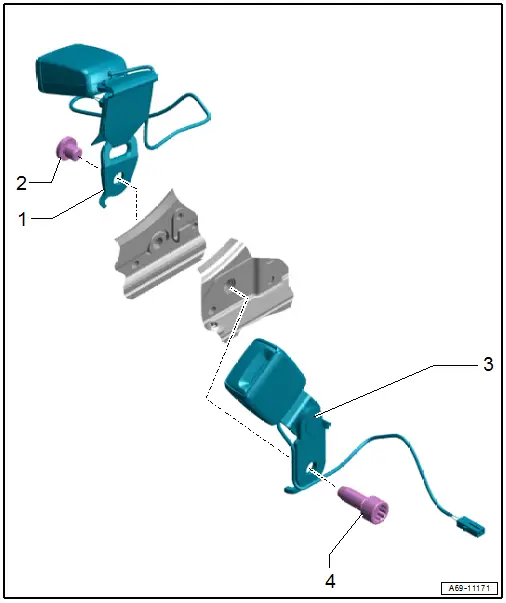
1 - Center Seat Belt Latch
- Without/with Center Rear Seat Belt Switch -E609-
- Removing and installing. Refer to → Chapter "Rear Seat Belt Latch, Removing and Installing, Second Row".
- Replace the seat belt latch if the belt tensioner has deployed with the belt buckled
2 - Bolt
- 40 Nm
- Replace the bolt if it was removed because of an accident when the seat belt was buckled.
3 - Outer Seat Belt Latch
- Driver side: without/with Driver Side Rear Seat Belt Switch -E258-
- Front passenger side: without/with Passenger Side Rear Seat Belt Switch -E259-.
- Removing and installing. Refer to → Chapter "Rear Seat Belt Latch, Removing and Installing, Second Row".
- Replace the seat belt latch if the belt tensioner has deployed with the belt buckled
4 - Bolt
- 40 Nm
- Replace the bolt if it was removed because of an accident when the seat belt was buckled.
Overview - Rear Seat Belt Latch, Third Row
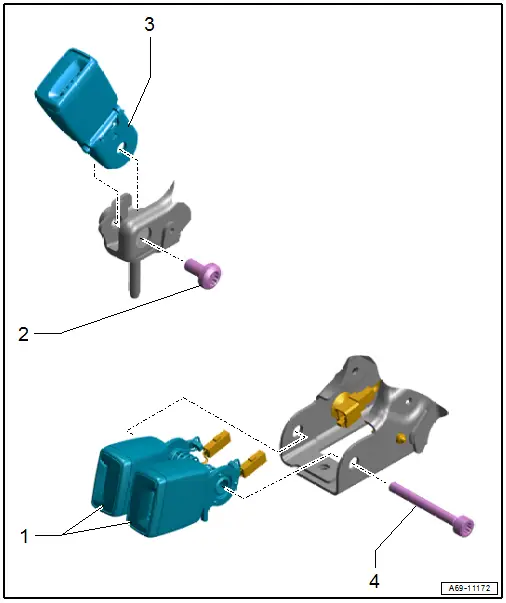
1 - Center Seat Belt Latch
- Driver side: without/with Driver Side Third Row Seat Belt Switch -F393-
- Front passenger side: without/with Passenger Side Third Row Seat Belt Switch -F393-
- Removing and installing. Refer to → Chapter "Rear Seat Belt Latch, Removing and Installing, Third Row".
- Replace the seat belt latch if the belt tensioner has deployed with the belt buckled
2 - Bolt
- 40 Nm
- Market-specific
- Replace the bolt if it was removed because of an accident when the seat belt was buckled.
3 - Outer Seat Belt Latch
- Market-specific version
- Removing and installing. Refer to → Chapter "Rear Seat Belt Latch, Removing and Installing, Third Row".
- Replace the seat belt latch if the belt tensioner has deployed with the belt buckled
4 - Bolt
- 20 Nm
- Replace the bolt if it was removed because of an accident when the seat belt was buckled.

