Audi Q7: Parking Aid
Overview - Parking Aid
Overview - Front Parking Aid
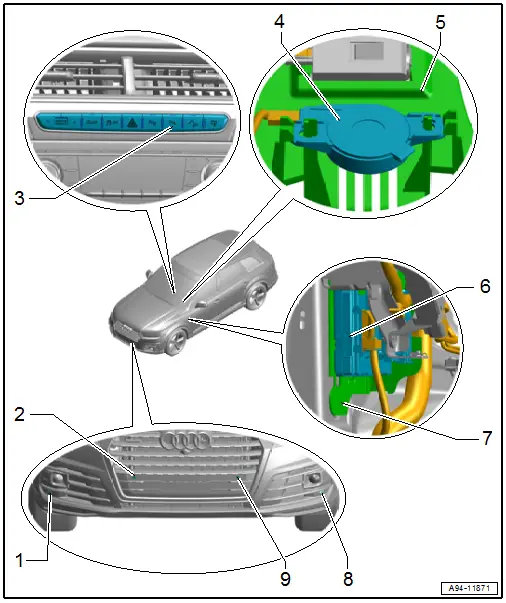
1 - Right Front Parking Aid Sensor -G252-
- Removing and installing. Refer to → Chapter "Front Parking Aid Sensor, Removing and Installing".
2 - Right Front Center Parking Aid Sensor -G253-
- Removing and installing. Refer to → Chapter "Front Parking Aid Sensor, Removing and Installing".
3 - Parking Aid Button -E266-
- Removing and installing. Refer to → Chapter "Buttons in Instrument Panel, Removing and Installing".
4 - Front Parking Aid Warning Buzzer -H22-
- Removing and installing. Refer to → Chapter "Front Parking Aid Warning Buzzer -H22-, Removing and Installing".
5 - Driver Side Instrument Panel Cover
6 - Vehicle Electrical System Control Module -J519-
- Component location overview. Refer to → Chapter "Component Location Overview - Control Modules".
7 - Bracket
- For vehicle electrical system control module
8 - Left Front Parking Aid Sensor -G255-
- Removing and installing. Refer to → Chapter "Front Parking Aid Sensor, Removing and Installing".
9 - Left Front Center Parking Aid Sensor -G254-
- Removing and installing. Refer to → Chapter "Front Parking Aid Sensor, Removing and Installing".
Overview - Rear Parking Aid
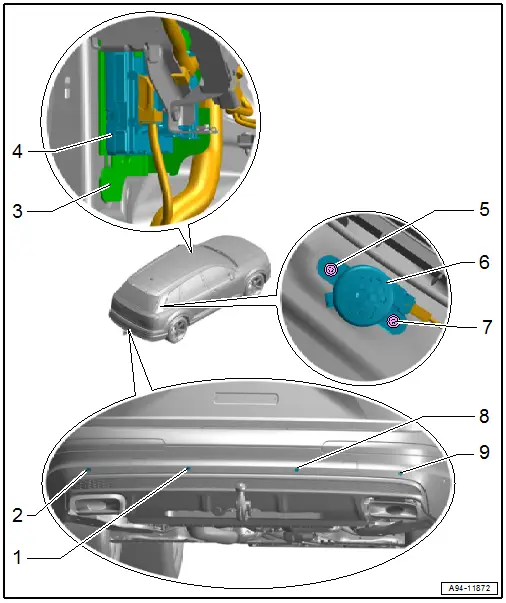
1 - Left Rear Center Parking Aid Sensor -G204-
- Removing and installing. Refer to → Chapter "Rear Parking Aid Sensor, Removing and Installing".
2 - Left Rear Parking Aid Sensor -G203-
- Removing and installing. Refer to → Chapter "Rear Parking Aid Sensor, Removing and Installing".
3 - Bracket
- For vehicle electrical system control module
4 - Vehicle Electrical System Control Module -J519-
- Component location overview. Refer to → Chapter "Component Location Overview - Control Modules".
5 - Expanding Clip
6 - Rear Parking Aid Warning Buzzer -H15-
- Removing and installing. Refer to → Chapter "Rear Parking Aid Warning Buzzer -H15-, Removing and Installing".
7 - Expanding Clip
8 - Right Rear Center Parking Aid Sensor -G205-
- Removing and installing. Refer to → Chapter "Rear Parking Aid Sensor, Removing and Installing".
9 - Right Rear Parking Aid Sensor -G206-
- Removing and installing. Refer to → Chapter "Rear Parking Aid Sensor, Removing and Installing".
Front Parking Aid Warning Buzzer -H22-, Removing and Installing
Removing
- Remove the driver side instrument panel cover. Refer to → Body Interior; Rep. Gr.68; Storage Compartments and Covers; Driver Side Instrument Panel Cover, Removing and Installing.
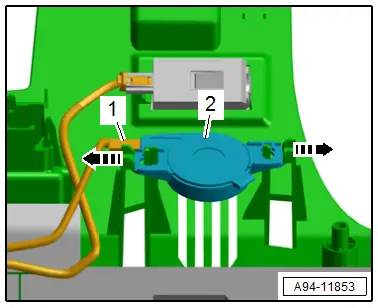
- Release the retainers in direction of -arrows-.
- Remove the front parking aid warning buzzer -2-.
- Disconnect the connector -1-.
Installing
Install in reverse order of removal.
Rear Parking Aid Warning Buzzer -H15-, Removing and Installing
Removing
- Remove the D-pillar trim panel. Refer to → Body Interior; Rep. Gr.70; Vehicle Interior Trim Panels; D-Pillar Trim Panel, Removing and Installing.
- Remove the bolts -1 and 4-.
- Remove the buzzer -2- with the expanding clips.
- Disconnect the connector -3-.

Installing
Install in reverse order of removal.
Front Parking Aid Sensor, Removing and Installing
Front Parking Aid Sensor, Removing and Installing
Removing
Exterior Sensors
- Remove the air intake grille. Refer to → Body Exterior; Rep. Gr.63; Front Bumper; Attachments, Removing and Installing.
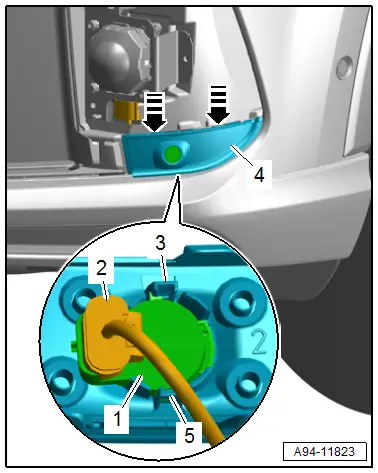
- Press both tabs in direction of -arrows- to the side and press the sensor -1- inward from the outside.
Interior Sensors
- Remove the bumper cover end plate. Refer to → Body Exterior; Rep. Gr.63; Front Bumper; Attachments, Removing and Installing.
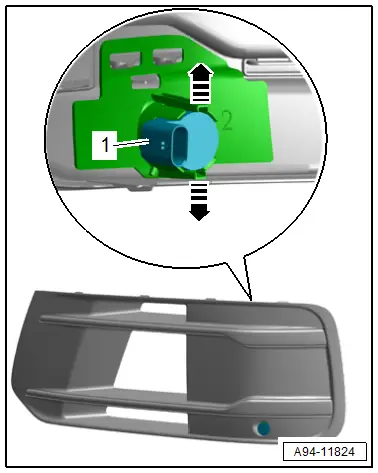
- Press both tabs to the side in direction of -arrows- and at the same time, push the sensor -3- through from the outside toward the inside.
- Disconnect the connector -2- by sliding the retainer -1- back and pressing the release down.
- If the sensor cannot be removed as described, then the front bumper must be removed. Refer to → Body Exterior; Rep. Gr.63; Front Bumper; Bumper Cover, Removing and Installing.

Installing
Install in reverse order of removal.
Front Parking Aid Sensors, Removing and Installing, Audi Q7 S-line
Removing
Exterior Sensors
- Remove the air intake grille. Refer to → Body Exterior; Rep. Gr.63; Front Bumper; Attachments, Removing and Installing.
- Release the catches in direction of -arrows- and mount -4-.
- Disconnect the connector -2- by sliding the retainer back and pressing the release down.
- Press the retainers -3 and 5- to the side and at the same time, push the sensor -1- through from the outside toward the inside.
Interior Sensors
- Remove the bumper cover end plate. Refer to → Body Exterior; Rep. Gr.63; Front Bumper; Attachments, Removing and Installing.
- Press both tabs to the side in direction of -arrows- and at the same time, push the sensor -3- through from the outside toward the inside.
- Disconnect the connector -2- by sliding the retainer -1- back and pressing the release down.
- If the sensor cannot be removed as described, then the front bumper must be removed. Refer to → Body Exterior; Rep. Gr.63; Front Bumper; Bumper Cover, Removing and Installing.

Installing
Install in reverse order of removal.
Rear Parking Aid Sensor, Removing and Installing
Rear Parking Aid Sensor, Removing and Installing, Vehicles without Trailer Hitch
Removing
Exterior Sensors
- Reach behind the bumper cover and expand both tabs in direction of -arrows- while pushing the sensor -3- from the outside toward the inside at the same time.
- Disconnect the connector -2- by sliding the retainer -1- back and pressing the release down.

Interior Sensors
- Remove the bolts in direction of -arrows- on the lower section of the bumper cover.
- Press both tabs to the side in direction of -arrows- and at the same time, push the sensor -3- through from the outside toward the inside.
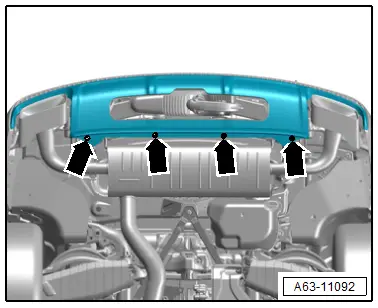
- Disconnect the connector -2- by sliding the retainer -1- back and pressing the release down.

Installing
Install in reverse order of removal.
Rear Parking Aid Sensor, Removing and Installing, Vehicles with Trailer Hitch
Removing
Exterior Sensors
- Reach behind the bumper cover and expand both tabs in direction of -arrows- while pushing the sensor -3- from the outside toward the inside at the same time.
- Disconnect the connector -2- by sliding the retainer -1- back and pressing the release down.

Interior Sensors:
 CAUTION
Risk of leg injury by releasing the trailer hitch.
- Stay outside of the ball head swivel range.
- Drive out the ball head from the trailer hitch. Refer to the Vehicles Owner's Manual.
- Reach through the opening and push both tabs to the side -arrows- while pushing the sensor -3- from the outside toward the inside at the same time.
- Disconnect the connector -2- by sliding the retainer -1- back and pressing the release down.

Installing
Install in reverse order of removal.

