Audi Q7: Pressing Off Tires, Run-Flat Tires
 Caution
Refer to → Chapter "Safety Precautions, Run-Flat Tires".
- Release air from tires, unscrew the valve insert to do so.
 Note
Note
- Be careful not to scratch off the glued- on wheel trim on these rims.
- The surface of the wheel trim is very sensitive.
- The rim will have be replaced if the wheel trim is damaged.
- The wheel trim cannot be replaced.

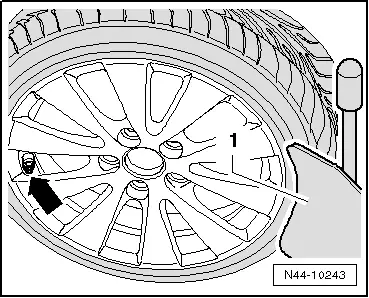
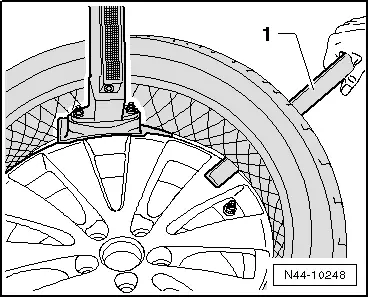
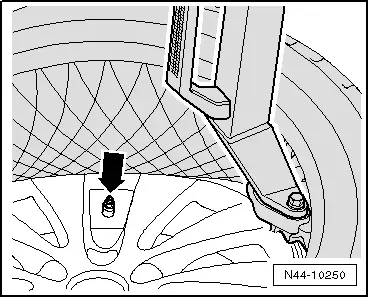
- When pressing off tire on a tire dismounting/mounting machine with press-off blade, always make sure that tire valve/tire pressure sensor -arrow- is located opposite the press-off blade -1-.
Press-off blade must be applied at maximum 2 cm removed from rim flange.
- Remove balancing weights and coarse dirt from disc wheel.
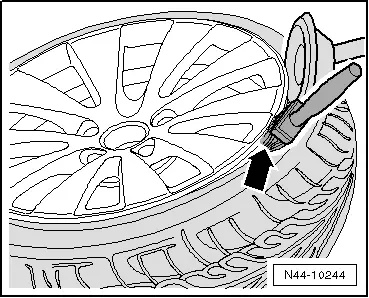
- Press off both tire beads around circumference while thoroughly applying tire mounting paste between tire and rim flange -arrow-.
Removing Tires, Run-Flat Tires
 Caution
Refer to → Chapter "Safety Precautions, Run-Flat Tires".
 Note
Note
- Be careful not to scratch off the glued- on wheel trim on these rims.
- The surface of the wheel trim is very sensitive.
- The rim will have be replaced if the wheel trim is damaged.
- The wheel trim cannot be replaced.

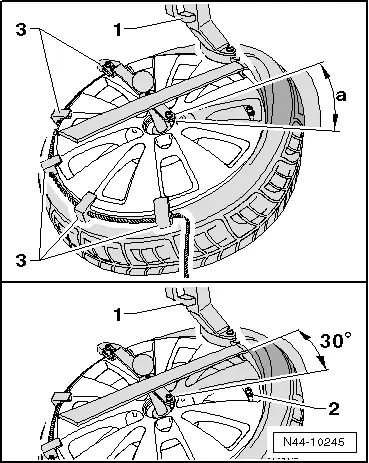
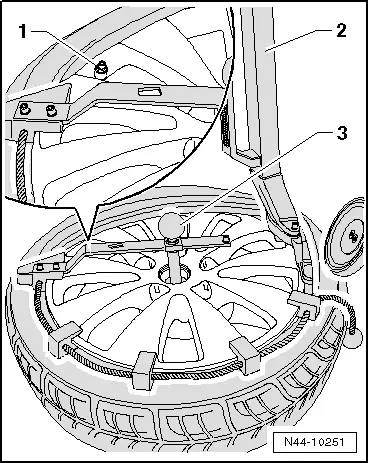
- Turn wheel on tire mounting device so that tire valve/tire pressure sensor -2- stands in front of mounting head -1-.
 Caution
Mounting head -1- must not be located in area -a- of tire valve/tire pressure sensor, otherwise the mounting head will damage the tire pressure sensor.
- Position mounting head -1- in vicinity of tire valve/tire pressure sensor so that tire iron can be put on approximately 30º next to tire valve/tire pressure sensor -2-.
- Install press holders -3- on disc wheel opposite the mounting head -1-.
- Now pry tire bead over mounting finger on mounting head using tire iron and remove tire iron again.
- Let the tire dismounting/mounting machine run clockwise until upper bead lies completely above the rim flange.
This slides the press holders -1- against the mounting head. This allows them to be removed again easily.
- Turn wheel on tire mounting device so that tire valve/tire pressure sensor -2- stands in front of mounting head -1-.
 Caution
Mounting head -1- must not be located in area -a- of tire valve/tire pressure sensor, otherwise the mounting head will damage the tire pressure sensor.
- Position mounting head -1- in vicinity of tire valve/tire pressure sensor so that tire iron can be put on approximately 30º next to tire valve/tire pressure sensor -2-.
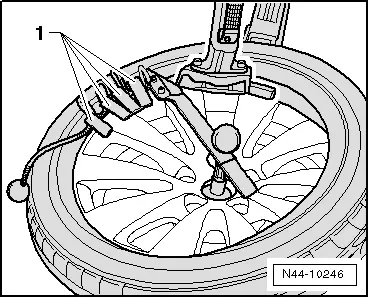
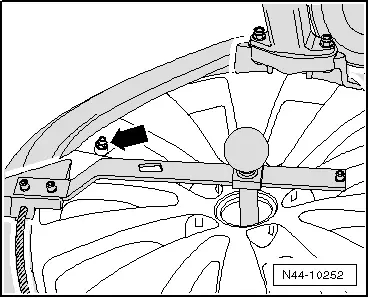
- Now pry tire bead over mounting finger of mounting head using tire iron -3-.
- In addition, insert a plastic mounting lever -4-.
- Remove tire iron -3- again.
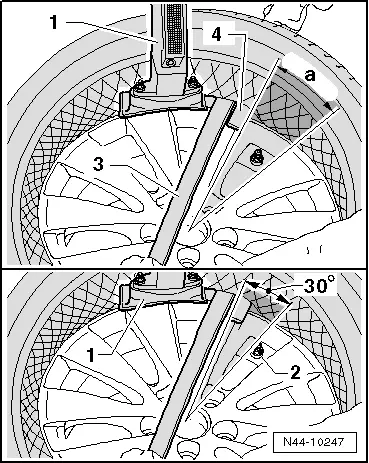
- Using plastic mounting lever -1-, hold bead in place over the rim flange from outside and let tire mounting device run clockwise until tire has been pulled off completely from disc wheel.
 Note
Note
- Check tire pressure sensor for loose or damaged parts. If threaded connections are loose, union nut, valve insert, seal, sealing washer and valve cap must be replaced by new parts from repair set Parts Catalog.
- If tire pressure sensor is damaged, then it must be replaced completely.
Tires, Mounting, Run-Flat Tires
 Caution
It is mandatory for run-flat tires to have a tire pressure monitoring system in the vehicle.
 Caution
- Refer to → Chapter "Installation Instructions, Run-Flat Tires"
- Refer to → Chapter "Safety Precautions, Run-Flat Tires"
- Coat rim flanges, tire beads and inside of upper tire beads thoroughly with tire mounting paste.
 WARNING
The minimum mounting temperature for a tire may not be below 21ºC (70ºF) or above 30℃. (86 ºF)
 Note
Note
- Be careful not to scratch off the glued- on wheel trim on these rims.
- The surface of the wheel trim is very sensitive.
- The rim will have be replaced if the wheel trim is damaged.
- The wheel trim cannot be replaced.

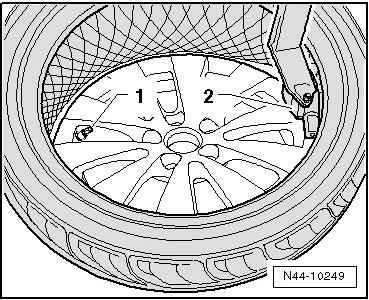
- Turn disc wheel on tire mounting device so that tire valve/Tire Pressure Sensor-1- stands on opposite side of mounting head -2-.
- Let the tire dismounting/mounting machine run clockwise.
 WARNING
The minimum mounting temperature for a tire may not be below 21℃ or above 30℃.
 Note
Note
- Be careful not to scratch off the glued- on wheel trim on these rims.
- The surface of the wheel trim is very sensitive.
- The rim will have be replaced if the wheel trim is damaged.
- The wheel trim cannot be replaced.
- Mounting of the lower bead ends before the tire valve/Tire Pressure Sensor-arrow- to prevent damage to Tire Pressure Sensor.
Tire bead now slips over the rim flange. Wheel may be turned only as far until mounting head is located just in front of tire valve/Tire Pressure Sensor-arrow-.
- Turn disc wheel on tire mounting device so that tire valve/Tire Pressure Sensor-1- stands on opposite side of mounting head -2-.
- Install press holders -3- on disc wheel.
- Make sure the tire bead is seated correctly on the mounting head and run the mounting machine clockwise.
- Mounting of the upper bead ends before the tire valve/Tire Pressure Sensor-arrow- to prevent damage to Tire Pressure Sensor.
Tire bead now slips over the rim flange. Wheel may be turned only as far until mounting head is located just in front of tire valve/Tire Pressure Sensor-arrow-.
- Remove press holders from rim flange.
- Inflate the tire to a inflation pressure of maximum 3.3 bar (bounce pressure).
 Caution
If tire beads do not make contact completely on disc wheel edge, pressure must not be increased under any circumstances.
Pre-damage to tire or disc wheel would result.
- If tire beads do not make contact completely on disc wheel edge, then release air, press off tire bead once more and coat rim flange thoroughly again with tire mounting paste.
- Inflate the tire to a inflation pressure of maximum 3.3 bar (bounce pressure).
- If tire beads make contact on bead seat without problems, then increase inflation pressure to 4 bar to "settle" tire.
- Screw on a new valve insert and fill the tires to the specified pressure.
- Then balance wheel.
- Install the wheel and tighten it to tightening specification.
Overview - Tire Pressure Monitoring System
 Caution
It is mandatory for run-flat tires to have a tire pressure monitoring system in the vehicle.
Beru wheel electronics system. Refer to → Chapter "Wheel Electronics System (Tire Pressure Monitoring System), Beru ".
Siemens wheel electronics system. Refer to → Chapter "Wheel Electronics System (Tire Pressure Monitoring System), Siemens ".
Direct Measurement Systems according to Vehicle Model. Refer to → Chapter "Metal Valve Body, Removing and Installing".
Indirect Measurement Systems according to Vehicle Model. Refer to → Chapter "Metal Valve Body, Removing and Installing".
Refer to → Chapter "Wheel Electronics, New Design".
 Note
Note
Which system is installed can be identified on the wheel electronics label.
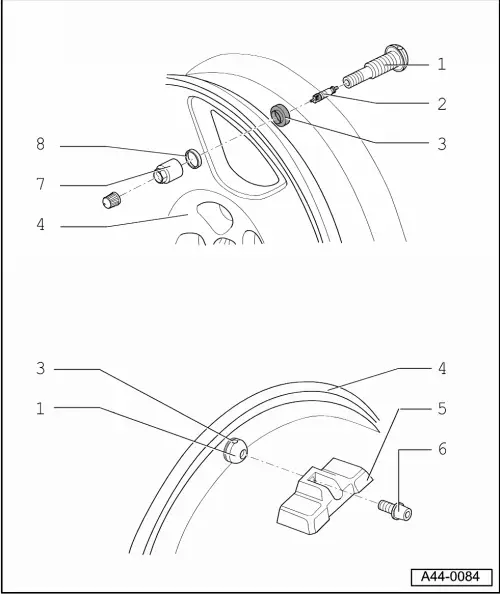
1 - Metal Valve Body
- Refer to the Parts Catalog for the allocation of the only valves to be installed.
- delivered complete
- Replace valve insert with every tire change
- Removing and Installing. Refer to → Chapter "Metal Valve Body, Removing and Installing".
2 - Valve Insert
3 - Seal
- Removing and Installing. Refer to → Chapter "Metal Valve Body, Removing and Installing".
 Note
Note
Depending on the model, it is not separable from the valve. Refer to Parts Catalog
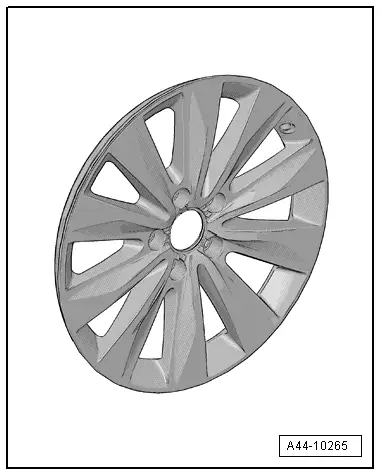
4 - Rim
- All models: 4 Nm
- Tires, Dismounting and Mounting. Refer to → Fig. "Dismounting Tire"
Run-Flat Tires, Dismounting. Refer to → Chapter "Removing Tires, Run-Flat Tires"
5 - Wheel Electronics
- Batteries must be completely replaced.
- Remaining battery life, temperature and pressure can be read via diagnosis using the Vehicle Diagnostic Tester.
- Beru Wheel Electronics System, Installing. Refer to → Chapter "Wheel Electronics System (Tire Pressure Monitoring System), Beru ".
- Siemens Wheel Electronics System, Installing. Refer to → Chapter "Wheel Electronics System (Tire Pressure Monitoring System), Siemens ".
 Note
Note
Which system is installed can be identified on the wheel electronics label.
 WARNING
If tire sealant was used, then the wheel electronics on that particular wheel must be replaced.
 WARNING
Damaged wheel electronics must be replaced.
6 - Microencapsulated Screw
 Note
Note
Only used on Beru systems
All Models: 4 Nm
- Replacing the bolt
- can only be obtained as a replacement part with wheel electronics
7 - Union Nut
- Removing and Installing. Refer to → Chapter "Metal Valve Body, Removing and Installing".
- Tightening specification. Refer to → Chapter "Metal Valve Body, Removing and Installing".
8 - Beveled Washer
