Audi Q7: Sunroof Motor -V1-, Removing and Installing
Removing
- The front sliding sunroof glass panel is closed.
- Switch off the ignition.
- Remove the front interior lamp/reading lamp. Refer to → Electrical Equipment; Rep. Gr.96; Controls; Front Interior Lamp/Reading Lamp, Removing and Installing.
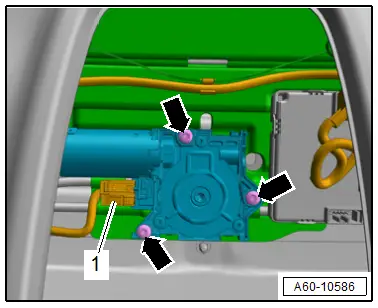
- Disconnect the connector -1-.
- Remove the bolts -arrows- and the Sunroof Motor -V1-.
Installing
Install in reverse order of removal and note the following:
- Perform an adaptation. Refer to → Chapter "Power Sunroof Control Module -J245-, Programming".
Tightening Specifications
- Refer to → Chapter "Overview - Sliding Sunroof"
Sunroof Seals, Removing and Installing
Roof Opening Seal, Removing and Installing
Special tools and workshop equipment required
- Roller -3356-
- Wiring Harness Repair Set - Hot Air Blower -VAS1978/14A-
- Cleaning Solution -D 009 401 04-
- Applicator -D 009 500 25-
- Bonding Agent -D 355 205 A2-
Removing
- Remove the front and rear glass panel. Refer to → Chapter "Glass Panel, Removing and Installing".
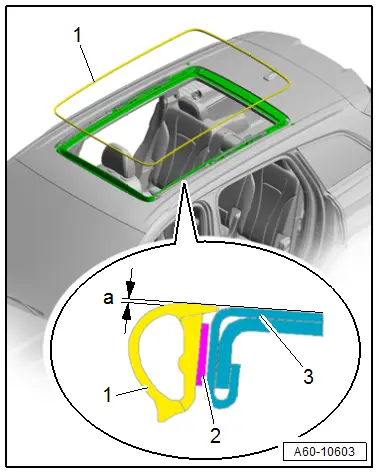
- Remove the roof opening seal -1- and warm it up if necessary using the -VAS1978/14A-.
Installing
Install in reverse order of removal and note the following:
- The vehicle and the seal must be at room temperature.
- The adhesive surfaces must be free of dirt and grease.
- If the Bonding Agent -D 355 205 A2- dries longer than 3 hours, then it must be primed again.
- Do not stretch the seal when installing it.
- Clean the adhesive surface using the Cleaning Solution -D 009 401 04-.
- Apply Bonding Agent -D 355 205 A2- on the adhesive surface using the Applicator -D 009 500 25- and let dry.
- Place the rear seal in the center of the roof all around on the edge -3- of the sunroof opening at the same time evenly remove the protective film from the adhesive strip -2-.
- The seal must be flush on the roof surface.
- Maximum height difference -a- = +- 0.5 mm.
- Press the seal onto the roof edge by going over it twice with the -3356-.
- Install the front and rear glass panel. Refer to → Chapter "Glass Panel, Removing and Installing".
Glass Panel Seal, Removing and Installing, Front
Removing
- Tilt open the glass panel and remove the seal.
Installing
- The vehicle and seal must be at room temperature.
- The adhesive surfaces must be free of dirt and grease.
- If the Bonding Agent -D 355 205 A2- dries longer than 3 hours, then it must be primed again.
- Clean the adhesive surface using the Cleaning Solution -D 009 401 04-.
- Apply Bonding Agent -D 355 205 A2- on the adhesive surface using the Applicator -D 009 500 25- and let dry.
- Remove the protective film from the adhesive surface.
- Apply the seals in the opening on the glass panel.
Glass Panel Seal, Removing and Installing, Rear
Removing
- Remove the rear glass panel. Refer to → Chapter "Glass Panel, Removing and Installing, Rear".
- Remove the seal.
Installing
- The vehicle and seal must be at room temperature.
- The adhesive surfaces must be free of dirt and grease.
- If the Bonding Agent -D 355 205 A2- dries longer than 3 hours, then it must be primed again.
- Clean the adhesive surface using the Cleaning Solution -D 009 401 04-.
- Apply Bonding Agent -D 355 205 A2- on the adhesive surface using the Applicator -D 009 500 25- and let dry.
- Remove the protective film from the adhesive surface.
- Attach the seals.
- Install the front glass panel. Refer to → Chapter "Glass Panel, Removing and Installing, Front".

