Audi Q7: Thorax Airbag Wire, Removing and Installing
Front Thorax Airbag Wire, Removing and Installing
Removing
 WARNING
- Follow all safety precautions when working on pyrotechnic components. Refer to → Chapter "Safety Precautions for Pyrotechnic Components".
- Follow the additional safety precautions when working with the thorax airbag. Refer to → Chapter "Additional Thorax Airbag Safety Precautions".
- Follow all regulations when disposing of pyrotechnic components. Refer to → Chapter "Airbag, Belt Tensioner and Battery Cut-Out Units, Storing, Transporting and Disposing (Pyrotechnic Components)".
- Remove the front seat. Refer to → Chapter "Front Seat, Removing and Installing".
- Fasten the front seat on the -VAS6136-. Refer to → Chapter "Front Seat, Mounting on Fixture for Seat Repair".
- Remove the backrest cover. Refer to → Chapter "Backrest Cover, Removing and Installing".
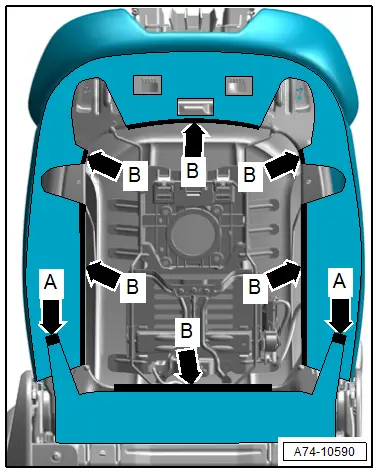
Seat without Pneumatic Components
- Disengage the lower, upper and side molding from the backrest frame -arrows A and B-.
- Remove the cushion from the backrest in the area of the thorax airbag.
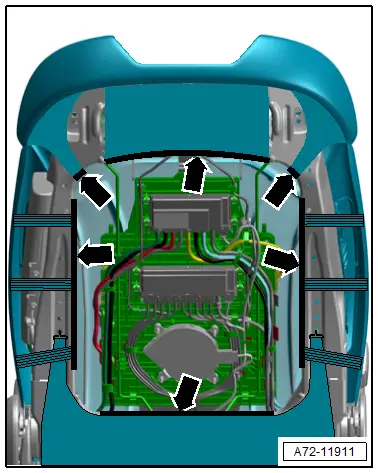
Seat with Pneumatic Components
- Disengage the lower, upper and side molding from the backrest frame -arrows-.
- Remove the cushion from the backrest in the area of the thorax airbag.
Continuation for All Seats
 WARNING
Before handling pyrotechnic components (for example, disconnecting the connector), the person handling it must "discharge static electricity". This can be done by briefly touching the door striker pin, for example.
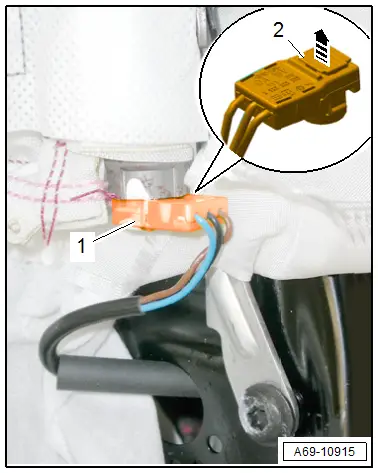
- Release the connector lock -2- with a small screwdriver in direction of -arrow-.
- Disconnect the connector -1- on the thorax airbag igniter.
- Unclip and free up the thorax airbag wire on the backrest frame.
- Disconnect modular wiring routing. Refer to → Chapter "Modular Wiring Routing, Disconnecting and Connecting".
- Open the corrugated tube, remove the wire for the thorax airbag with the connector and free up at the seat pan.
- Carefully remove the thorax airbag wire from the backrest frame.
Installing
 WARNING
- Follow all safety preCautions when working on pyrotechnic components. Refer to → Chapter "Safety PreCautions for Pyrotechnic Components".
- Before handling pyrotechnic components (for example, connecting the connector), the person handling it must "discharge static electricity". This can be done by briefly touching the door striker pin, for example.
- Observe all measures when installing the front seat. Refer to → Chapter "Front Seat, Removing and Installing".
Install in reverse order of removal.
Installation Notes, for example tightening specifications, replacing components. Refer to → Chapter "Overview - Front Thorax Airbag".
Rear Thorax Airbag Wire, Removing and Installing
Removing
 WARNING
- Follow all safety preCautions when working on pyrotechnic components. Refer to → Chapter "Safety PreCautions for Pyrotechnic Components".
- Follow the additional safety preCautions when working with the thorax airbag. Refer to → Chapter "Additional Thorax Airbag Safety PreCautions".
- Follow all regulations when disposing of pyrotechnic components. Refer to → Chapter "Airbag, Belt Tensioner and Battery Cut-Out Units, Storing, Transporting and Disposing (Pyrotechnic Components)".
- Disconnect the battery ground cable with the ignition turned on. Refer to → Electrical Equipment; Rep. Gr.27; Battery; Battery, Disconnecting and Connecting.
- Remove the outer cushion. Refer to → Chapter "Cover and Cushion, Removing and Installing, Second Row Seat Pan High".
- Set/fold the backrest forward; move the rear seat slightly forward if necessary.
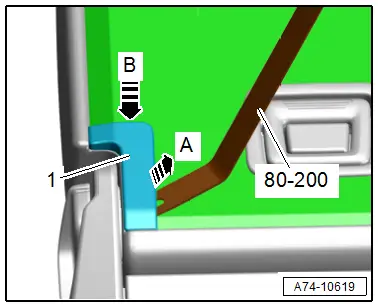
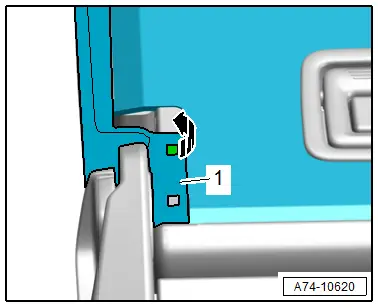
- Unclip the backrest hinge cover -1- at the position shown in the image using the -80-200- in direction of -arrow A- and remove downward in direction of -arrow B-.
- Disengage the cover -1- on the metal bracket in direction of -arrow-.
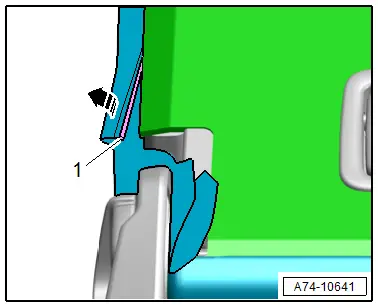
- Disengage the cover molding -1- along the outside of the backrest in direction of -arrow-.
- Pull the cover with cushion slightly back.
 WARNING
Before handling pyrotechnic components (for example, disconnecting the connector), the person handling it must "discharge static electricity". This can be done by briefly touching the door striker pin, for example.
- Release the connector lock -2- with a small screwdriver in direction of -arrow-.
- Disconnect the connector -1- on the thorax airbag igniter.
- Unclip and free up the thorax airbag wire on the seat frame.
- Disconnect modular wiring routing. Refer to → Chapter "Modular Wiring Routing, Disconnecting and Connecting".
- Remove the thorax airbag wire from the protective cover and free it up.
- Carefully remove the thorax airbag wire from the backrest frame.

Installing
 WARNING
- Follow all safety preCautions when working on pyrotechnic components. Refer to → Chapter "Safety PreCautions for Pyrotechnic Components".
- Before handling pyrotechnic components (for example, connecting the connector), the person handling it must "discharge static electricity". This can be done by briefly touching the door striker pin, for example.
- Observe all measures when installing the front seat. Refer to → Chapter "Front Seat, Removing and Installing".
Install in reverse order of removal.
Installation Notes, for example tightening specifications, replacing components. Refer to → Chapter "Overview - Rear Thorax Airbag".

