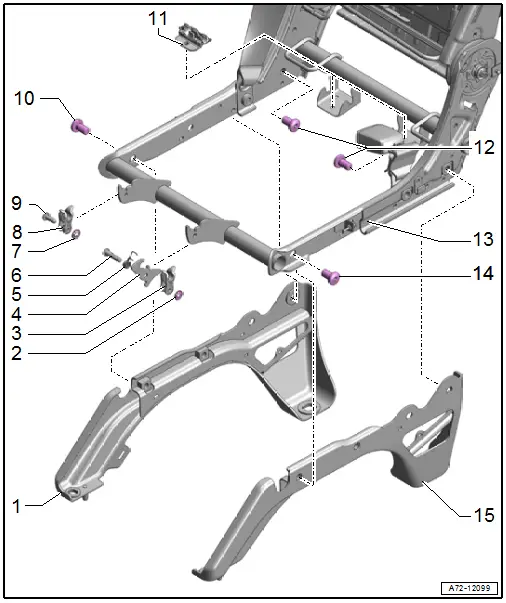
Audi Q7: Overview - Bench Seat/Single Seat, Seat Frame Low, Center Second Row Seat

1 - Right Stand Support
2 - Lock Washer
3 - Front Mount
- For seat/backrest frame
4 - Locking Mechanism
- For seat frame
5 - Spiral Spring
6 - Pins
7 - Lock Washer
8 - Front Mount
- For seat frame
9 - Pins
10 - Bolt
- 40 Nm
- Replace after removing
- Self-locking
11 - Rear Mount
- For seat/backrest frame
- Quantity: 2
12 - Bolts
- 40 Nm
- Replace after removing
- Self-locking
13 - Seat/Backrest Frame
14 - Bolt
- 40 Nm
- Replace after removing
- Self-locking
15 - Left Stand Support
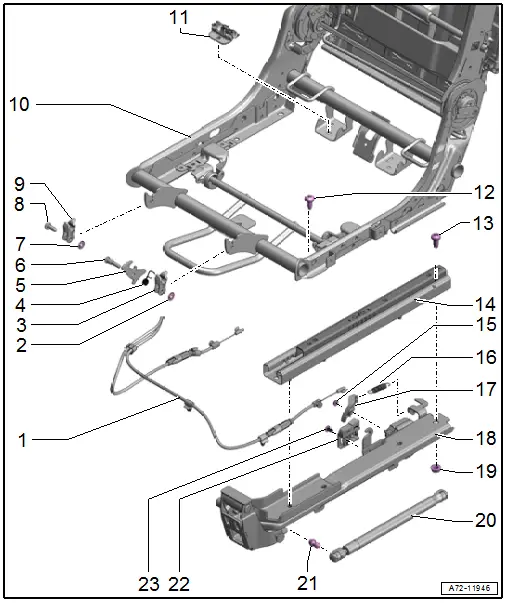
Overview - Bench Seat/Single Seat, Seat Frame High, Outer Second Row Seat

1 - Release Cable
- For seat folding release
- Removing and installing. Refer to → Chapter "Release Cable for Seat Folding Release, Removing and Installing, Seat High, Outer Second Row".
2 - Lock Washer
3 - Front Mount
- For seat frame
4 - Spiral Spring
5 - Locking Mechanism
- For seat frame
6 - Pins
7 - Lock Washer
8 - Pins
9 - Front Mount
- For seat frame
10 - Seat/Backrest Frame
11 - Rear Mount
- For seat frame
- Quantity: 2
12 - Bolt
- 25 Nm
- Replace after removing
- Self-locking
13 - Bolt
- Replace after removing
- Self-locking
14 - Seat Rail
15 - Nut
- 2.9 Nm
16 - Spiral Spring
- For release lever
17 - Lever
- For seat folding release
18 - Mount
- For the seat rail
19 - Nut
- 25 Nm
- Self-locking
- Replace after removing
20 - Gas-Filled Strut
- For seat folding release
- Removing and installing. Refer to → Chapter "Gas-Filled Strut, Removing and Installing, Seat High, Outer Second Row".
- Press onto ball pin and engage.
21 - Ball Pin
- Welded on to the seat frame
22 - Rear Seat Backrest Contact Switch
- Left Rear Seat Backrest Contact Switch -F315-, Right Rear Seat Backrest Contact Switch -F316-
- Removing and installing. Refer to → Chapter "Rear Seat Backrest Contact Switch, Removing and Installing, Seat High, Outer Second Row".
23 - Bolt
- 2.9 Nm
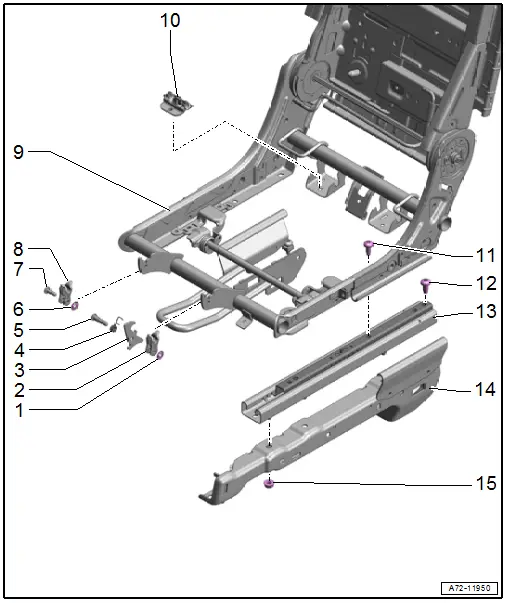
Overview - Bench Seat/Single Seat, Seat Frame High, Center Second Row Seat

1 - Lock Washer
2 - Front Mount
- For seat frame
3 - Locking Mechanism
- For seat frame
4 - Spiral Spring
5 - Pins
6 - Lock Washer
7 - Pins
8 - Front Mount
- For seat frame
9 - Seat/Backrest Frame
10 - Rear Mount
- For seat frame
- Quantity: 2
11 - Bolt
- 25 Nm
- Replace after removing
- Self-locking
12 - Bolt
- 25 Nm
- Replace after removing
- Self-locking
13 - Seat Rail
14 - Mount
- For the seat rail
15 - Nut
- 25 Nm
- Replace after removing
- Self-locking
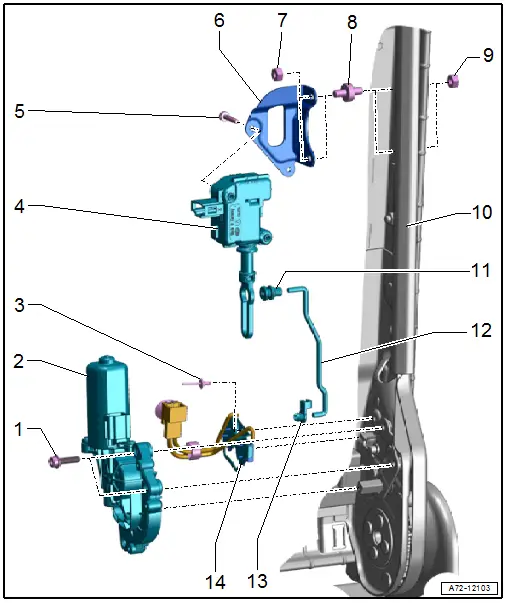
Overview - Bench Seat/Single Seat, Third Row Seat Frame

1 - Bolt
- 5.7 Nm
- Replace after removing
- Quantity: 2
- Self-locking
2 - Left Third Row Seat Backrest Adjustment Motor -V368-
- Right side: Right Third Row Seat Backrest Adjustment Motor -V361-
- Removing and installing. Refer to → Chapter "Backrest Adjustment Motor, Removing and Installing, Third Row".
3 - Rivet
4 - Backrest Adjustment Locking Latch Motor
- Left side includes:
- Left Third Row Backrest Adjustment Locking Latch Motor -F524-
- Left Third Row Backrest Adjustment Locking Latch Motor 2 -F543-
- Right side includes:
- Right Third Row Backrest Adjustment Locking Latch Motor -F525-
- Right Third Row Backrest Adjustment Locking Latch Motor 2 -F544-
- Removing and installing. Refer to → Chapter "Backrest Adjustment Locking Latch Motor, Removing and Installing, Third Row".
5 - Bolt
- 2.5 Nm
- Quantity: 2
6 - Bracket
7 - Nut
- 9 Nm
- Quantity: 2
8 - Bearing
- Quantity: 2
9 - Nut
- 9 Nm
- Quantity: 2
10 - Backrest Frame
11 - Clip
12 - Connecting Rod
13 - Clip
14 - Backrest Adjustment Stop Switch
- Left side includes:
- Left Third Row Seat Backrest Adjustment Stop Switch -Locked- -F530-
- Left Third Row Seat Backrest Adjustment Stop Switch -Unlocked- -F531-
- Left Third Row Seat Backrest Adjustment Stop Switch 2 -Locked- -F532-
- Left Third Row Seat Backrest Adjustment Stop Switch 2 -Unlocked- -F533-
- Right side includes:
- Right Third Row Seat Backrest Adjustment Stop Switch -Locked- -F526-
- Right Third Row Seat Backrest Adjustment Stop Switch -Unlocked- -F527-
- Right Third Row Seat Backrest Adjustment Stop Switch 2 -Locked- -F528-
- Right Third Row Seat Backrest Adjustment Stop Switch 2 -Unlocked- -F529-
- Removing and installing. Refer to → Chapter "Backrest Adjustment Stop Switch, Removing and Installing, Third Row".

