Audi Q7: Overview - Headrest and Headrest Guide
Audi Q7 (4M) 2016-2026 Workshop Manual / Body / Body Interior / Seat Frames / Overview - Headrest and Headrest Guide
Overview - Headrest and Headrest Guide, Outer Second Row Seat
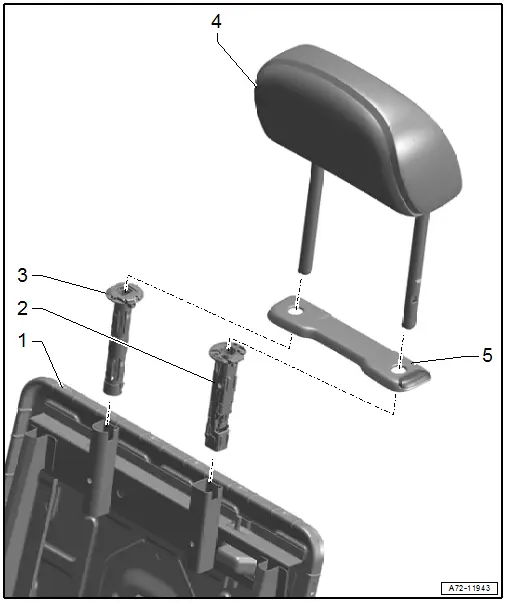
1 - Backrest Frame
2 - Headrest Guide with Locking Spring
- Installed on left side of backrest
- Removing and installing. Refer to → Chapter "Headrest Guide, Removing and Installing, Outer Second Row Seat".
- Press until all three retainers are completely locked into the backrest frame
3 - Headrest Guide with Release Button
- Installed on right side of backrest
- Removing and installing. Refer to → Chapter "Headrest Guide, Removing and Installing, Outer Second Row Seat".
4 - Headrest
- Cannot be disassembled
- Removing and installing. Refer to → Chapter "Headrest, Removing and Installing, Outer Second Row Seat".
- Must be locked in the headrest guides
5 - Trim
- For headrest guide
- Removing and installing. Refer to → Chapter "Headrest, Removing and Installing, Outer Second Row Seat".
- Press on until it engages audibly.
Overview - Headrest and Headrest Guide, Center Second Row Seat

1 - Backrest Frame
2 - Headrest Guide
- With release button
- Installed on right side of backrest
- Removing and installing. Refer to → Chapter "Headrest Guide, Removing and Installing, Center Second Row Seat".
3 - Headrest
- Cannot be disassembled
- Removing and installing. Refer to → Chapter "Headrest, Removing and Installing, Center Second Row Seat".
- Must be locked in the headrest guides
4 - Headrest Guide
- With locking spring
- Installed on left side of backrest
- Removing and installing. Refer to → Chapter "Headrest Guide, Removing and Installing, Center Second Row Seat".
- Press until all three retainers are completely locked into the backrest frame
Overview - Headrest, Third Row Seat
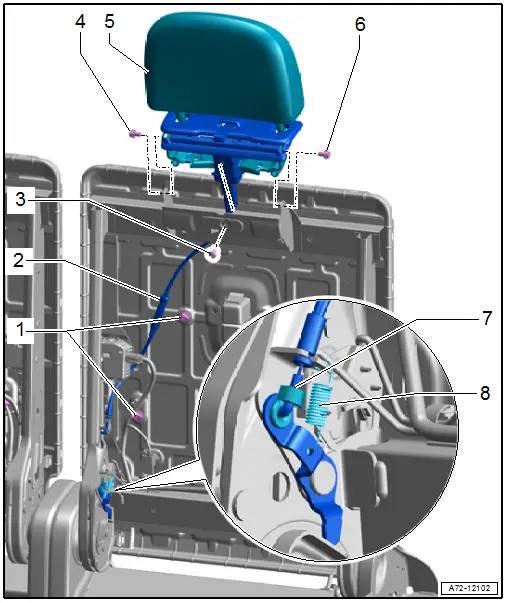
1 - Bracket/Cable Tie
- For the release cable
2 - Release Cable
- For headrest folding release
- Available only with -5-
- Removing and installing. Refer to → Chapter "Headrest, Removing and Installing".
3 - Bolt
- 5.7 Nm
4 - Bolt
- 9 Nm
- Replace after removing
- Self-locking
5 - Headrest
- Cannot be disassembled
- Available only together with -2-
- Removing and installing. Refer to → Chapter "Headrest, Removing and Installing, Third Row".
6 - Bolt
- 9 Nm
- Replace after removing
- Self-locking
7 - Clip
- For the release cable
8 - Spiral Spring

