Audi Q7: Overview - Center Console
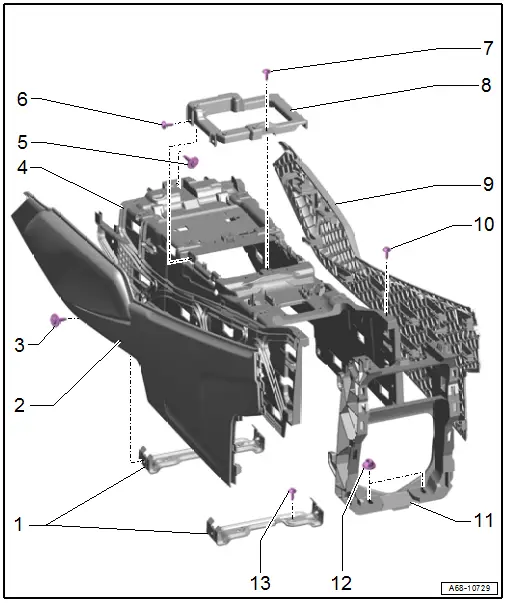
Overview - Center Console
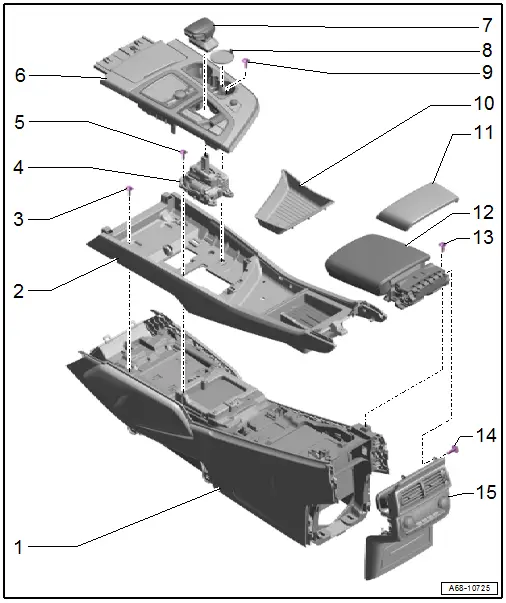
1 - Center Console Support
- Removing and Installing. Refer to → Chapter "Center Console Support, Removing and Installing".
2 - Center Console
- Removing and Installing. Refer to → Chapter "Center Console, Removing and Installing".
3 - Bolt
- 2 Nm
- Quantity: 7
4 - Gearshift Mechanism
- Removing and Installing. Refer to → 8-Speed Automatic Transmission; Rep. Gr.37; Selector Mechanism; Selector Mechanism, Removing and Installing
5 - Bolt
- Quantity: 4
- Tightening specification. Refer to → 8-Speed Automatic Transmission; Rep. Gr.37; Selector Mechanism; Overview - Selector Mechanism.
6 - Center Console Insert
- Removing and Installing. Refer to → Chapter "Center Console Insert, Removing and Installing".
- Replace damaged or deformed clips
- Press on until it engages audibly
7 - Selector Lever Handle
- Overview. Refer to → 8-Speed Automatic Transmission; Rep. Gr.37; Selector Mechanism; Overview - Selector Mechanism.
8 - Liner Mat
9 - Bolt
- 2 Nm
10 - Storage Compartment
- Removing and Installing. Refer to → Chapter "Front Storage Compartment, Removing and Installing".
11 - Center Console Cover
- Replace damaged or deformed clips
- Removing and Installing. Refer to → Chapter "Center Console Rear Trim, Removing and Installing".
- Press on until it engages audibly
12 - Front Center Armrest
- Removing and Installing. Refer to → Chapter "Front Center Armrest, Removing and Installing".
13 - Bolt
- 20 Nm
- Quantity: 2
14 - Bolt
- 3 Nm
- Quantity: 2
15 - Rear Trim
- For the center console
- Removing and Installing. Refer to → Chapter "Center Console Rear Trim, Removing and Installing".
- Replace damaged or deformed clips
- Press on until it engages audibly
Overview - Center Console, Insert
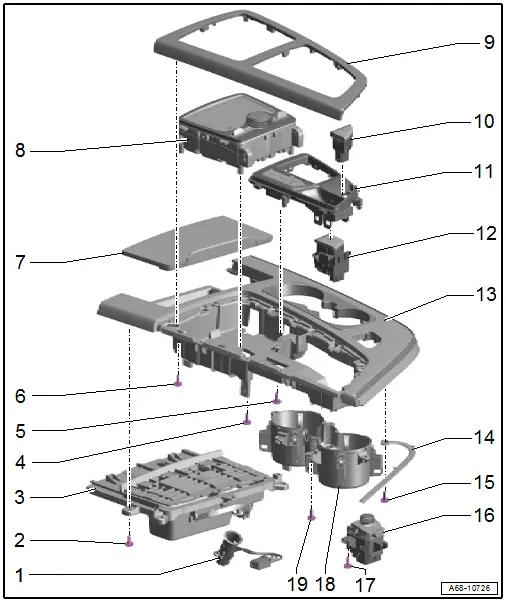
1 - Socket
- There are different versions.
- Removing and installing.
2 - Bolt
- 1.2 Nm
- Quantity: 4
3 - Storage Compartment
- Removing and installing.
4 - Bolt
- Quantity: 4
- Tightening specification. Refer to → Communication; Rep. Gr.91; Infotainment System; Component Location Overview - Infotainment System.
5 - Bolt
- Quantity: 4
- Tightening specification. Refer to → Electrical Equipment; Rep. Gr.96; Lamps; Component Location Overview - Center Console Lamps.
6 - Bolt
- 1.1 Nm
- Quantity: 12
7 - Storage Compartment
- Removing and installing.
- Engage on the cover and press on it until it audibly engages
8 - Multimedia System Control Head -E380-
- Component location overview. Refer to → Communication; Rep. Gr.91; Infotainment System; Component Location Overview - Infotainment System.
9 - Center Console Insert Trim
- Removing and installing. Refer to → Chapter "Center Console Insert Trim, Removing and Installing".
10 - -AUTO HOLD- Button -E540-
- Removing and installing. Refer to → Electrical Equipment; Rep. Gr.96; Controls; Electromechanical Parking Brake ButtonE538/-AUTO HOLD- ButtonE540, Removing and Installing.
11 - Selector Lever Transmission Range Display -Y5-
- Removing and installing. Refer to → Electrical Equipment; Rep. Gr.96; Lamps; Component Location Overview - Center Console Lamps.
12 - Electromechanical Parking Brake Button -E538-
- Removing and installing. Refer to → Electrical Equipment; Rep. Gr.96; Controls; Electromechanical Parking Brake ButtonE538/-AUTO HOLD- ButtonE540, Removing and Installing.
13 - Center Console Insert
- Removing and installing. Refer to → Chapter "Center Console Insert, Removing and Installing".
- Replace damaged or deformed clips
- Press on until it engages audibly
14 - Trim/Ambient Lighting Fiber Optic Cable
- Removing and installing. Refer to → Electrical Equipment; Rep. Gr.96; Lamps; Component Location Overview - Center Console Lamps.
15 - Bolt
- 1.2 Nm
16 - Driver Volume Control -E67-
- Component location overview. Refer to → Communication; Rep. Gr.91; Infotainment System; Component Location Overview - Infotainment System.
17 - Bolt
- Quantity: 3
- Tightening specification. Refer to → Communication; Rep. Gr.91; Infotainment System; Component Location Overview - Infotainment System.
18 - Cupholder
- Removing and installing. Refer to → Chapter "Cupholder, Removing and Installing".
19 - Bolt
- 1.2 Nm
- Quantity: 6
Overview - Center Console, Storage Compartment
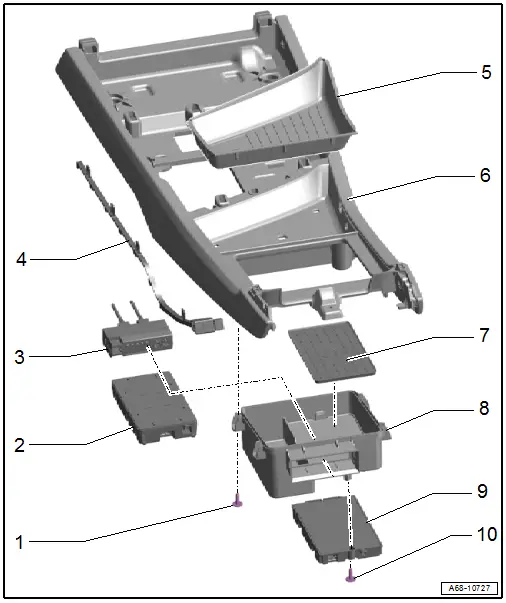
1 - Bolt
- 2 Nm
- Quantity: 4
2 - WLC Antenna
3 - External Audio Source Connection -R199-
- Equipped on some models
- Removing and installing. Refer to → Communication; Rep. Gr.91; Connection for External Multimedia Devices; External Audio Source ConnectionR199, Removing and Installing
4 - Fiber Optic Cable for Ambient Lighting Lamp
- Quantity: 2
- Equipped on some models
- Removing and installing. Refer to → Electrical Equipment; Rep. Gr.96; Lamps; Component Location Overview - Center Console Lamps.
5 - Storage Compartment
- Removing and installing. Refer to → Chapter "Front Storage Compartment, Removing and Installing".
6 - Center Console
- Removing and installing. Refer to → Chapter "Center Console, Removing and Installing".
7 - Liner Mat
8 - Multimedia Device Storage Compartment
- Removing and installing. Refer to → Chapter "Multimedia Devices Storage Compartment, Removing and Installing".
9 - Telephone Baseplate -R126-
- Removing and installing. Refer to → Communication; Rep. Gr.91; Telephone System; Telephone BaseplateR126, Removing and Installing
10 - Screw
- Tightening specification. Refer to → Communication; Rep. Gr.91; Telephone System; Component Location Overview - Telephone System.
Overview - Center Console, Rear Trim
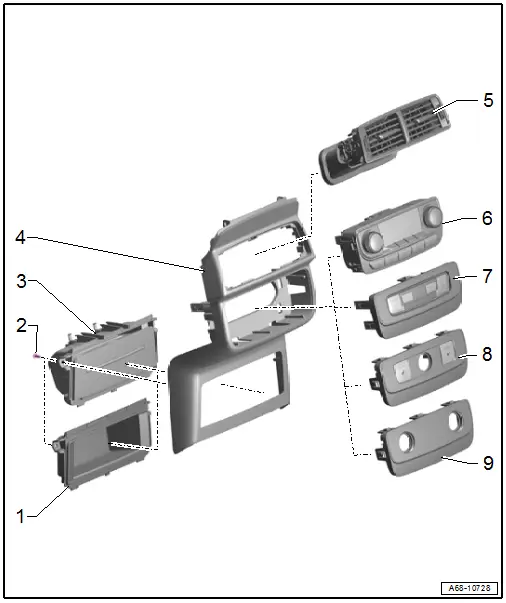
1 - Storage Compartment
- Equipped on some models
- Removing and installing. Refer to → Chapter "Multimedia Devices Storage Compartment, Removing and Installing".
2 - Bolt
- 1.5 Nm
- Quantity: 2
- 3 - Folding Compartment Socket
- Equipped on some models
- Removing and installing. Refer to → Chapter "Storage Compartment/Folding Compartment Socket, Removing and Installing".
4 - Rear Trim
- For the center console
- Removing and installing. Refer to → Chapter "Center Console Rear Trim, Removing and Installing".
5 - Rear Vent
- Removing and installing. Refer to → Chapter "Rear Center Console Vent, Removing and Installing".
- Replace damaged or deformed clips
- Insert in the installation opening an press on all the way.
6 - Rear A/C Display Control Head -E265-
- Equipped on some models
- Removing and installing. Refer to → Heating, Ventilation and Air Conditioning; Rep. Gr.87; Display Control Head; Display Control Head, Removing and Installing.
7 - Rear A/C Display Control Head Trim
- Equipped on some models
- Removing and installing. Refer to → Chapter "A/C System Display Control Head Trim, Removing and Installing".
8 - Rear Seat Heating Socket/Button Trim
- Equipped on some models
- Removing and installing. Refer to → Chapter "Rear Seat Heating Button/Socket Trim, Removing and Installing".
9 - Socket Trim
- Equipped on some models
- Removing and installing. Refer to → Chapter "Rear Seat Heating Button/Socket Trim, Removing and Installing".
Overview - Center Console, Support/Cover
1 - Center Console Bracket
- Removing and installing. Refer to → Chapter "Center Console Bracket, Removing and Installing".
2 - Center Console Trim Panel
- Removing and installing. Refer to → Chapter "Center Console Trim Panel, Removing and Installing".
- Hooked on the support and pressed on all the way
3 - Bolt
- 8 Nm
- Quantity: 2 on the left and right side
4 - Center Console Support
- Removing and installing. Refer to → Chapter "Center Console Support, Removing and Installing".
5 - Bolt
- 4 Nm
6 - Bolt
- 4 Nm
- Quantity: 4
7 - Bolt
- 4 Nm
- Quantity: 2
8 - Securing Bracket
- Removing and installing. Refer to → Chapter "Center Console Bracket, Removing and Installing".
9 - Center Console Trim Panel
- Removing and installing. Refer to → Chapter "Center Console Trim Panel, Removing and Installing".
- Replace any damaged or deformed clips
- Hook into the support and press until it audibly engages
10 - Bolt
- 4 Nm
- Quantity: 2
11 - Center Armrest Support Base
- Removing and installing. Refer to → Chapter "Center Console Support, Removing and Installing".
12 - Nut
- 20 Nm
- Quantity: 2
13 - Bolt
- 5 Nm
- Quantity: 2 each on front and rear

