Audi Q7: Overview - Cover and Cushion, Second Row Backrest
Audi Q7 (4M) 2016-2025 Workshop Manual / Body / Body Interior / Seat Upholstery, Covers / Overview - Cover and Cushion, Second Row Backrest
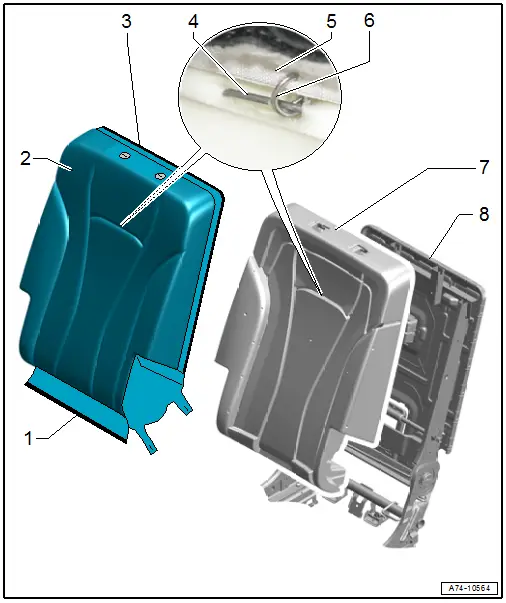
1 - Molding
- Sewn into cover
- For attaching the cover to the backrest frame
- Check for proper seating
2 - Cover
- Removing and installing. Refer to → Chapter "Cover and Cushion, Removing and Installing, Outer Second Row Backrest".
- Cover and cushion, separating. Refer to → Chapter "Cover and Cushion, Separating, Outer Second/Third Row Backrest".
- Check that there are no folds after installing
3 - Molding
- Sewn into cover
- For attaching the cover to the backrest frame
- Check for proper seating
4 - Wire
- Covered in foam padding
- For securing the cover to the cushion
5 - Contour Wire
- Pushed into the cover
- For securing the cover to the cushion
6 - Upholstery Clip
- For securing the cover to the cushion
- Replace after removing
- Install at the same location with Upholstery Clip Pliers -VAG1634-.
7 - Cushion
- Removing and installing. Refer to → Chapter "Cover and Cushion, Removing and Installing, Outer Second Row Backrest".
- Cover and cushion, separating. Refer to → Chapter "Cover and Cushion, Separating, Outer Second/Third Row Backrest".
8 - Backrest Frame
Overview - Cover and Cushion, Second Row Backrest with Center Armrest
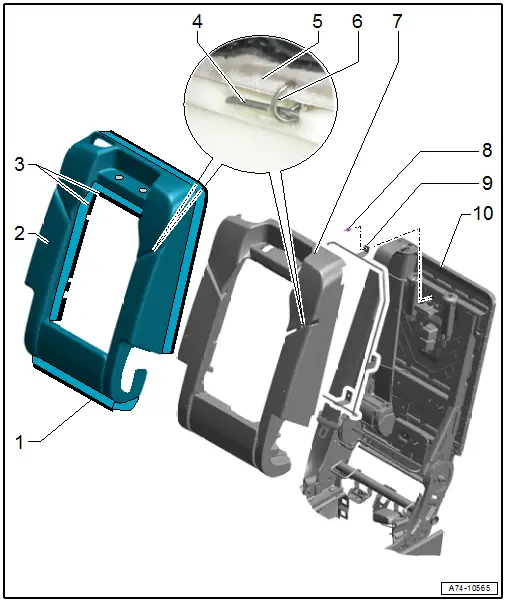
1 - Molding
- Sewn into cover
- For attaching the cover to the backrest frame
- Check for proper seating
2 - Cover
- Removing and installing. Refer to → Chapter "Cover and Cushion, Removing and Installing, Center Second Row Backrest".
- Cover and cushion, separating. Refer to → Chapter "Cover and Cushion, Separating, Center Second Row Backrest".
- Check that there are no folds after installing
3 - Molding
- Sewn into cover
- For attaching the cover to the wire frame
- Check for proper seating
4 - Wire
- Covered in foam padding
- For securing the cover to the cushion
5 - Contour Wire
- Pushed into the cover
- For securing the cover to the cushion
6 - Upholstery Clip
- For securing the cover to the cushion
- Replace after removing
- Install at the same location with Upholstery Clip Pliers -VAG1634-.
7 - Cushion
- Removing and installing. Refer to → Chapter "Cover and Cushion, Removing and Installing, Center Second Row Backrest".
- Cover and cushion, separating. Refer to → Chapter "Cover and Cushion, Separating, Center Second Row Backrest".
8 - Expanding Clip
9 - Wire Frame
10 - Backrest Frame
Overview - Cover and Cushion, Third Row Backrest
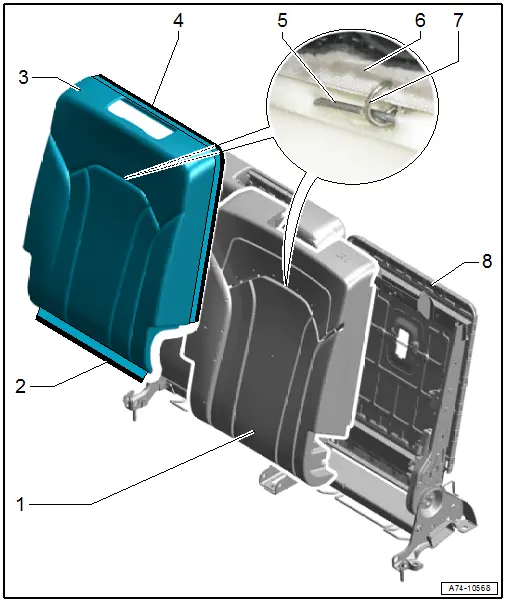
1 - Cushion
- Covers and cushions, removing and installing. Refer to → Chapter "Cover and Cushion, Removing and Installing, Third Row Backrest".
- Cover and cushion, separating. Refer to → Chapter "Cover and Cushion, Separating, Outer Second/Third Row Backrest".
2 - Molding
- Sewn into cover
- For attaching the cover to the backrest frame
- Check for proper seating
3 - Cover
- Covers and cushions, removing and installing. Refer to → Chapter "Cover and Cushion, Removing and Installing, Third Row Backrest".
- Cover and cushion, separating. Refer to → Chapter "Cover and Cushion, Separating, Outer Second/Third Row Backrest".
- Check that there are no folds after installing
4 - Molding
- Sewn into cover
- For attaching the cover to the backrest frame
- Check for proper seating
5 - Wire
- Covered in foam padding
- For securing the cover to the cushion
6 - Contour Wire
- Pushed into the cover
- For securing the cover to the cushion
7 - Upholstery Clip
- For securing the cover to the cushion
- Replace after removing
- Install at the same location with Upholstery Clip Pliers -VAG1634-.
8 - Backrest Frame
Overview - Seat Heating Element

1 - Connector
- For seat heating element
2 - Left Rear Bench Seat Heating Element -Z10-
- Front passenger side: Right Rear Bench Seat Heating Element -Z12-
- The heating element is glued to the cushion
- Replacing. Refer to → Chapter "Seat Heating Element, Removing and Installing".
3 - Backrest Cushion
- When replacing, apply a new heating element. Refer to → Chapter "Backrest Heating Element, Removing and Installing".
4 - Left Rear Backrest Heating Element -Z11-
- Front passenger side: Right Rear Backrest Heating Element -Z13-
- The heating element is glued to the cushion
- Replacing. Refer to → Chapter "Backrest Heating Element, Removing and Installing".
5 - Connector
- For backrest heating element
6 - Seat Cushion
- When replacing, apply a new heating element. Refer to → Chapter "Seat Heating Element, Removing and Installing".

