Audi Q7: Overview - Seat Versions
Audi Q7 (4M) 2016-2025 Workshop Manual / Body / Body Interior / Seat Frames / Overview - Seat Versions
Component Location Overview - Seat Versions
Overview - Front Seat
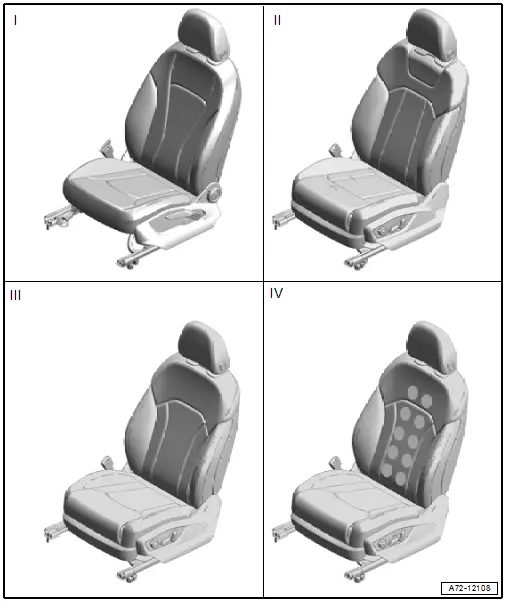
I - Standard Seat
- Equipment for plastic
- Manual seat length/height and angle adjustment
- Manual backrest angle adjuster
- Height adjustable headrest
- Cargo net
- Footwell lamp
- Additional equipment for leather
- Power seat length/height and angle adjustment
- Power backrest angle adjuster
- Power lumbar support adjuster
- Optional equipment
- Front passenger side child seat anchor
- Memory driver seat
- Seat heating
- Seat ventilation with heating
- RSE preparation
- Height and angle adjustable headrest
- Fire extinguisher bracket
- Overview. Refer to → Chapter "Overview - Front Seat".
II - Sport Seat
- Equipment
- Power seat length/height/depth and angle adjustment
- Power backrest angle adjuster
- Power lumbar support adjuster
- Height adjustable headrest
- Cargo net
- Footwell lamp
- Optional equipment
- Front passenger side child seat anchor
- Memory driver seat
- Driver/front passenger memory seat
- Seat heating
- Seat ventilation with heating
- RSE preparation
- Height and angle adjustable headrest
- Fire extinguisher bracket
- Overview. Refer to → Chapter "Overview - Front Seat".
III - Sport Seat Plus
- Equipment
- Power seat length/height/depth and angle adjustment
- Power backrest angle adjuster
- Pneumatic lumbar support adjuster
- Pneumatic seat bolster/backrest bolster adjuster
- Height and angle adjustable headrest
- Cargo net
- Footwell lamp
- Optional equipment
- Front passenger side child seat anchor
- Memory driver seat
- Driver/front passenger memory seat
- Seat heating
- RSE preparation
- Fire extinguisher bracket
- Overview. Refer to → Chapter "Overview - Front Seat".
IV - Custom Seat
- Equipment
- Power seat length/height/depth and angle adjustment
- Power backrest angle adjuster
- Pneumatic lumbar support adjuster
- Pneumatic seat bolster/backrest bolster adjuster
- Height and angle adjustable headrest
- Seat ventilation with heating
- Cargo net
- Footwell lamp
- Optional equipment
- Front passenger side child seat anchor
- Memory driver seat
- Driver/front passenger memory seat
- Pneumatic massage function
- RSE preparation
- Fire extinguisher bracket
- Overview. Refer to → Chapter "Overview - Front Seat".
Overview - Second Row Seats
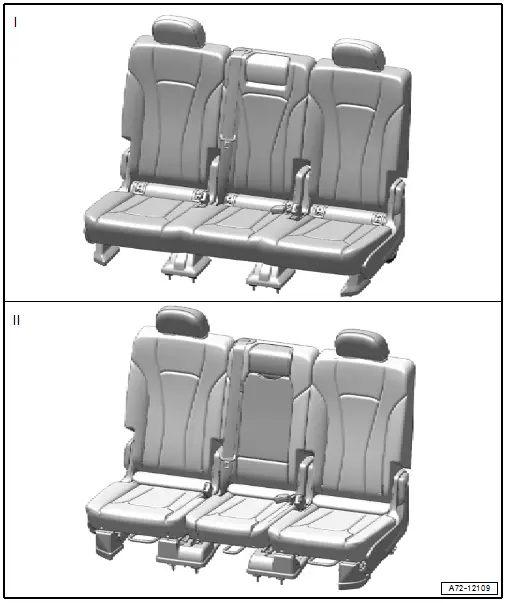
I - Rear Seat Low
- Equipment
- Backrest angle adjuster
- Folding backrest
- Child seat anchor on every seat
- Optional equipment
- Center armrest
- Thorax airbags
- Overview. Refer to → Chapter "Overview - Bench Seat/Single Seat".
II - Rear Seat High
- Equipment
- Seat forward/back adjuster
- Backrest angle adjuster
- Folding backrest
- Seat folding at the outside
- Child seat anchor on every seat
- Center armrest
- Optional equipment
- Thorax airbags
- Seat heating
- Overview. Refer to → Chapter "Overview - Bench Seat/Single Seat".
Front Seat, Mounting on Fixture for Seat Repair
Special tools and workshop equipment required
- Engine and Gearbox Bracket -VAS6095A-
- Engine/Transmission Holder - Seat Repair Fixture -VAS6136-
Procedure
 Note
Note
The single seats for the second row are mounted in the same way on the -VAS6136-.
- Seat removed from the vehicle.
- Attach the -VAS6136- onto the -VAS6095A-.
- Secure the seat on the -VAS6136-.

