Audi Q7: Parking Brake
Overview - Parking Brake
 Note
Note
Due to a mechanical or electrical fault, it may be required to mechanically loosen the parking brake in order to move the vehicle. Refer to → Chapter "Parking Brake, Manually Loosening".
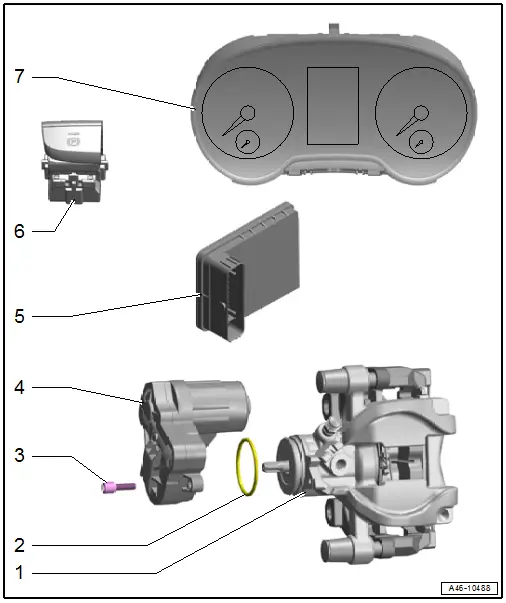
1 - Rear Brake Caliper
2 - Gasket
- Replace after removing
3 - Bolt
- 12 Nm
- Replace after removing
- Self-locking
4 - Electro-Mechanical Parking Brake Motor
- Left Parking Brake Motor -V282-
- Right Parking Brake Motor -V283-
- Refer to → Chapter "Left and Right Parking Brake Motor - V282-/-V283-, Removing and Installing"
5 - ABS Control Module -J104-
- With integrated control for the electro-mechanical parking brake
- Refer to → Chapter "ABS Control Module -J104-/ABS Hydraulic Unit -N55-, Removing and Installing"
6 - Electromechanical Parking Brake Button -E538-
- With Electromechanical Parking Brake Indicator Lamp -K213-
- Removing and installing. Refer to → Electrical Equipment; Rep. Gr.96; Controls; Component Location Overview - Controls in Center Console.
7 - Instrument Cluster
- With Instrument Cluster Control Module -J285- for the display of the indicator lamps and warning lamps
Left and Right Parking Brake Motor - V282-/-V283-, Removing and Installing
Special tools and workshop equipment required
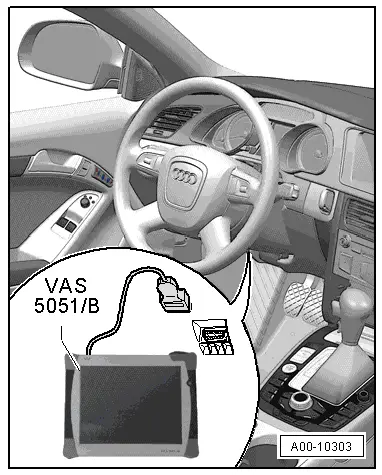
- Vehicle Diagnostic Tester
- Torque Wrench 1331 5-50Nm -VAG1331-
 Caution
This procedure contains mandatory replaceable parts. Refer to component overview prior to starting procedure.
Mandatory Replacement Parts
- Bolt - Electro-Mechanical Parking Brake Motor to Brake Caliper
- Gasket - Electro-Mechanical Parking Brake Motor to Brake Caliper
Removing
- Loosen the parking brake.
- Switch off the ignition.
- Remove the rear wheel. Refer to → Suspension, Wheels, Steering; Rep. Gr.44; Wheels and Tires.
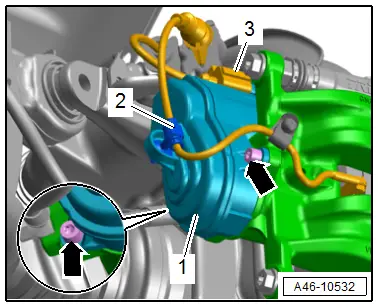
- Disconnect the connector -3- for the parking brake motor.
- Open the clip -2- and free up the brake pad wear indicator wire.
- Remove the bolts -arrows-.
- Remove the parking brake motor -1- from the brake caliper.
- Remove the seal.
Installing
Install in reverse order of removal and note the following:
 Note
Note
Replace the gasket after removal.
- The ring groove for the gasket and the parking brake motor contact surface must not be damaged.
- Clean the parking brake motor ring groove and contact surface.
- Install the new seal.
 Note
Note
Make sure that the gasket is not removed while assembling the parking brake motor.
- Bring the parking brake motor -1- into the installation position at the same time turn the parking brake motor back and forth slightly.
- Tighten the bolts -arrows-.
- The parking brake motor must be flush with the brake caliper. Under no circumstances may it be pulled against the brake caliper with bolts.
 Caution
The threads could be damaged.
- Position the bolts by hand and screw in a few turns.
- If the thread is damaged, the entire brake caliper must be replaced.

- Perform a basic setting after installing:
- Connect the Vehicle Diagnostic Tester to the data link connector on the vehicle with the ignition switched off.
- Switch the ignition on.
- Select diagnostic and start.
- Select the Test plan tab.
- Select the button Individual tests... and select the following tree structures one after the other:
- Suspension
- Brake System
- 01 - OBD-capable systems
- 03 - ABS Control Module J104 integrated parking brake
- 03 - Electric parking brake functions
- 03 - Basic setting
- Start the selected program and follow the instructions in the display of the Vehicle Diagnostic Tester.
 WARNING
Risk of accident!
Make sure the brakes are working correctly before driving the vehicle for the first time.
Tightening Specifications
- Refer to → Chapter "Overview - Parking Brake"
Parking Brake, Manually Loosening
 Note
Note
Due to a mechanical or electrical fault, it may be required to mechanically loosen the parking brake in order to move the vehicle.
Procedure
 WARNING
Risk of accident!
Before removing the parking brake motor, secure the vehicle from rolling away.
- Loosen the parking brake.
- Switch off the ignition.
- Remove the rear wheel. Refer to → Suspension, Wheels, Steering; Rep. Gr.44; Wheels and Tires.
- Disconnect the connector -3- for the parking brake motor.
- Open the clip -2- and free up the brake pad wear indicator wire.
- Remove the bolts -arrows-.
- Remove the parking brake motor -1- from the brake caliper.
- Remove the seal.

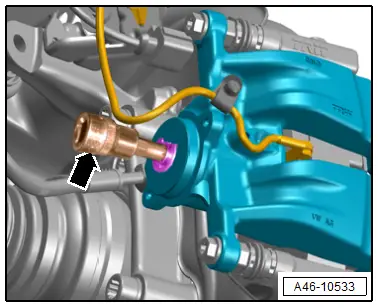
- Using a TX45 socket -arrow-, turn the drive axle back until the brake is loosened.
 Note
Note
After eliminating the fault install the parking brake motor. Refer to → Chapter "Left and Right Parking Brake Motor - V282-/-V283-, Removing and Installing".
Tightening Specifications
- Refer to → Chapter "Overview - Parking Brake"
- Refer to → Suspension, Wheels, Steering; Rep. Gr.44; Wheels and Tires.
