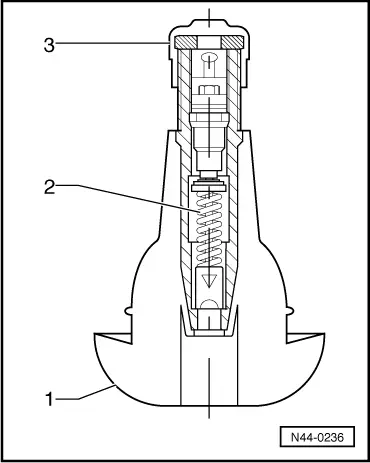
Audi Q7: Rubber Valve

1 - Valve body
2 - Valve Insert
3 - Valve cap
1. The Valve Body
The rubber valve for tubeless tires is designed to seal air-tight in the hole in the rim. The elastic material of the rubber body presses itself tightly into the hole in the rim.
When valves with threaded metal feet are used, a rubber seal is used to seal the rim. The area around the edge of the valve hole is a sealing area. Therefore, they must be free of rust, dirt and damage.
2. The Valve Insert
The valve insert has the most important role in the valve: it seals and makes it possible to regulate the tire pressure. The small plate seal on the valve core can only do its job when it is free of impurities, dirt and moisture.
3. Valve Cap
A valve cap must always be screwed onto the valves. It prevents dirt from getting into the valve. Dirt which may be in the valve would reach the seal of the valve plate when the tire is inflated and cause a leak.
The valve must be replaced every time a new tire is fitted.
If the vehicle is driven without caps on the valves, there is the danger that dirt may get into the valve. This leads to gradual loss of air and therefore lead to the destruction of the tire.
- Separation of shell and rubber
- Wide circumferential furrows in the area of the bead
- Disintegrated tread
 Note
Note
CAUTION! An air-tight seal is ensured only if the valve cap is secured tightly.
 Caution
Do not use valve caps made of aluminum on a valve body made of steel.
Tires, Storing
The storage room
Tire storage must be:
- Dark
- Dry
- Cool
- Ventilated
Stored tires must not come in contact with fuel, oil, grease or chemicals under any circumstances. Otherwise, the material in the tire will be damaged by chemical reactions which are not always visible.
This may lead to life-threatening situations when the car is driven. However, tire damage occurs only when the reaction time of the chemicals is long. If a few drops of fuel land on a tire during a fill-up, this is harmless.
Tire Storage
Complete wheels
Tires mounted on wheels can be stored flat, stacked on upon another. The air pressure should be raised to a maximum of 3 bar.
Tires without rims
Tires without rims are best stored standing upright. If tires lie stacked upon another for longer periods of time, they will be strongly pressed together. This makes mounting more difficult because the tires do not lie on the bead seat. If the tires are stored standing vertically, it is recommended to turn them every 14 days to avoid severe flattening.
Tires, Aging
Tires age as a result of physical and chemical processes whereby the function can be impaired. Tires which are stored for longer periods of time become harder and brittle faster than tires which are constantly in use on a vehicle. Older tires may develop hairline cracks from aging. When tires are in constant use, the kneading activates softeners in the rubber, preventing hardening and the development of cracks.
Therefore, one should note not just the tread depth but also the age of spare tires, stored tires and tires which are not permanently in use. Tire age can be determined from the DOT code which contains, among other things, the tire's production date.
Example of a DOT number:

In this example, the production date is the 50th week in 2002. Through 12/31/1999, the DOT number was a three-digit number.
Recommendation:
- It is recommended using tires more than 6 years old only in emergencies and only with a cautious driving style.
- When new tires are fitted, the spare tire may also be used if it is in flawless condition and is not more than six years old. The age of the tire has a great influence on the high-speed capability of the tire. The combination of a spare tire which is several years old with new tires is possible, but it can influence the car's handling.
- Tires are constantly being further developed, this can lead, for example, to slight changes in the rubber compound, even if the tires are of the same make, size and tread.
- For driving safety reasons, tires of the same make and with the same tread should be mounted on one axle.
- Vehicles with AWD always must be equipped with four wheels that have tires of the same size, construction, tread pattern and make. Excepted are vehicles that were shipped by Audi AG with different sized tires on the front and rear axle.
 Note
Note
- For all four wheels use only tires of the same construction type, size, and tread.
- Excepted are vehicles that were shipped by Audi AG with different sized tires on the front and rear axle.
Tires, Replacing
 Note
Note
We recommend using tires that have "AO" on them. These tires are suited for each Audi model.
Tires must be changed when:
- The legal minimum tread depth of 1.6 mm is reached.
- There is visible damage from mechanical damage.
- The tires are more than six years old.

