Audi Q7: Seals
Left Seal, Replacing
Special tools and workshop equipment required
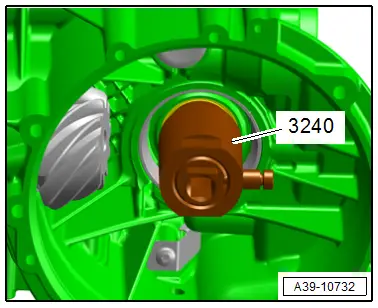
- Puller - Camshaft Seal -3240-
- Engine/Gearbox Jack - Gearbox Support -T10337-
 Caution
This procedure contains mandatory replaceable parts. Refer to component overview prior to starting procedure.
Mandatory Replacement Parts
- O-ring - Front final drive cover
 Note
Note
A defective seal will allow gear oil to enter the torque converter bell housing.
Procedure
 Note
Note
- General repair instructions. Refer to → Chapter "General Repair Information".
- Guidelines for clean working conditions. Refer to → Chapter "Guidelines for Clean Working Conditions".
- Drain the gear oil from front final drive. Refer to → Chapter "Gear Oil, Draining and Filling".
- Remove the right flange shaft. Refer to → Chapter "Right Flange Shaft, Removing and Installing".
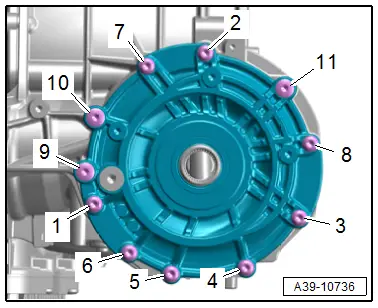
- Remove the bolts from the front final drive cover in the following sequence: -11 to 1-.
- Remove the front final drive cover together with the tapered roller bearing outer race and the shim.
 Note
Note
The shim must be the correct size and must not be replaced by a shim with a different thickness.
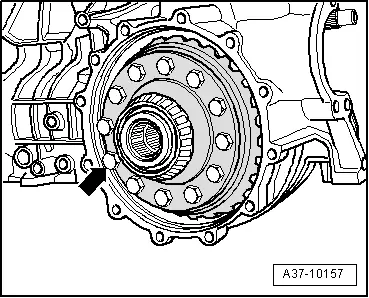
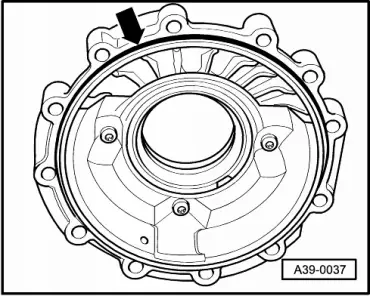
- Remove the differential -arrow-.
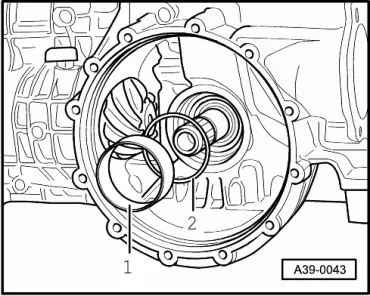
- Remove the outer race for the differential tapered roller bearing -1- and the shim -2- located behind it from the transmission housing by hand.
 Note
Note
The shim must be the correct size and must not be replaced by a shim with a different thickness.
- Remove the left flange shaft slightly from the transmission but do not remove completely. Refer to → Chapter "Left Flange Shaft, Removing and Installing".
- Position the inner section of the Puller - Camshaft Seal -3240- flush with the outer section and lock the inner section using the knurled bolt -arrow-.
- Lubricate the puller threads, position, and using strong pressure insert the puller - camshaft seal as far as possible in the seal until the seal turns.
- Turn the puller - camshaft seal further and at the same time pull until the seal is removed.
- Tension the puller - camshaft seal on the flat side in a vise and remove the seal using pliers.
- Check the seal in the transmission housing for damage and rework if necessary.
- Clean the running and sealing surface.
- Coat the outer circumference of the seal sealing lip with gear oil.
 Note
Note
Push the seal onto the thrust piece so that the projecting sealing lip of seal faces the tool.
- Install the new gasket all the way.

- Insert the shim -2- and the outer race -1- for the differential tapered roller bearing into the transmission housing by hand as far as the stop.

- Replace the O-ring -arrow-.
- Insert the differential into the transmission housing.
If the tapered roller bearing outer race and the shim have fallen out of the front final drive cover:
- Lubricate the shim and tapered roller bearing outer race with gear oil and insert them into the front final drive cover as far as the stop.
- Install the left flange shaft. Refer to → Chapter "Left Flange Shaft, Removing and Installing".
- Tighten the front final drive cover bolts. Refer to → Fig. "Front Final Drive Cover - Tightening Specifications and Sequence".
- Install the right flange shaft. Refer to → Chapter "Right Flange Shaft, Removing and Installing".
- Fill with gear oil in the transmission. Refer to → Chapter "Gear Oil, Draining and Filling".
Right Seal, Replacing
Special tools and workshop equipment required
- Puller - Seal Lever -VW681- or Puller - Crankshaft/Power Steering Seal -T20143/2-
- Used Oil Collection and Extraction Unit -SMN372500-
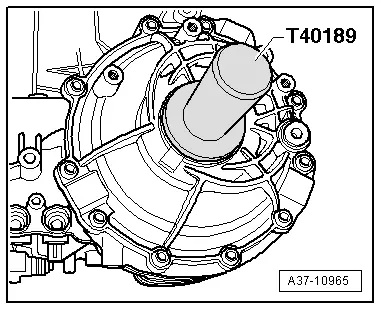
- Seal Installer - Flange Seal -T40189-
 Caution
This procedure contains mandatory replaceable parts. Refer to component overview prior to starting procedure.
Mandatory Replacement Parts
- Seal - Right flange shaft
Procedure
 Note
Note
- General repair instructions. Refer to → Chapter "General Repair Information".
- Guidelines for clean working conditions. Refer to → Chapter "Guidelines for Clean Working Conditions".
- Place the Used Oil Collection and Extraction Unit -SMN372500- under the transmission.
- Remove the right flange shaft. Refer to → Chapter "Right Flange Shaft, Removing and Installing".
- Remove the right flange shaft seal at the same time do not damage the contact surface in the front final drive cover.

- Coat the outer circumference of the new seal with gear oil.
- Installed position: The open side of the seal faces the transmission.
- Install the new gasket all the way. When doing this, do not bend the seal or install it on an angle.
- Install the right flange shaft. Refer to → Chapter "Right Flange Shaft, Removing and Installing".
- Check the gear oil. Refer to → Chapter "Gear Oil, Checking Level, Front Final Drive".