Audi Q7: Seat Pan Cover and Cushion, Removing and Installing
Seat Pan Cover and Cushion, Removing and Installing, Seat without Seat Depth Adjuster
Special tools and workshop equipment required
- Backrest Panel Tool -3370-
 Caution
This procedure contains mandatory replaceable parts. Refer to component overview prior to starting procedure.
Mandatory Replacement Parts
- Upholstery Clip - Cover to Seat Cushion
Removing
 WARNING
- Follow all safety precautions when working on pyrotechnic components. Refer to → Chapter "Safety Precautions for Pyrotechnic Components".
- Before handling pyrotechnic components (for example, connecting the connector), the person handling it must "discharge static electricity". This can be done by briefly touching the door striker pin, for example.
- Observe all measures when installing the front seat. Refer to → Chapter "Front Seat, Removing and Installing".
- Remove the front seat. Refer to → Chapter "Front Seat, Removing and Installing".
- Fasten the front seat on the -VAS6136-. Refer to → Chapter "Front Seat, Mounting on Fixture for Seat Repair".
- Remove the tunnel-side seat side trim. Refer to → Chapter "Seat Side Trim on Tunnel Side, Removing and Installing".
- Remove the side sill side seat side trim and the bracket. Refer to → Chapter "Seat Side Trim On Side Sill Side, Removing and Installing".
- Remove the backrest. Refer to → Chapter "Front Backrest, Removing and Installing".
- Equipped on some models: remove the child seat anchor. Refer to → Chapter "Front Child Seat Anchor, Removing and Installing".
- Versions: observe the Notes for the passenger occupant detection system. Refer to → Chapter "Passenger Occupant Detection System, Removing and Installing".
- Disconnect and free up the connectors. Refer to → Chapter "Modular Wiring Routing, Disconnecting and Connecting".
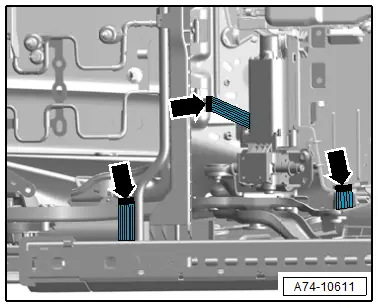
- Detach the molding -1, 2 and 7- of the seat cover in the front and side areas using the -3370-.
- Detach seat cover molding -5- in the rear area using the -3370-.
- Disengage the left and right tab hooks -4 and 6- on the seat pan -3-.
- Remove the seat cover and seat cushion -8- from the seat pan while guiding the seat heating wiring harness.
Installing
 WARNING
- Follow all safety precautions when working on pyrotechnic components. Refer to → Chapter "Safety Precautions for Pyrotechnic Components".
- Before handling pyrotechnic components (for example, connecting the connector), the person handling it must "discharge static electricity". This can be done by briefly touching the door striker pin, for example.
- Observe all measures when installing the front seat. Refer to → Chapter "Front Seat, Removing and Installing".
Install in reverse order of removal.
Installation notes, for example tightening specifications, replacing components. Refer to → Chapter "Overview - Seat Pan Cover and Cushion, Seat without Seat Depth Adjuster".
Seat Bolster Cushion on Seat Pan, Removing and Installing, Seat with Seat Depth Adjuster
Special tools and workshop equipment required
- Backrest Panel Tool -3370-
Removing
 WARNING
- Follow all safety precautions when working on pyrotechnic components. Refer to → Chapter "Safety Precautions for Pyrotechnic Components".
- Before handling pyrotechnic components (for example, disconnecting the connector), the person handling it must "discharge static electricity". This can be done by briefly touching the door striker pin, for example.
- Remove the front seat. Refer to → Chapter "Front Seat, Removing and Installing".
- Fasten the front seat on the -VAS6136-. Refer to → Chapter "Front Seat, Mounting on Fixture for Seat Repair".
- Remove the front seat trim. Refer to → Chapter "Front Seat Trim, Removing and Installing".
- Remove the tunnel-side seat side trim. Refer to → Chapter "Seat Side Trim on Tunnel Side, Removing and Installing".
- Remove the seat side trim on side sill side. Refer to → Chapter "Seat Side Trim On Side Sill Side, Removing and Installing".
- Remove the backrest. Refer to → Chapter "Front Backrest, Removing and Installing".
- Equipped on some models: remove the child seat anchor. Refer to → Chapter "Front Child Seat Anchor, Removing and Installing".
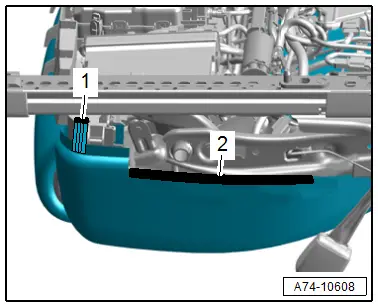
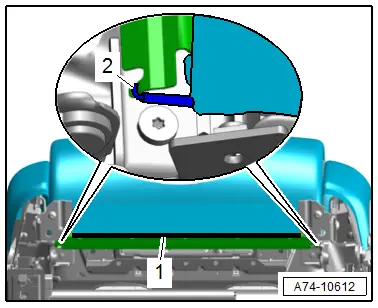
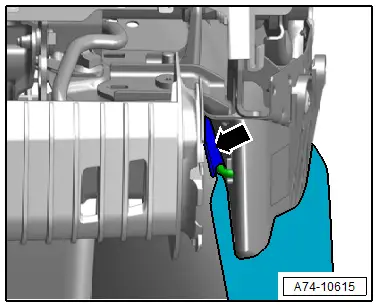
- Disengage the cover molding to the rear of the seat pan -arrow- using the -3370-.
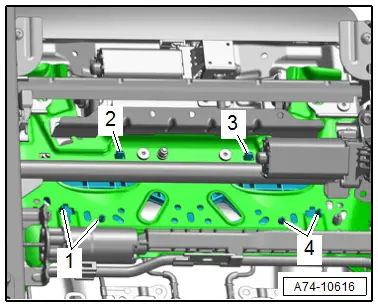
- Disengage the molding on the tunnel side -2- using the -3370-.
- Disengage the tab -1-.
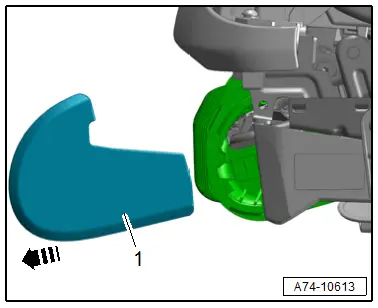
- Disengage the tabs on the tunnel-side -arrows- and pound the cover upward over the seat bolster cushion.
- Disengage the tabs on the side sill side -arrows- and pound the cover upward over the seat bolster cushion.
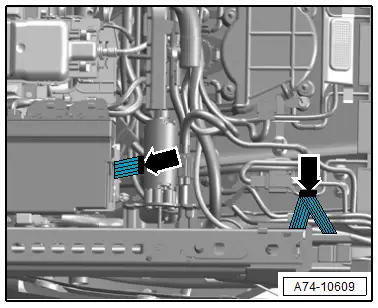
- Equipped on some models: disconnect the connector and free up the wire for the heating element.
- Remove the seat bolster cushion.
Installing
 WARNING
- Follow all safety precautions when working on pyrotechnic components. Refer to → Chapter "Safety Precautions for Pyrotechnic Components".
- Before handling pyrotechnic components (for example, connecting the connector), the person handling it must "discharge static electricity". This can be done by briefly touching the door striker pin, for example.
- Observe all measures when installing the front seat. Refer to → Chapter "Front Seat, Removing and Installing".
Install in reverse order of removal and note the following:
- Versions with seat heating: apply a new backrest heating element when replacing the cushion. Refer to → Chapter "Seat Heating Element, Removing and Installing, Seat Bolster Cushion".
Installation notes, for example tightening specifications, replacing components. Refer to → Chapter "Overview - Seat Pan Cover and Cushion, Seat with Seat Depth Adjuster".
Seat Pan Cover and Cushion, Removing and Installing, Seat with Seat Depth Adjuster
Special tools and workshop equipment required
- Backrest Panel Tool -3370-
Removing
 WARNING
- Follow all safety precautions when working on pyrotechnic components. Refer to → Chapter "Safety Precautions for Pyrotechnic Components".
- Before handling pyrotechnic components (for example, disconnecting the connector), the person handling it must "discharge static electricity". For example, this can be done by briefly touching the door striker.
- Versions: observe the Notes for the passenger occupant detection system. Refer to → Chapter "Passenger Occupant Detection System, Removing and Installing".
- Remove seat bolster cushion. Refer to → Chapter "Seat Bolster Cushion on Seat Pan, Removing and Installing, Seat with Seat Depth Adjuster".
- Remove the seat cushion fan. Refer to → Chapter "Seat Cushion Fan, Removing and Installing".
- Disconnect and free up the connectors. Refer to → Chapter "Modular Wiring Routing, Disconnecting and Connecting".
- Disengage the left and right rubber bands -2- at the seat depth adjuster and secure from sliding back using a cable tie, for example.
- Disengage the molding -1- for the cover on the seat depth adjuster.
- Remove the left and right trim for the seat depth adjuster -1- forward -arrow-.
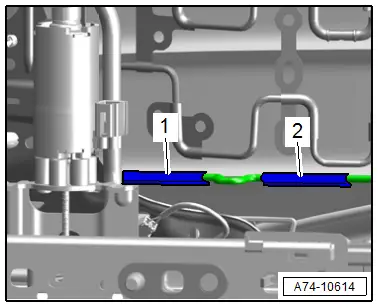
- Disengage the left and right molding for the cover -1 and 2- using the -3370-.
- Disengage the cover molding -arrow- from the front using a screwdriver.
- Release the tabs -2 and 3- and remove the seat cushion retaining plate together with the cover and cushion.
Installing
 WARNING
- Follow all safety precautions when working on pyrotechnic components. Refer to → Chapter "Safety Precautions for Pyrotechnic Components".
- Before handling pyrotechnic components (for example, connecting a connector), the person handling it must "discharge static electricity". For example, this can be done by briefly touching the door striker.
- Follow all the instructions when installing the front seat. Refer to → Chapter "Front Seat, Removing and Installing".
Install in reverse order of removal.
Installation instructions: for example tightening specifications, replacing components. Refer to → Chapter "Overview - Seat Pan Cover and Cushion, Seat with Seat Depth Adjuster".

