Audi Q7: Side Windows
Overview - Rear Side Window
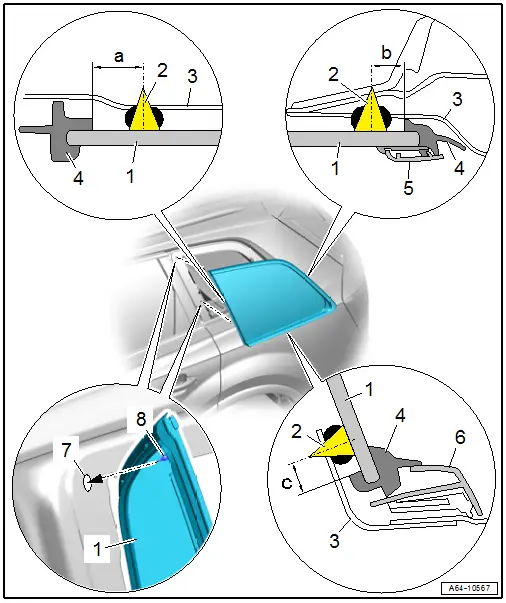
1 - Rear Side Window
- Removing and Installing. Refer to → Chapter "Rear Side Window, Removing and Installing".
- after installing push in first with the retainers -item 8-
2 - Adhesive Bead
- Observe the minimum curing time. Refer to → Chapter "Minimum Curing Times for Bonded Windows".
- Note the different spacing dimensions to window edge
- Dimension -a- = 13 mm.
- Dimension -b- = 8 mm
- Dimension -c- = 13 mm
- Adhesive bead thickness.
3 - Side Panel Window Opening
4 - Molding
- Must not be damaged in the visible area
5 - Trim Molding
6 - Lower trim molding
7 - Securing Hole
8 - Retainer
- No replacement part
- Is cut through when removing the window.
Rear Side Window, Removing and Installing
Undamaged Side Window, Removing
- Follow repair instructions. Refer to → Chapter "Repair Information".
Special tools and workshop equipment required
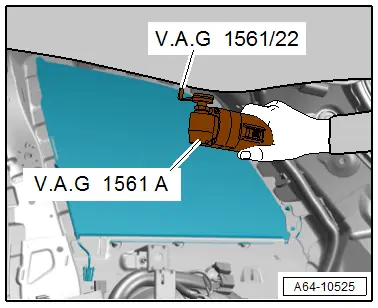
- Window Cutter -VAG1561 A-
- Window Cutter - L Blade (2 pc.) -VAG1561/22-
- Remove the left and right C-pillar trim panel. Refer to → Body Interior; Rep. Gr.70; Vehicle Interior Trim Panels; C-Pillar Trim Panel, Removing and Installing.
- Remove the left and right D-pillar trim panel. Refer to → Body Interior; Rep. Gr.70; Vehicle Interior Trim Panels; C-Pillar Trim Panel, Removing and Installing.
- In the window glass cutting area, protect the side panel and roof against paint damage with adhesive tape.
 WARNING
Risk of injury to the hands and eyes from glass fragments.
Getting cut is possible.
- Wear protective eyewear.
- Wear safety gloves.
- Cut through the adhesive bead from the vehicle interior all around the side window using the -VAG1561A- and -VAG1561/22-. This also cuts through the locating pins on the side window.
- Loosen the trim molding from the side window molding. Refer to → Chapter "Trim Molding, Removing and Installing, Side Window ".
Damaged Side Window, Removing
- Follow repair instructions. Refer to → Chapter "Repair Information".
Special tools and workshop equipment required
- Window Cutter -VAG1561 A-
- Window Cutter - Blade, Offset -VAG1561/10-
- Remove the left and right C-pillar trim panel. Refer to → Body Interior; Rep. Gr.70; Vehicle Interior Trim Panels; C-Pillar Trim Panel, Removing and Installing.
- Remove the left and right D-pillar trim panel. Refer to → Body Interior; Rep. Gr.70; Vehicle Interior Trim Panels; C-Pillar Trim Panel, Removing and Installing.
- In the window glass cutting area, protect the side panel and roof against paint damage with adhesive tape.
 WARNING
Risk of injury to the hands and eyes from glass fragments.
Getting cut is possible.
- Wear protective eyewear.
- Wear safety gloves.
- Protect the body and vehicle interior from glass splinters.
- Tape off the flange all the way around with fabric-reinforced adhesive tape.
- Remove the glass pieces up to the adhesive sealant.
- Slide the protective film (for example from -VAS6452-) between the trim panels and the window rests.
- Cut through the adhesive sealant (with glass remnants) in the opening for the window using a -VAG1561A- and -VAG1561/10- (with stopper roll).
- Loosen the trim molding from the side window molding. Refer to → Chapter "Trim Molding, Removing and Installing, Side Window ".
Side Window, Installing
- Follow repair instructions. Refer to → Chapter "Repair Information".
- Necessary Tools and Materials for Removing and Installing. Refer to → Chapter "Necessary Tools and Materials for Removing and Installing".
- Prepare the new window glass for installation. Refer to → Chapter "New Window Glass, Preparing for Installation".
- Prepare the undamaged window glass for installing. Refer to → Chapter "Undamaged Window Glass, Preparing for Installation".
- Prepare the body flange for installation. Refer to → Chapter "Body Flange, Preparing for Installation".
- Use One-Part Window Adhesive -DH 009 100 03- (small cartridge). If more than one window glass must be installed, the Two-Part Window Adhesive Kit -D 004 660 M2- can also be used.
- Insert the new window glass into the opening for the window and first press it onto the C-pillar with the locating pins, and then press it onto the D-pillar with the locating pin.
- On windows without a locating pin, align the window lengthwise to the edge on the side panel and then insert it into the cut-out for the window.
- Install the lower trim molding into the clips on the side panel and then center the window glass. Refer to → Chapter "Trim Molding, Removing and Installing, Side Window ".
- Secure the window in window opening with adhesive tape.
- Observe minimum curing times. Refer to → Chapter "Minimum Curing Times for Bonded Windows".
Further installation is the reverse order of removal.

