Audi Q7: Speaker Trim, Removing and Installing, in Door Trim Panels
Special tools and workshop equipment required
- Drill
- Drill 3.0 mm diameter, 6.5 mm diameter
- Protective Eyewear
Removing
- Remove the door trim panel. Refer to → Chapter "Rear Door Trim Panel, Removing and Installing".
- Place the trim panel on a soft surface.
- Remove the insulation mat.
 Caution
Risk of damaging the door trim panel.
Be extremely careful when drilling.
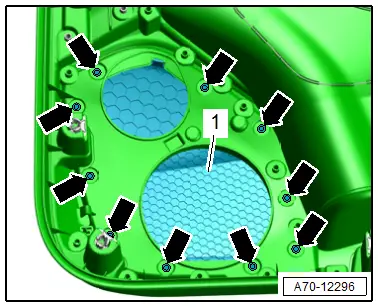
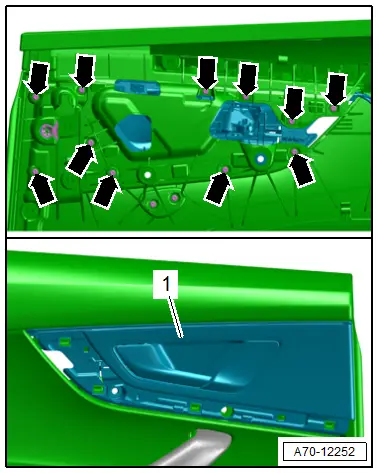
- Using a 6.5mm drill bit, drill out the speaker trim attachment points -arrows- from the door trim panel, just until the speaker trim begins to loosen from the door trim panel.
- Carefully loosen the attachment points one after another and remove the speaker trim -1- from the door trim panel.
Installing
Install in reverse order of removal and note the following:
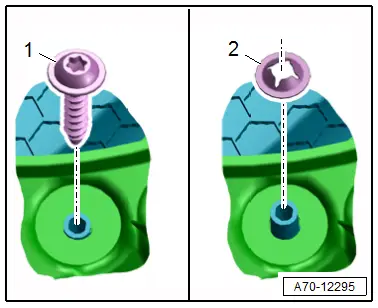
- When using a speaker trim that has already been welded, drill the screw holes to a 3.0 mm diameter and secure with a screw -1-.
- Insert the new speaker trim into the door trim panel and secure the plastic domes with lock washers -2-.
Installation notes, for example tightening specifications, replacing components. Refer to → Chapter "Overview - Rear Door Trim Panel".
Trim Molding, Removing and Installing
Special tools and workshop equipment required
- Wedge Set -T10383-
Removing
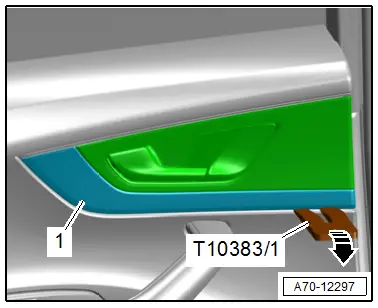
- Unclip the trim -1- using the -T10383/1- in direction of -arrow-, disengage the trim at the door trim panel and remove it.
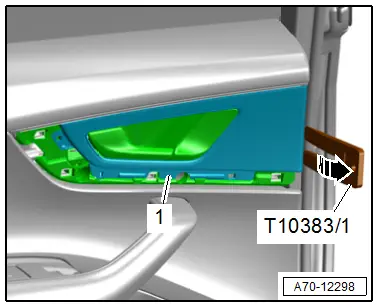
- Unclip the trim -1- with the -T10383/1- in direction of -arrow- and remove it.
Installing
Install in reverse order of removal.
Installation notes, for example tightening specifications, replacing components. Refer to → Chapter "Overview - Rear Door Trim Panel".
Interior Door Mechanism, Removing and Installing
Removing
- Remove the door trim panel. Refer to → Chapter "Rear Door Trim Panel, Removing and Installing".
- Place the trim panel on a soft surface.
- Remove the insulation mat.
- Disconnect the connectors at the rear of the door trim panel.
- If equipped, remove the ambient lighting lamp. Refer to → Electrical Equipment; Rep. Gr.96; Lamps; Component Location Overview - Door Ambient Lighting.
- Remove the bolts -arrows-.
- Pull the interior door mechanism -1- from the door trim panel and remove it.
Installing
Install in reverse order of removal.
Installation notes, for example tightening specifications, replacing components. Refer to → Chapter "Overview - Rear Door Trim Panel".

