Audi Q7: Overview - Instrument Panel
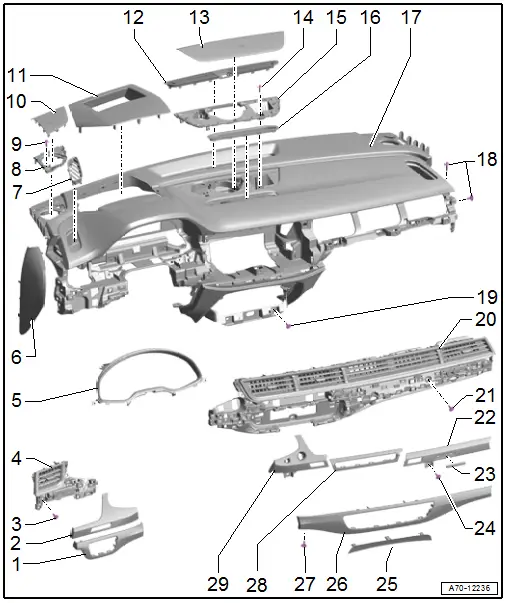
1 - Light Switch Trim
- Removing and Installing. Refer to → Chapter "Light Switch Trim, Removing and Installing".
- Press on until it engages audibly
2 - Instrument Panel Decorative Trim, Driver Side
- Removing and Installing. Refer to → Chapter "Instrument Panel Decorative Trim, Removing and Installing, Driver Side".
- Press on until it engages audibly
3 - Bolts
- 3 Nm
- Quantity: 2
4 - Driver Side Instrument Panel Vent
- Removing and Installing. Refer to → Chapter "Driver Side Instrument Panel Vent, Removing and Installing".
- Press on until it engages audibly
5 - Instrument Cluster Trim
- Removing and Installing. Refer to → Chapter "Instrument Cluster Trim, Removing and Installing".
6 - Instrument Panel Side Cover
- Removing and Installing. Refer to → Chapter "Instrument Panel Side Cover, Removing and Installing".
- Press on until it engages audibly
7 - Side Defroster Vent
- Removing and Installing. Refer to → Chapter "Side Defroster Vent, Removing and Installing".
- Press on it until it locks
8 - Speaker Mount
- Removing and Installing. Refer to → Chapter "Speaker Mount, Removing and Installing".
9 - Bolt
- 3 Nm
10 - Outer Speaker Trim
- Removing and Installing. Refer to → Chapter "Speaker Trim, Removing and Installing".
- Press on until it engages audibly
11 - Windshield Projection Trim
- Equipped on some models
- Removing and Installing. Refer to → Chapter "Windshield Projection (Head-Up Display) Trim, Removing and Installing".
- Press on until it engages audibly
12 - Front Center Defroster Vent
- Removing and Installing. Refer to → Chapter "Front Center Defroster Vent, Removing and Installing".
- Press on until it engages audibly
13 - Speaker in Center Trim
- Removing and Installing. Refer to → Chapter "Speaker Trim, Removing and Installing".
- Press on until it engages audibly
14 - Bolt
- 3 Nm
15 - Speaker Mount
- Removing and Installing. Refer to → Chapter "Speaker Mount, Removing and Installing".
16 - MMI Screen Cover
- Removing and Installing. Refer to → Chapter "MMI Screen Cover, Removing and Installing".
- Press on until it engages audibly
17 - Instrument Panel
 WARNING
- Follow all safety precautions when working on pyrotechnic components. Refer to → Chapter "Safety Precautions for Pyrotechnic Components".
- Note the allocation of the airbag to the instrument panel. Refer to the Parts Catalog.
- Removing and Installing. Refer to → Chapter "Instrument Panel, Removing and Installing".
18 - Bolts
- 3 Nm
- Quantity: 2 on the left and right side
19 - Bolt
- 3 Nm
- Quantity: 6
20 - Front Passenger Side Instrument Panel Vent
- Removing and Installing. Refer to → Chapter "Passenger Side Instrument Panel Vent, Removing and Installing".
- Press on until it engages audibly
21 - Bolt
- 3 Nm
- Quantity: 6
22 - Instrument Panel Decorative Trim, Front Passenger Side
- Removing and Installing. Refer to → Chapter "Instrument Panel Decorative Trim, Removing and Installing, Front Passenger Side".
- Press on until it engages audibly
23 - Emblem
- attached using lock washers on the decorative trim
24 - Bolt
- 3 Nm
25 - Instrument Panel Trim
- Removing and Installing. Refer to → Chapter "Instrument Panel Trim, Removing and Installing".
- Press on until it engages audibly
26 - A/C Display Control Head Trim
- Removing and Installing. Refer to → Chapter "Display Control Head Trim, Removing and Installing".
- Press on until it engages audibly
27 - Bolt
- 3 Nm
- Quantity: 3
28 - Instrument Panel Decorative Trim, Center
- For the Switch Module in Instrument Panel, Center -EX22-
- Removing and Installing. Refer to → Chapter "Instrument Panel Decorative Trim, Removing and Installing, Center".
- Press on until it engages audibly
29 - Access/Start Authorization Switch Trim
- Removing and Installing. Refer to → Chapter "Access/Start Authorization Switch Trim, Removing and Installing".
- Press on until it engages audibly
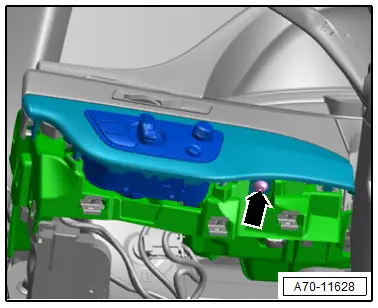
Tightening Specification - Light Switch Trim
- Tighten the screw -arrow- to 3 Nm.