Audi Q7: Wheels and Tires, General Information
Only install tires with the same manufacturer, construction type and tread on all wheels.
Always replace rubber valve when replacing steel wheel or rim.
Install tires with DOT identification facing toward outside of wheel. Only applies to left side of vehicle with directional tires.
With directional tires, a wheel/tire combination for the right side should be installed as a spare wheel.
Light Alloy Wheels Component Overview
 Note
Note
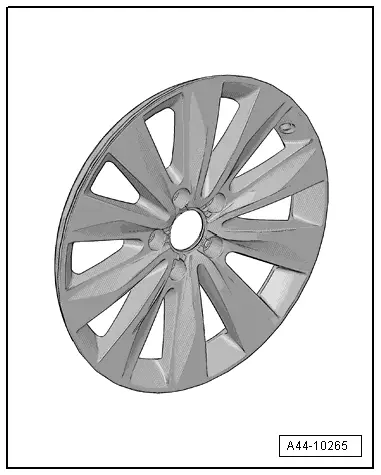
- Be careful not to scratch off the glued- on wheel trim on these rims.
- The surface of the wheel trim is very sensitive.
- The rim will have be replaced if the wheel trim is damaged.
- The wheel trim cannot be replaced.
Light alloy wheels assembly overview.
Changing/mounting wheel, assembly information. Refer to → Chapter "Wheel, Changing and Mounting".

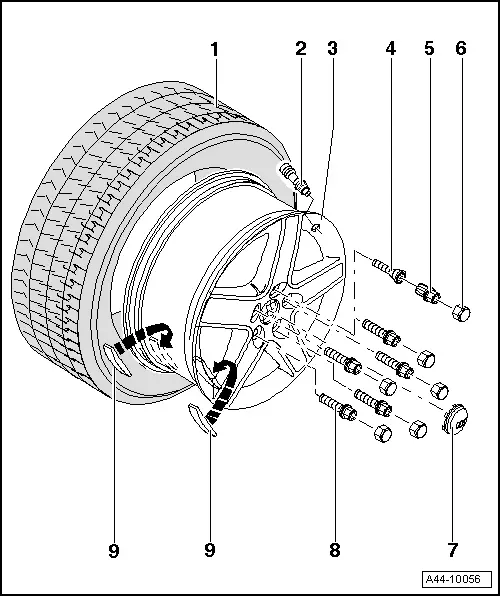
1 - Tires
2 - Valve
- Always replace
- Only install valve according to the Parts Catalog
3 - Wheel
- Note assembly instructions. Refer to → Chapter "Wheel, Changing and Mounting"
4 - Wheel Bolt
- Note assembly instructions. Refer to → Chapter "Wheel, Changing and Mounting"
- Anti-theft wheel bolts. Refer to → Fig. "Anti-Theft Wheel Bolts"
- Refer to → Chapter "Wheel Bolt Tightening Specifications"
5 - Wheel Bolt Adapter
- Place on wheel bolt designed for it. Refer to → Fig. "Anti-Theft Wheel Bolts"
6 - Wheel Bolt Cover Cap
7 - Cap
8 - Wheel Bolt
 Note
Note
Make sure the correct wheel bolts are installed. Refer to the Parts Catalog
- Note assembly instructions. Refer to → Chapter "Wheel, Changing and Mounting"
- Refer to → Chapter "Wheel Bolt Tightening Specifications"
9 - Adhesive Balancing Weights
- Maximum 60 grams per rim flange permitted
- Clean wheel where it will be adhered so it is free of dirt and grease
- Remove protective film
- Attach balance weights to intended surfaces
Component Overview - Run-Flat Tire (PAX)
 Caution
It is mandatory for run-flat tires to have a tire pressure monitoring system in the vehicle.
 Note
Note
- Be careful not to scratch off the glued- on wheel trim on these rims.
- The surface of the wheel trim is very sensitive.
- The rim will have be replaced if the wheel trim is damaged.
- The wheel trim cannot be replaced.
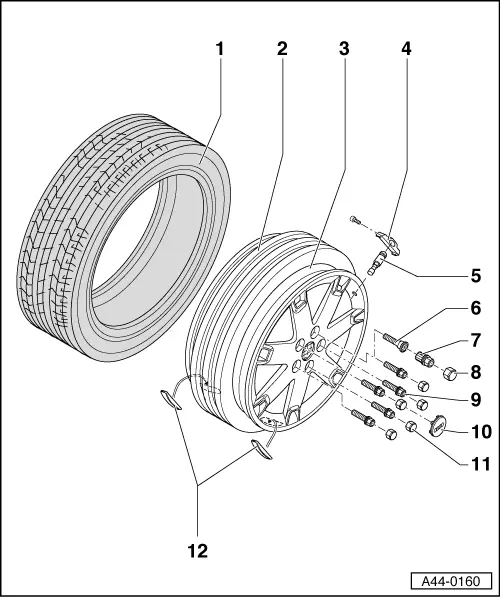
1 - PAX Tires
2 - Support Ring
3 - Wheel for PAX Tires
- Note assembly instructions. Refer to → Chapter "Wheel, Changing and Mounting"
4 - Wheel Electronics
- Batteries must be completely replaced.
- Remaining battery life, temperature and pressure can be read via diagnosis with Vehicle Diagnostic Tester.
Beru wheel electronics system. Refer to → Chapter "Wheel Electronics System (Tire Pressure Monitoring System), Beru ".
Siemens wheel electronics system. Refer to → Chapter "Wheel Electronics System (Tire Pressure Monitoring System), Siemens ".
5 - Metal Valve Body
- Only install valve according to Parts Catalog
- Delivered complete
6 - Wheel Bolt
 Note
Note
Make sure the correct wheel bolts are installed. Refer to the Parts Catalog.
- Note assembly instructions. Refer to → Chapter "Wheel, Changing and Mounting"
- Anti-theft wheel bolts. Refer to → Fig. "Anti-Theft Wheel Bolts"
- Refer to → Chapter "Wheel Bolt Tightening Specifications"
7 - Wheel Bolt Adapter
- Place on wheel bolt designed for it. Refer to → Fig. "Anti-Theft Wheel Bolts"
8 - Cap
- Place on wheel bolt
9 - Wheel Bolt, Two-Part
- Note assembly instructions. Refer to → Chapter "Wheel, Changing and Mounting"
- Refer to → Chapter "Wheel Bolt Tightening Specifications"
10 - Cap
11 - Wheel Bolt Cover Cap
12 - Adhesive Balancing Weights
- Maximum 60 grams per rim permitted
- Clean wheel where it will be adhered so it is free of dirt and grease
- Remove protective film
- Attach balance weights to intended surfaces

