Audi Q7: Closing Assist Motor, Removing and Installing
Removing
- Remove the front door trim panel. Refer to → Body Interior; Rep. Gr.70; Front Door Trim Panels; Front Door Trim Panel, Removing and Installing.
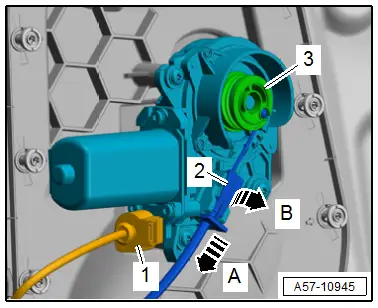
- Disconnect the connector -1-.
- Release the catch -arrow B- on the cable -2- downward from the support bracket -arrow A-.
- Disengage the cable on the closing assist motor -3-.
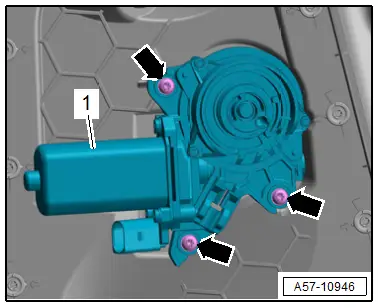
- Remove the bolts -arrows- and the closing assist motor -1-.
Installing
Install in reverse order of removal and note the following:
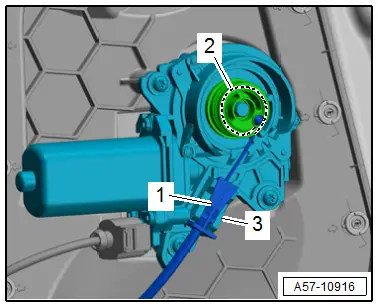
- Wind the cable -1- on the closing assist motor -2- and engage on the support bracket -3- until it clicks into place.
Tightening Specifications
- Refer to → Chapter "Overview - Door Lock and Striker, Versions with Closing Assist"
Window Guide, Removing and Installing
Removing
- Remove the B-pillar trim. Refer to → Chapter "Door B-Pillar Trim, Removing and Installing".
- Remove the door window. Refer to → Chapter "Front Door Window, Removing and Installing".
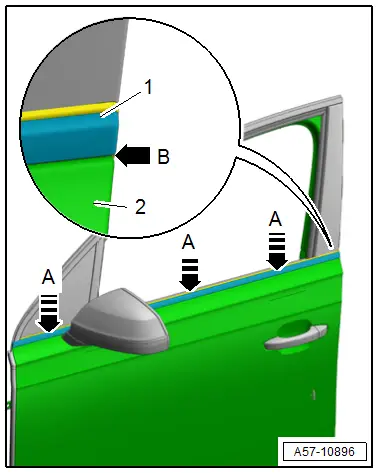
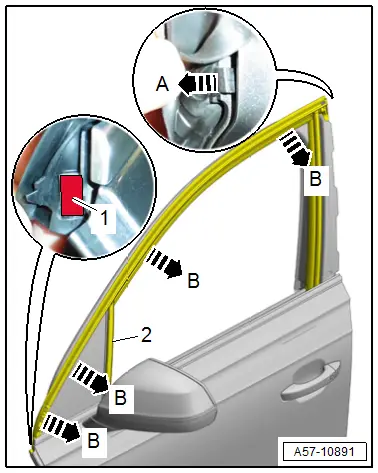
- Free up the window guide -2- on the fixed front door window and loosen it from the front bonding -1-.
- Starting at the front of the window guide remove first outward from the door flange -B arrows- and toward the rear from the guide -arrow A-.
Installing
- Engage the window guide -2- on the rear door flange -arrow A-.
- Starting at the back push on the window guide -C arrows- and then in the guide on the fixed front door window.
- Remove the protective film from the adhesive tape -1- and apply the front window guide at the same time the lower raised section of the door panel must engage -arrow A-.
Further installation is the reverse order of removal.

Inner Window Shaft Strip, Removing and Installing
Removing
- Remove the front window frame trim panel. Refer to → Body Interior; Rep. Gr.70; Front Door Trim Panels; Window Frame Trim Panel, Removing and Installing.
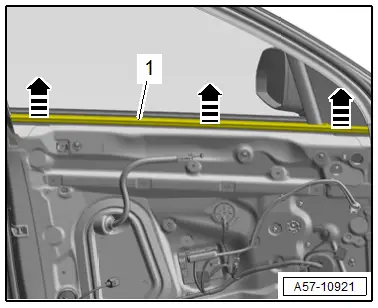
- Remove the window shaft strip -1- upward -arrows-.
Installing
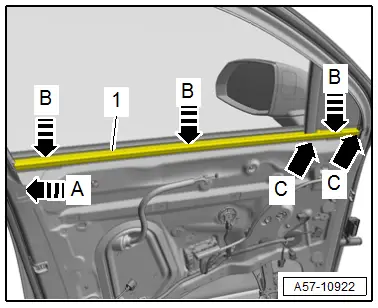
- Place the window shaft strip -1- on the ridge to the fixed front door window and A-pillar -C arrows-.
- Push the window shaft strip to the B-pillar to the stop -arrow A-.
- Push the window shaft strip begging from the B-pillar completely on the door flange -B arrows-.
Further installation is the reverse order of removal.
Outer Window Shaft Strip, Removing and Installing
Special tools and workshop equipment required
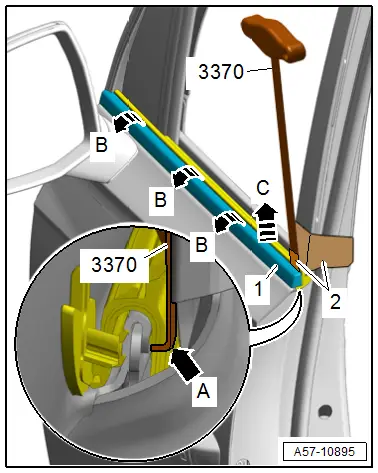
- Backrest Panel Tool -3370-
Removing
- Move the door window into the "open" position.
- Loosen the window guide -2- from the front bonding -1-.
- Remove the front window guide outward from the door flange -arrow-.
- To prevent damage, tape off the -3370- and the B-pillar trim with adhesive tape -2-.
- Guide the -3370- from behind in the window shaft strip -1--arrow A-.
- Remove the window shaft strip with the -3370- carefully in the rear area upward from the door flange -arrow C-.
- Remove the window shaft strip with both hands to the A-pillar from the door flange -B arrows-.
Installing
 Note
Note
The lower edge of the window shaft strip can be coated with tire mounting paste for installation.
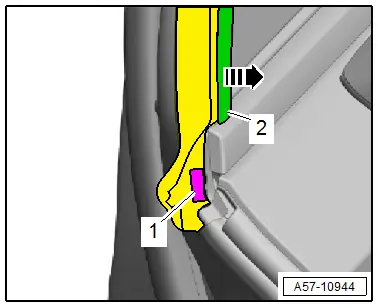
- Align the window shaft strip -1- flush to the door body -2--arrow B- and attach it on the door flange all the way to the A-pillar -A arrows-.
Further installation is the reverse order of removal.