Audi Q7: Front Brake Pads, Removing and Installing
Special tools and workshop equipment required
- Piston Resetting Tool -T10145-
- Lithium Grease -G 052 150 A2-. Refer to the Parts Catalog.
 Caution
This procedure contains mandatory replaceable parts. Refer to component overview prior to starting procedure.
Mandatory Replacement Parts
- Brake Pad Wear Indicator Wire - Replace when pads are replaced.
- Brake Pad Retaining Plate - Replace when pads are replaced.
- Brake Pad Spring - Replace when pads are replaced.
Removing
- Remove the brake caliper. Refer to → Chapter "Brake Caliper, Removing and Installing".
- Free up the wire for the brake pad wear contact -1-, to do so open the protective cap -3- and disengage the wire from the brake caliper -arrows-.
 Note
Note
Ignore item -2-.

 Note
Note
Label the brake pads that will be used again when removing. Install in the same position, otherwise the braking effect will be uneven.
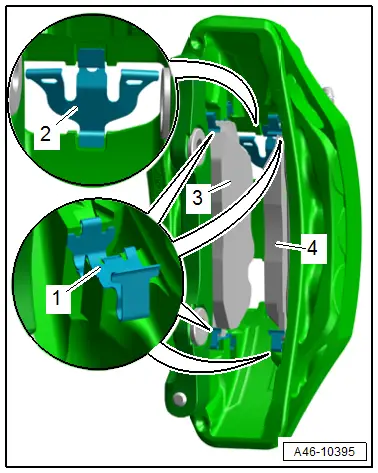
- Remove the brake pads -3 and 4- one after the other toward the center of the brake caliper.
- Unclip the brake pad retaining plate -1-.
- When the brake pads are being replaced, unclip the brake pad spring -2-.

 Note
Note
- If reusing the brake pads check the brake pad spring and the brake pad retaining plate for damage, if necessary replace.
- Do not change the shape of the brake pad spring and brake pad retaining plate.
Installing
Install in reverse order of removal and note the following:
- When the brake pads are replaced, check the brake rotors for wear and damage:
- Brake rotor wear limit. Refer to → Chapter "Technical Data".
 Note
Note
- Always replace brake pads on the same axle at the same time.
- Replacing the brake pad wear indicator wire.
- Use the complete repair kit when installing new brake pads.
 WARNING
Health Risk.
Do not blow out brake system with compressed air.
 Note
Note
- Use only mineral spirits to clean the brake caliper.
- Check the protective caps of the brake caliper pistons for damage and install the complete repair kit, if necessary. Refer to → Chapter "Dust Cap, Removing and Installing".
 Caution
Danger of contamination and paint damage from escaping brake fluid.
- If the brake pads are worn out and unnecessary brake fluid was filled, the brake fluid may overflow, when the brake caliper pistons in the brake cylinders are pressed back.
- Check the brake fluid level before pressing back the brake caliper pistons. If there is brake fluid up to the "MAX" mark, some brake fluid will need to be extracted.
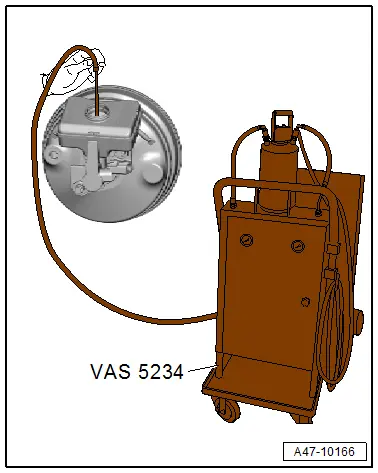
- Use the Brake Charger/Bleeder Unit -VAS5234- to extract brake fluid from brake fluid reservoir.
- Use the Piston Resetting Tool -T10145- to press the brake caliper piston completely back into the brake caliper.
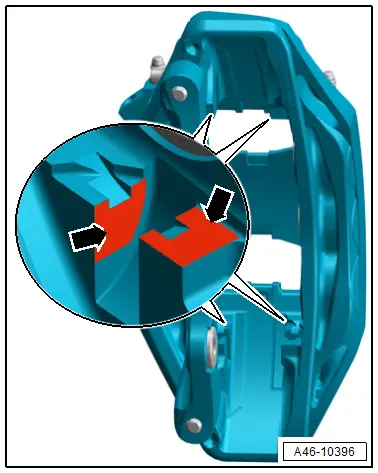
- Clean the brake caliper at the contact surfaces -arrows- for the brake pad retaining plate and thinly coat with Lithium Grease -G 052 150 A2-.
- Clip the brake pad spring -2- and brake pad retaining plate -1- in the brake caliper.
- The brake pad spring must be completely locked into the brake caliper.
- If re-using, install the marked brake pads in the same location.
- Pay attention to the installation position on new brake pads. Refer to → Fig. "Brake Pads Installation Position".
- Insert the brake pads -3 and 4- in succession into the brake caliper by pressing each brake pad against the brake pad spring and pushing them all the way onto the brake pad retaining plate.
 Note
Note
- Make sure the brake hose is routed correctly.
- Make sure the brake hose is not blocked, bent, twisted or rubbing against the vehicle.
- Install the brake pad wear indicator wire. Refer to → Chapter "Brake Pad Wear Indicator Wire, Removing and Installing".
- Install the brake caliper. Refer to → Chapter "Brake Caliper, Removing and Installing".
- Check brake fluid level, and fill if necessary.
 WARNING
Risk of accident!
- With the vehicle stationary, firmly press the brake pedal several times so that the brake pads in the operating condition properly set in their respective position.
- Make sure the brakes are working correctly before driving the vehicle for the first time.
Tightening Specifications
- Refer to → Chapter "Overview - Front Brakes"

