Audi Q7: Front Doors, Central Locking System
Overview - Fuel Filler Door Unit
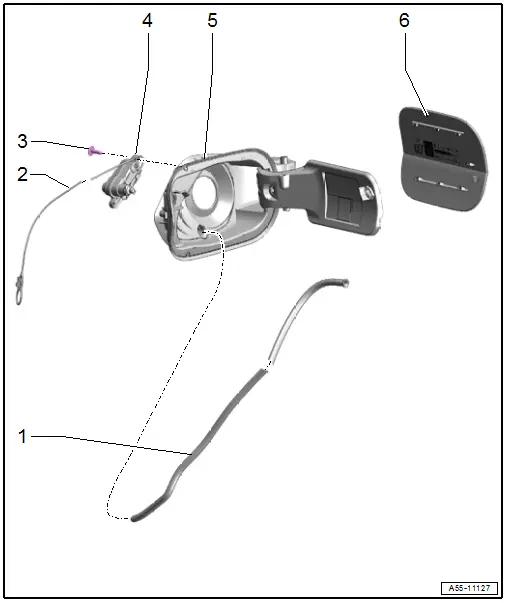
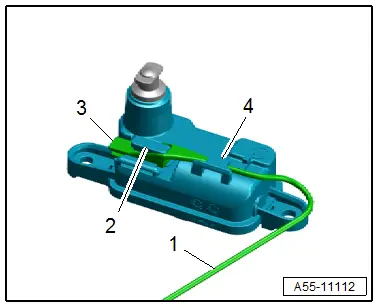
1 - Drain Hose
- For the fuel filler door unit
- Removing and Installing. Refer to → Chapter "Fuel Filler Door Unit Drain Hose, Removing and Installing".
2 - Cable
- For the fuel filler door locking mechanism
- Removing and Installing. Refer to → Chapter "Cable for Fuel Filler Door Locking Mechanism, Removing and Installing".
3 - Bolt
- 1.5 Nm
- Quantity: 2
4 - Fuel Filler Door Lock Motor -V155-
- Removing and Installing. Refer to → Chapter "Fuel Filler Door Lock Motor -V155-, Removing and Installing".
5 - Fuel Filler Door Unit
- Replace after removing
- Removing and Installing. Refer to → Chapter "Fuel Filler Door Unit, Removing and Installing".
6 - Fuel Filler Door Trim
- Removing and Installing. Refer to → Chapter "Fuel Filler Door Unit Trim, Removing and Installing".
Fuel Filler Door Unit, Removing and Installing
 Caution
This procedure contains mandatory replaceable parts. Refer to component overview prior to starting procedure. Refer to → Chapter "Overview - Fuel Filler Door Unit"
Removing
- Free up the cable in the luggage compartment.
- Detach the rear section of the right wheel housing liner and push it aside. Refer to → Chapter "Rear Wheel Housing Liner, Removing and Installing".
- Free up the drain hose -1--arrows-.
- Remove the fuel filler door trim. Refer to → Chapter "Fuel Filler Door Unit Trim, Removing and Installing".

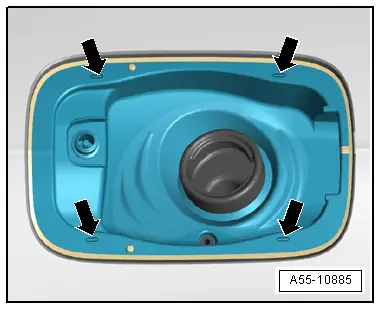
- Release the fuel filler door unit at the markings. To do so puncture the respective marks designated with the -arrows- with a small screwdriver.
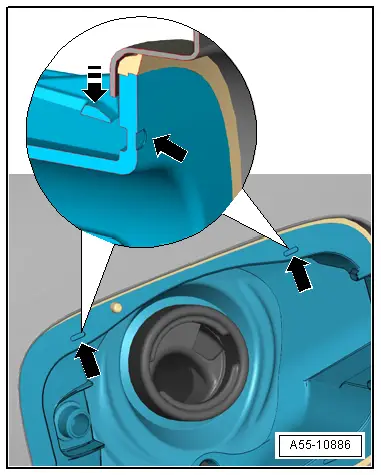
- At the top of the fuel filler door unit, pierce a small screwdriver through the fuel filler door markings over the retainers at an angle from below -in the direction of the arrow-.
- Gently lift the screwdriver upward and release the retainers.
- On the underside, pierce the screwdriver at the markings at an angle from above to below.
- Gently push the screwdriver downward and release the retainers.
- Remove the fuel filler door unit with the drain hose gradually from the opening.
- Disconnect the connector.
- Remove the fuel filler door unit while guiding out the emergency release cable.
Installing
Install in reverse order of removal and note the following:
- Insert the hinge side of the fuel filler door unit first into the fuel filler door opening and push it in until it clicks into place.
Fuel Filler Door Unit Trim, Removing and Installing
Removing
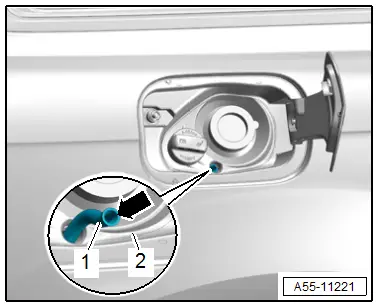
- Open the fuel filler door.
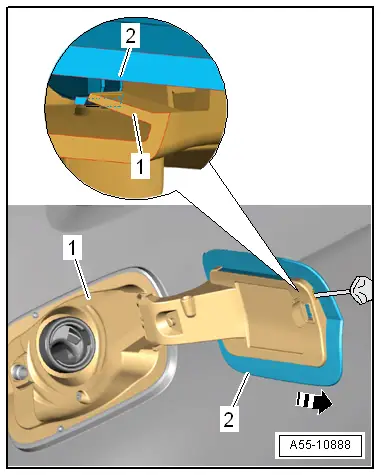
- Release the clips with a screwdriver in the gap between the trim -2- and the fuel filler door -1-.
- Pull the trim slightly toward the rear from the fuel filler door -arrow- and remove it.
Installing
Install in reverse order of removal and note the following:
- The guides on the trim -2- must be positioned behind the mounts -arrows- when placing on the fuel filler door -1-.
- Slide the trim forward until the clips audibly engage.

Fuel Filler Door Unit Drain Hose, Removing and Installing
Removing
- Detach the rear section of the right wheel housing liner and push it aside. Refer to → Chapter "Rear Wheel Housing Liner, Removing and Installing".
- Free up the drain hose -1--arrows-.
- Remove the drain hose upward from the fuel filler door unit.
Installing
Install in reverse order of removal and note the following:

- Insert the drain hose -1- from above into the fuel filler door cup -2-.
- The collar -arrow- on the drain hose must be on top.
- Insert the drain hose into the mount.
Cable for Fuel Filler Door Locking Mechanism, Removing and Installing
Removing
- Remove the fuel filler door unit. Refer to → Chapter "Fuel Filler Door Unit, Removing and Installing".
- Remove the fuel filler door lock motor. Refer to → Chapter "Fuel Filler Door Lock Motor -V155-, Removing and Installing".
- Thread the cable -1- out of the guide -4-.
- Disengage the tab -3- on the emergency release mount -2- and remove it from the cable bracket.
Installing
Install in reverse order of removal.

