Audi Q7: Gear Oil, Draining and Filling
Gear Oil, Draining and Filling, Front Final Drive
Special tools and workshop equipment required
- Used Oil Collection and Extraction Unit -SMN372500-
- Pressurized Gearbox Oil Filler Kit -VAS6617-
- Protective Eyewear
Draining
- The engine is off.
- Move the vehicle onto a 4-column shop hoist or over a work pit so it is completely level.
- Transmission is in "P".
- The parking brake button is pressed to activate the electro-mechanical parking brake.
 Note
Note
- General repair instructions. Refer to → Chapter "General Repair Information".
- Guidelines for clean working conditions. Refer to → Chapter "Guidelines for Clean Working Conditions".
- Follow all applicable disposal regulations.
- Replace the drain plug with the gasket.
- Replace the plug for the inspection and fill hole.
- Remove the center or rear noise insulation. Refer to → Body Exterior; Rep. Gr.66; Noise Insulation; Noise Insulation, Removing and Installing.
- Place the Used Oil Collection and Extraction Unit -SMN372500- under the transmission.
 WARNING
Danger of eye injury.
Wear protective eyewear.
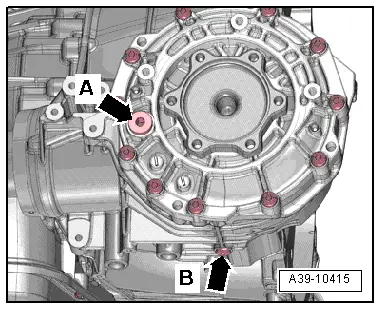
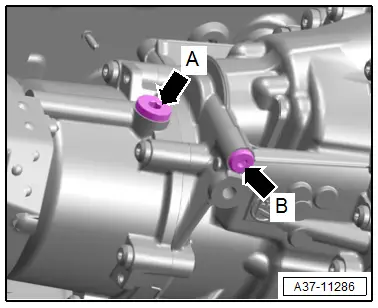
- Remove the drain plug -arrow B- from the front final drive and drain the transmission fluid.
 Caution
Risk of damaging the transmission.
Do not start the engine if there is no gear oil in the front final drive.
- Install the new fill/check plug -arrow B-.
Filling and Adjusting
- Gear oil temperature: approximately 20 ºC (68 ºF) (room temperature).
- Place the Used Oil Collection and Extraction Unit -SMN372500- under the transmission.
 WARNING
Danger of eye injury.
Wear protective eyewear.
- Remove the fill/check plug -arrow A- from the front final drive.

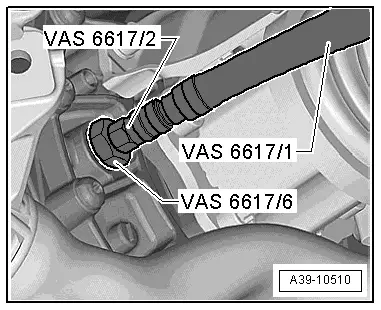
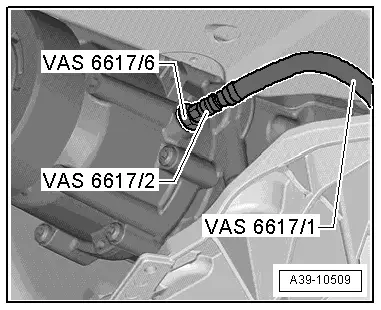
- Install the Pressurized Gearbox Oil Filler - Adapter 6 -VAS6617/6- with the Pressurized Gearbox Oil Filler Kit -VAS6617/2- in the inspection and fill hole in the front final drive.
- Connect the Pressurized Gearbox Oil Filler Kit -VAS6617- and fill the front final drive with approximately 1.0 liters (1.05 quarts) of gear oil.
- Transmission fluid. Refer to the Parts Catalog.
- Wait five minutes.
 Note
Note
A waiting time of at least five minutes is required so that the internal oil level between the differential and oil fill space can equalize.
- Remove the Pressurized Gearbox Oil Filler - Adapter 6 -VAS6617/6- from the transmission and let any extra gear oil drain out.
- Tighten the new fill/check plug -arrow A- for the front final drive.

 Note
Note
It is not necessary to check the oil level again at this stage.
- Thoroughly clean the subframe crossbrace.
Tightening Specifications
- Refer to → Body Exterior; Rep. Gr.66; Noise Insulation; Overview - Noise Insulation.
Gear Oil, Draining and Filling, Transfer Case
Special tools and workshop equipment required
- Used Oil Collection and Extraction Unit -SMN372500-
- Pressurized Gearbox Oil Filler Kit -VAS6617-
- Engine and Gearbox Jack -VAS6931-
- Engine/Gearbox Jack - Gearbox Support -T10337-
- Protective Eyewear
Draining
- The engine is off.
- Move the vehicle onto a 4-column shop hoist or over a work pit so it is completely level.
- Transmission is in "P".
- The parking brake button is pressed to activate the electro-mechanical parking brake.
 Note
Note
- General repair instructions. Refer to → Chapter "General Repair Information".
- Guidelines for clean working conditions. Refer to → Chapter "Guidelines for Clean Working Conditions".
- Follow all applicable disposal regulations.
- Replace the drain plug with the gasket.
- Replace the plug for the inspection and fill hole.
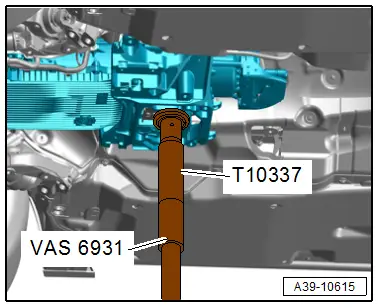
- Mount the Engine/Gearbox Jack - Gearbox Support -T10337- on the Engine and Gearbox Jack -VAS6931- and attach it under the transmission mount.
- Slightly lift the transmission with the engine and transmission jack.
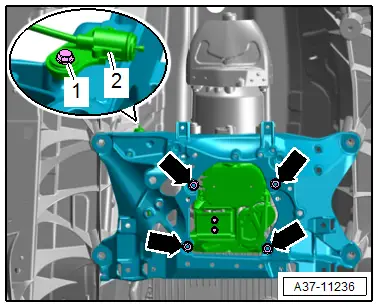
- Remove the bolts -arrows-.

- Remove the nuts -arrows- and lower the tunnel crossmember -3- slightly.
- Remove the bolt -1- and free up the rear emergency release cable -2-.
- Place the tunnel crossmember on the Engine and Gearbox Jack -VAS6931-.
- Place the Used Oil Collection and Extraction Unit -SMN372500- under the transmission.
 WARNING
Danger of eye injury.
Wear protective eyewear.
- Remove the drain plug -arrow B- and drain the transmission fluid.
 Caution
Risk of damaging the transmission.
Do not start the engine when there is no ATF in the transfer case.
- Tighten the new drain plug -arrow B-.
- Install tunnel crossmember. Refer to → Chapter "Tunnel Crossmember, Removing and Installing".
- Install the parking lock emergency release cable. Refer to → Chapter "Front Parking Lock Emergency Release Cable, Removing and Installing".
Filling and Adjusting
- Gear oil temperature: approximately 20 ºC (68 ºF) (room temperature).
- Place the Used Oil Collection and Extraction Unit -SMN372500- under the transmission.
 WARNING
Danger of eye injury.
Wear protective eyewear.
- Remove the fill/check plug -arrow A- from the center differential housing.

- Install the Pressurized Gearbox Oil Filler - Adapter 6 -VAS6617/6- with the Pressurized Gearbox Oil Filler Kit -VAS6617/2- in the inspection and fill hole in the transfer case hand-tight.
- Connect the Pressurized Gearbox Oil Filler Kit -VAS6617- and fill the transfer case with approximately 1.0 liters (1.05 quarts) of gear oil.
- Transmission fluid. Refer to the Parts Catalog.
- Wait five minutes.
 Note
Note
- The inside of the transfer case is divided into several oil chambers. The chambers must be filled equally.
- A waiting time of at least 5 minutes is required so that the internal oil level between the center differential and oil fill space can equalize.
- Remove the Pressurized Gearbox Oil Filler - Adapter 6 -VAS6617/6- from the transmission and let any extra gear oil drain out.
l Specified value: The level is correct when the transmission fluid comes up to the bottom edge of oil filler hole. Fill the gear oil once more if necessary.
- Tighten the new fill/check plug -arrow A- for the center differential housing.
 Note
Note
It is not necessary to check the oil level again at this stage.


