Audi Q7: Overview - Display Control Head
Overview - Front Display Control Head, "Low" or "Mid" A/C System
- General Information. Refer to → Chapter "A/C System Control and Regulation Components in Vehicle Interior".
- Depending on vehicle equipment, there are different versions of the A/C system for the Audi Q7. Make sure to use the correct version and pay attention to the allocation of different components. Refer to → Chapter "A/C System Versions" and Parts Catalog.
- The following illustration shows the Front A/C Display Control Head -E87-, is shown as it would be installed on a vehicle with a "low" or "Mid" A/C system with the "seat heating and ventilation" optional equipment. There are different versions of the Front A/C Display Control Head -E87- with different allocations, pay attention to the correct allocation. Refer to the Parts Catalog.
- The following briefly discusses the different buttons and rotary push button for the adjustment of the vehicle interior air conditioning on the Front A/C Display Control Head -E87-. An exact description of the different possibilities for the vehicle air conditioning via the settings on the Front A/C Display Control Head -E87- can be found for example in the vehicle Owner's Manual. Refer to the Owner's Manual and the Infotainment/MMI Operating Instructions.
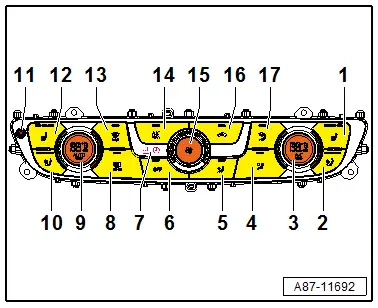
1 - Right Seat Heating Button
- Illuminated LED indicates the level selected.
- The selected setting can be set back one unit after a pre-set time. Refer to → Chapter "Seat Heating".
2 - Right Seat Ventilation Button
- Illuminated LED indicates the level selected.
- The selected setting can be set back one unit after a pre-set time. Refer to → Chapter "Seat Ventilation".
3 - Rotary Push Button for the Right Temperature Preset and the A/C Button
- A/C button for A/C compressor
- The set temperature and the selected function "A/C compressor on" is shown in the differential fuel pressure regulator
4 - Button for Setting the Air Distribution "to the Instrument Panel Vent"
- Illuminated LED indicates the selected "air distribution".
5 - Button for Setting the "Downward" Air Distribution
- Illuminated LED indicates the selected "air distribution".
6 - OFF-Button for the Hearing and the Climate Controls
- Illuminated LED indicates the "off" function is selected.
7 - "Parking Air Conditioning" Function Display Symbol
- Turning on of the "parking heater on" or the "parking heater timer / parking ventilation mode active" symbol.
- Only applies to vehicles with the parking heater optional equipment installed. Refer to the → Heating, Ventilation and Air Conditioning; Rep. Gr.00; General Information.
8 - Rear Window Defogger Button
- Illuminated LED indicates the "Rear window defogger on" function is selected. Refer to → Chapter "Rear Window Defogger".
9 - Rotary Push Button for the Left Temperature Preset and the Auto Button
- Auto button for automatic heating and A/C system control
- The set temperature and the state of the automatic regulation is displayed in the rotary push button
10 - Left Seat Ventilation Button
- Illuminated LED indicates the level selected.
- The selected setting can be set back one unit after a pre-set time. Refer to → Chapter "Seat Ventilation".
11 - Infrared Sensor for Temperature and Sunlight
- The sensor determines the temperature and sunlight on the display control head.
 Note
Note
A contaminated or taped off infrared sensor determines an incorrect temperature, this can lead to problems with the regulation of the heating and A/C system.
12 - Left Seat Heating Button
- Illuminated LED indicates the level selected.
- The selected setting can be set back one unit after a pre-set time. Refer to → Chapter "Seat Heating".
- The selected setting can be set back one unit after a pre-set time. Refer to → Chapter "Seat Ventilation".
13 - Defrost Mode Button
- Illuminated LED indicates the "defrost mode" function is selected.
- On a vehicle with the "windshield defogger" optional equipment installed the activation of this is shown by the turned on or blinking LED. Refer to → Chapter "Windshield Defogger".
14 - A/C MAX Button
- The LED turned on shows the selected function "maximum cooling"
- Via this function the vehicle interior is cooled as quickly as possible, if necessary also with a raised fresh air blower speed.
15 - Fresh Air Blower Speed Preset Knob
- The adjusted or the selected fresh air blower speed is displayed via the turned on LED
- On a vehicle with a "Low" A/C system the speed of the Fresh Air Blower -V2- is regulated according to the setting and the temperature is determined by the Front A/C Display Control Head -E87- according to the characteristics curve.
- On vehicles with a "Mid" A/C system the speed on the Fresh Air Blower -V2- and the Rear Fresh Air Blower -V80- is regulated according to the corresponding setting on the Front A/C Display Control Head -E87- and the Rear A/C Display Control Head - E265- as well as from the Front A/C Display Control Head -E87- determined temperature from the Front A/C Display Control Head -E87- according to the characteristics curve.
16 - Recirculating Air Mode Button
- Illuminated LEDs indicate the "recirculated-air mode" function is selected.
- The "recirculated-air mode" function is canceled when the defrost mode button (air to the windshield) is pressed
- 17 - Button for Setting the Air Distribution "to the Windshield"
- Illuminated LED indicates the selected "air distribution".
- The air is directed upward (to the windshield and the front side window)
Overview - Front Display Control Head, "Mix" or "High" A/C System
- General Information. Refer to → Chapter "A/C System Control and Regulation Components in Vehicle Interior".
- Depending on vehicle equipment, there are different versions of the A/C system for the Audi Q7. Make sure to use the correct version and pay attention to the allocation of different components. Refer to → Chapter "A/C System Versions" and Parts Catalog.
- The following illustration shows a Front A/C Display Control Head -E87- is shown as it would be installed on a vehicle with a "Mix" or "High" A/C system (with an ECO button) and with the "seat heating and ventilation" installed. There are different versions of the Front A/C Display Control Head -E87- with different allocations, pay attention to the correct allocation. Refer to the Parts Catalog.
- The following briefly discusses the different buttons and rotary push button for the adjustment of the vehicle interior air conditioning on the Front A/C Display Control Head -E87-. An exact description of the different possibilities for the vehicle air conditioning via the settings on the Front A/C Display Control Head -E87- can be found for example in the vehicle Owner's Manual. Refer to the Owner's Manual and the Infotainment/MMI Operating Instructions.
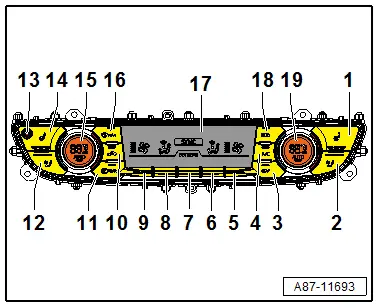
1 - Right Seat Heating Button
- Illuminated LED indicates the level selected.
- The selected setting can be set back one unit after a pre-set time. Refer to → Chapter "Seat Heating".
2 - Right Seat Ventilation Button
- Illuminated LED indicates the level selected.
- The selected setting can be set back one unit after a pre-set time. Refer to → Chapter "Seat Ventilation".
3 - OFF-Button for the Hearing and the Climate Controls
- Illuminated LED indicates the "off" function is selected.
4 - A/C Button for A/C Compressor
- Illuminated LED indicates the "A/C compressor on" function is selected
5 - Right Air Door Preset Button
- The adjusted or the selected air quantity from the controls for the right side is shown in the display
- The air quantity to the right side is controlled via the speed of the Fresh Air Blower - V2- and the setting of the doors in the rear A/C Display Control Head from the Front A/C Display Control Head -E87- via the characteristics curve.
- On vehicles with a "High" A/C system the speed on the Rear Fresh Air Blower -V80- is regulated according to the corresponding setting on the Front A/C Display Control Head -E87- and the Rear A/C Display Control Head - E265- as well as from the Front A/C Display Control Head -E87- determined temperature from the Front A/C Display Control Head -E87- via the characteristics curve.
- On vehicles with a "Mix" A/C system the speed on the Fresh Air Blower -V2- and the Rear Fresh Air Blower -V80- is regulated according to the corresponding setting on the Front A/C Display Control Head -E87- and the Rear A/C Display Control Head - E265- as well as from the Front A/C Display Control Head -E87- determined temperature from the Front A/C Display Control Head -E87- via the characteristics curve.
6 - Button for Adjustment of the Right Air Distribution
- The adjusted or the selected air distribution (upper, center or lower) for the right side is shown in the display
7 - Button for the Adjustment of Additional Functions
- Certain functions ("SYNC", "parking air conditioning", "Rear operation from the front" etc.) can be selected and deselected via this button.
- The set or selected function is shown in the display.
8 - Button for Adjustment of the Left Air Distribution
- The adjusted or the selected air distribution (upper, center or lower) for the left side is shown in the display
9 - Left Air Door Preset Button
- The adjusted or the selected air quantity from the controls for the left side is shown in the display
- The air quantity to the left side is controlled via the speed of the Fresh Air Blower - V2- and the setting of the doors in the rear A/C Display Control Head from the Front A/C Display Control Head -E87- via the characteristics curve.
- On vehicles with a "High" A/C system the speed on the Rear Fresh Air Blower -V80- is regulated according to the corresponding setting on the -E87- and the Rear A/C Display Control Head -E265- as well as from the Front A/C Display Control Head -E87- determined temperature from the Front A/C Display Control Head -E87- via the characteristics curve.
- On vehicles with a "Mix" A/C system the speed on the Fresh Air Blower -V2- and the Rear Fresh Air Blower -V80- is regulated according to the corresponding setting on the Front A/C Display Control Head -E87- and the Rear A/C Display Control Head - E265- as well as from the Front A/C Display Control Head -E87- determined temperature from the Front A/C Display Control Head -E87- via the characteristics curve.
10 - Recirculating Air Mode Button
- Illuminated LEDs indicate the "recirculated-air mode" function is selected.
- The "recirculated-air mode" function is canceled when the defrost mode button (air to the windshield) is pressed
11 - Rear Window Defogger Button
- Illuminated LED indicates the "Rear window defogger on" function is selected. Refer to → Chapter "Rear Window Defogger".
12 - Left Seat Ventilation Button
- Illuminated LED indicates the level selected.
- The selected setting can be set back one unit after a pre-set time. Refer to → Chapter "Seat Ventilation".
13 - Infrared Sensor for Temperature and Sunlight
- The sensor determines the temperature and sunlight on the display control head
 Note
Note
A contaminated or taped off infrared sensor determines an incorrect temperature, this can lead to problems with the regulation of the heating and A/C system.
14 - Left Seat Heating Button
- Illuminated LED indicates the level selected.
- The selected setting can be set back one unit after a pre-set time. Refer to → Chapter "Seat Heating".
15 - Rotary Push Button for the Temperature Preset and the Left Auto Button
- Auto button for the automatic regulation of the heating and A/C system on the right side.
- The set temperature and the state of the automatic regulation is displayed in the rotary push button
- With active operation in the Rear A/C Display Control Head -E265- the temperature display is switched off for a certain period of time.
16 - Defrost Mode Button
- Illuminated LED indicates the "defrost mode" function is selected.
- In defrost mode the air is directed upward (to the windshield and the front side window) the A/C compressor is switched on and the recirculating air mode is switched off
- On a vehicle with the "windshield defogger" optional equipment installed the activation of this is shown by the turned on or blinking LED. Refer to → Chapter "Windshield Defogger".
17 - Display for Showing the Set Functions of the Heating and A/C System
- In display the selected or activated settings from the Front A/C Display Control Head -E87- is displayed according to the characteristic curve.
- On a vehicle with a parking heater installed as optional equipment for an active parking air conditioning this is shown by the turning on of symbols ("Parking heater on" or "Parking heater timer / parking ventilation mode active"). Refer to → Heating, Ventilation and Air Conditioning; Rep. Gr.00; General Information.
18 - ECO/ A/C MAX Button
- There are different versions depending on the vehicle version. Refer to the Parts Catalog.
- Versions with an A/C MAX button, the turned on LED shows the set function "maximum cooling". Via this function the vehicle interior is cooled as quickly as possible, if necessary also with a raised fresh air blower speed.
- Versions with an ECO button, the turned on LED shows the set function "cooling as quickly as possible". Via this function the vehicle interior is cooled as quickly as possible without comfort restriction (for example without raised fresh air blower speed) via the calculated passenger compartment temperature setting.
 Note
Note
The calculated passenger compartment temperature from the Front A/C Display Control Head -E87- can be higher or lower than the set temperature due to various factors (exterior temperature, sunlight etc.).
19 - Rotary Push Button for the Temperature Preset and the Right Auto Button
- Auto button for the automatic regulation of the heating and A/C system on the right side.
- The set temperature and the state of the automatic regulation is displayed in the rotary push button
- with active operation in the Rear A/C Display Control Head -E265- the temperature display is switched off for a certain period of time.
Overview - Rear Display Control Head, "Mix" or "High" A/C System
- General Information. Refer to → Chapter "A/C System Control and Regulation Components in Vehicle Interior".
- The following illustration shows the Rear A/C Display Control Head -E265-, is shown as it would be installed on a vehicle with a "Mid" or "Mix" A/C system and with the "seat heating" optional equipment. There are different versions of the Rear A/C Display Control Head -E265- with different allocations, pay attention to the correct allocation. Refer to the Parts Catalog.
- The following briefly discusses the different button for the adjustment of the rear vehicle interior air conditioning on the Rear A/C Display Control Head -E265-. An exact description of the different possibilities for the vehicle air conditioning via the settings on the Rear A/C Display Control Head -E265- can be found for example in the vehicle Owner's Manual. Refer to the Owner's Manual and the Infotainment/MMI Operating Instructions.
- Via the various settings on the Front A/C Display Control Head -E87- or for the vehicle (active child safety system for example) the Rear A/C Display Control Head -E265- switches off of the possibility to change the settings on the Rear A/C Display Control Head -E265- via the button is locked. Refer to the Owner's Manual and the Infotainment/MMI Operating Instructions.
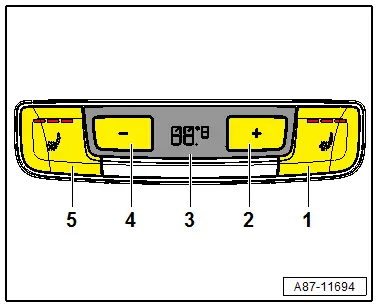
1 - Right Rear Seat Heating Button
- Illuminated LED indicates the level selected.
- The selected setting can be set back one unit after a pre-set time. Refer to → Chapter "Seat Heating".
2 - + Button for Temperature Preset Warmer
- The temperature of the air to the rear vent is calculated via the settings on Rear A/C Display Control Head -E265- and the Front A/C Display Control Head -E87- from the Front A/C Display Control Head -E87- and is activated according to the characteristic curve.
- The set temperature will be shown in the display.
3 - Temperature Display
- The temperature set on the Rear A/C Display Control Head -E265- for the rear is displayed.
- For various settings in the vehicle (for example active child safety system) the display can be switched off or locked.
4 - - Button for Temperature Preset Cooler
- The temperature of the air to the rear vent is calculated via the settings on Rear A/C Display Control Head -E265- and the Front A/C Display Control Head -E87- from the Front A/C Display Control Head -E87- and is activated according to the characteristic curve.
- The set temperature will be shown in the display.
5 - Left Rear Seat Heating Button
- Illuminated LED indicates the level selected.
- The selected setting can be set back one unit after a pre-set time. Refer to → Chapter "Seat Heating".
Overview - Rear Display Control Head, "High" A/C system
- General information. Refer to → Chapter "A/C System Control and Regulation Components in Vehicle Interior".
- Depending on vehicle equipment, there are different versions of the A/C system for the Audi Q7. Make sure to use the correct version and pay attention to the allocation of different components. Refer to → Chapter "A/C System Versions" and Parts Catalog.
- The following illustration shows a Rear A/C Display Control Head -E265-, is shown as it would be installed on a vehicle with a "High" A/C system and with the "seat heating and ventilation" optional equipment. There are different versions of the Rear A/C Display Control Head -E265- with different allocations, pay attention to the correct allocation. Refer to the Parts Catalog.
- The following briefly discusses the different buttons and rotary push button for the adjustment of the rear vehicle interior air conditioning on the Rear A/C Display Control Head -E265-. An exact description of the different possibilities for the vehicle air conditioning via the settings on the Rear A/C Display Control Head -E265- can be found for example in the vehicle Owner's Manual. Refer to the Owner's Manual and the Infotainment/MMI Operating Instructions.
- Via the various settings on the Front A/C Display Control Head -E87- or for the vehicle (active child safety system for example) the Rear A/C Display Control Head -E265- switches off of the possibility to change the settings on the Rear A/C Display Control Head -E265- via the buttons and the rotary push button is locked. Refer to the Owner's Manual and the Infotainment/MMI Operating Instructions.
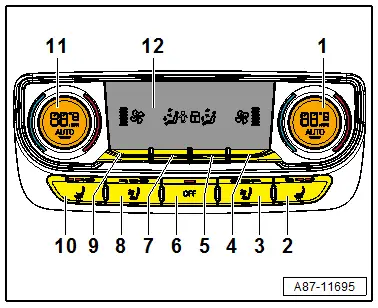
1 - Rotary Push Button for the Temperature Preset and the Right Rear Auto Button
- Auto button for the automatic regulation of the heating and A/C system on the right side.
- The set temperature and the state of the automatic regulation is displayed in the rotary push button
- The temperature of the air to the right rear vent is calculated via the settings on Rear A/C Display Control Head -E265- and the Front A/C Display Control Head -E87- from the Rear A/C Display Control Head -E265- and is activated according to the characteristic curve.
2 - Right Rear Seat Heating Button
- Illuminated LED indicates the level selected.
- The selected setting can be set back one unit after a pre-set time. Refer to → Chapter "Seat Heating".
- 3 - Right Rear Seat Ventilation Button
- Illuminated LED indicates the level selected.
- The selected setting can be set back one unit after a pre-set time. Refer to → Chapter "Seat Ventilation".
4 - Right Rear Air Door Preset Button
- The adjusted or the selected air quantity from the controls for the right side is shown in the display
- The air quantity to the right side is controlled via the speed of the Rear Fresh Air Blower -V80- and the setting of the doors in the rear A/C Display Control Head from the Rear A/C Display Control Head -E265- via the characteristics curve.
- The speed of the Rear Fresh Air Blower -V80- is regulated according to the corresponding setting on the Rear A/C Display Control Head -E265- (and the Front A/C Display Control Head -E87-) as well as from the Rear A/C Display Control Head -E265- and the Front A/C Display Control Head -E87- determined temperature from the Rear A/C Display Control Head -E265- via the characteristics curve.
5 - Button for Adjustment of the Right Rear Air Distribution
- The adjusted or the selected air distribution (upper, center or lower) for the right side is shown in the display
6 - OFF Button for the Rear Heat and the Climate Controls
- Illuminated LED indicates the "off" function is selected.
- If the Rear A/C Display Control Head -E265- is switched off the settings on the Front A/C Display Control Head -E87- are used for the regulation of the rear heating and A/C system, however the possibilities for the regulation are restricted.
7 - Button for Adjustment of the Left Rear Air Distribution
- The adjusted or the selected air distribution (upper, center or lower) for the left side is shown in the display
8 - Left Rear Seat Ventilation Button
- Illuminated LED indicates the level selected.
- The selected setting can be set back one unit after a pre-set time. Refer to → Chapter "Seat Ventilation".
9 - Left Rear Air Door Preset Button
- The adjusted or the selected air quantity from the controls for the left side is shown in the display
- The air quantity to the left side is controlled via the speed of the Rear Fresh Air Blower -V80- and the setting of the doors in the rear A/C Display Control Head from the Rear A/C Display Control Head -E265- via the characteristics curve.
- The speed of the Rear Fresh Air Blower -V80- is regulated according to the corresponding setting on the Rear A/C Display Control Head -E265- (and the Front A/C Display Control Head -E87-) as well as from the Rear A/C Display Control Head -E265- and the Front A/C Display Control Head -E87- determined temperature from the Rear A/C Display Control Head -E265- via the characteristics curve.
10 - Left Rear Seat Heating Button
- Illuminated LED indicates the level selected.
- The selected setting can be set back one unit after a pre-set time. Refer to → Chapter "Seat Heating".
11 - Rotary Push Button for the Temperature Preset and the Left Rear Auto Button
- Auto button for the automatic regulation of the heating and A/C system on the left side.
- The set temperature and the state of the automatic regulation is displayed in the rotary push button
- The temperature of the air to the left rear vent is calculated via the settings on Rear A/C Display Control Head -E265- and the Front A/C Display Control Head -E87- from the Rear A/C Display Control Head -E265- and is activated according to the characteristic curve.
12 - Display for Showing the Set Functions of the Rear Heating and A/C System
- In display the selected or activated settings from the Rear A/C Display Control Head -E265- is displayed according to the characteristic curve.
- Via the various settings on the Front A/C Display Control Head -E87- or for the vehicle (active child safety system for example) the Rear A/C Display Control Head -E265- switches off of the possibility to change the settings on the Rear A/C Display Control Head -E265- via the buttons and the rotary push button is locked. An active child safety system is displayed for example by turning on the corresponding symbol. Refer to Operating Instructions and Infotainment/MMI Operating Instructions.

