Audi Q7: Overview - Headlamps
Overview - Headlamps, Headlamp Mount
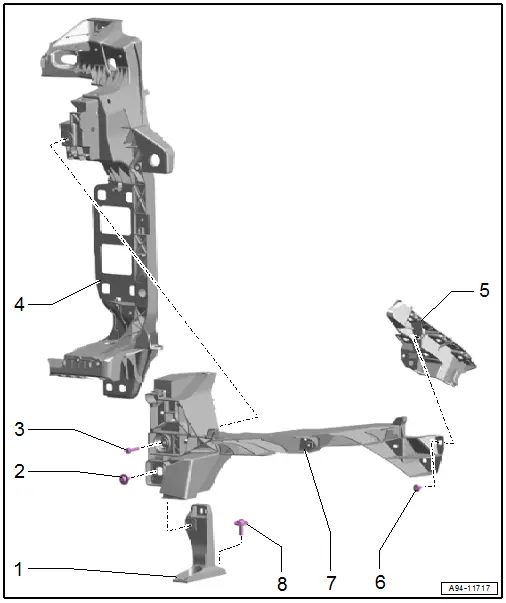
1 - Support
- For the headlamp mount
2 - Bolt
- 8 Nm
3 - Bolt
- 8 Nm
4 - Lock Carrier
- For mounting the headlamp
5 - Mount
- For the bumper cover
- To secure the headlamp mount
- Removing and installing. Refer to → Body Exterior; Rep. Gr.50; Fender; Fender, Removing and Installing.
6 - Bolt
- 8 Nm
- Quantity: 2
7 - Mount
- For headlamp
- Removing and installing. Refer to → Chapter "Headlamp Mount, Removing and Installing".
8 - Bolt
- 8 Nm
- Quantity: 2
Overview - Headlamps, HID Headlamps
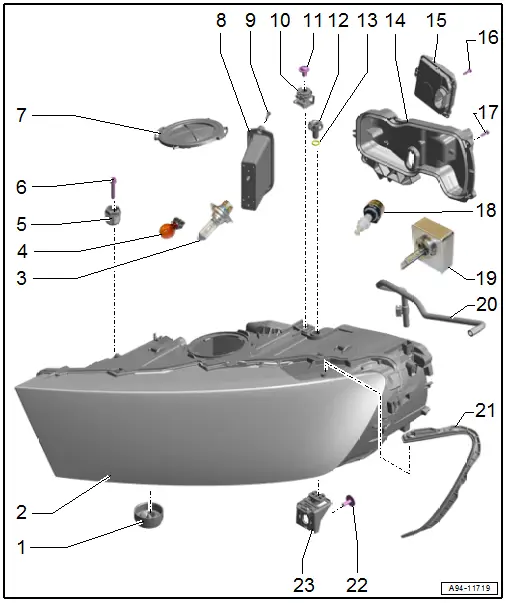
1 - Filter Membrane
- Removing and installing. Refer to → Chapter "Filter Membrane, Removing and Installing".
2 - Headlamp Housing
- With integrated Left Low Beam Headlamp Reflector Motor -V294-, Right Low Beam Headlamp Reflector Motor -V295-
- The trim for the low beams cannot be replaced separately.
- If faulty replace the headlamp housing
- Removing and installing. Refer to → Chapter "Headlamp Housing, Removing and Installing".
3 - Bulb
- Left Front Fog Lamp Bulb -L22-, Right Front Fog Lamp Bulb -L23- (All Weather Lamp)
- 12 V, 55 W (H7)
- Bulb, replacing. Refer to → Chapter "Left and Right Front Fog Lamp Bulb -L22-/-L23-, Removing and Installing".
4 - Front Turn Signal Bulb
- Left Front Turn Signal Bulb -M5-, Right Front Turn Signal Bulb -M7-
- 12 V, 24 W
- Bulb, replacing. Refer to → Chapter "Left and Right Front Turn Signal Bulb -M5-/-M7-, Removing and Installing".
5 - Adjusting Nut
- For the headlamp height adjustment
6 - Bolt
- 4.5 Nm
7 - Housing Cover
8 - Daytime Running Lamp and Position Lamp LED Module
- Left Daytime Running Lamp and Position Lamp LED Module -L176-, Right Daytime Running Lamp and Position Lamp LED Module -L177-
- Removing and installing. Refer to → Chapter "Left and Right Daytime Running Lamp and Position Lamp LED Module -L176-/-L177-, Removing and Installing".
9 - Bolt
- 0.9 Nm
- Quantity: 2
10 - Adjuster
- For adjusting the headlamp housing to the bumper contour
11 - Bolt
- 4.5 Nm
12 - Height Adjusting Screw
13 - Gasket
- Cannot be replaced separately If damaged replace the height adjustment
14 - Housing Cover
15 - Control Module for Lighting Control
- Left Light Control Module -J1018-, Right Light Control Module -J1023-
- Removing and installing. Refer to → Chapter "Left and Right Light Control Module -J1018-/-J1023-, Removing and Installing".
16 - Bolt
- 1.5 Nm
- Quantity: 3
17 - Bolt
- 1.5 Nm
- Quantity: 4
18 - Headlamp Beam Adjustment Motor
- Left Headlamp Beam Adjustment Motor -V48-, Right Headlamp Beam Adjustment Motor -V49-
- Removing and installing. Refer to → Chapter "Left and Right Headlamp Beam Adjustment Motor -V48-/-V49-, Removing and Installing".
19 - HID Headlamp Bulb
- Left HID Headlamp Bulb -L13- integrated in the Left HID Headlamp Control Module -J343-, Right HID Headlamp Bulb -L14- integrated in the Right HID Headlamp Control Module -J344-
- Removing and installing. Refer to → Chapter "Left and Right HID Headlamp Bulb -L13-/-L14-, Removing and Installing".
20 - Breather Hose
- For the headlamp housing
21 - Sealing Frame
- Removing and installing. Refer to → Chapter "Sealing Frame, Removing and installing".
22 - Bolt
- 4.5 Nm
23 - Headlamp Housing Bracket
- Quantity: 2
- Removing and installing. Refer to → Chapter "Headlamp Mount, Removing and Installing".
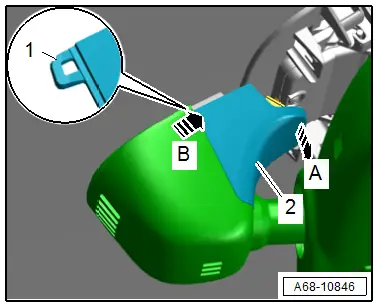
Component Location Automatic High Beam Assist Control Module -J844-
- Integrated in the interior rearview mirror base.
TIP
The Automatic High Beam Assist Control Module -J844- cannot be replaced separately. If faulty replace the interior rearview mirror. Refer to → Body Interior; Rep. Gr.68; Interior Rearview Mirror; Interior Rearview Mirror, Removing and Installing.
Overview - Headlamps, LED Headlamps
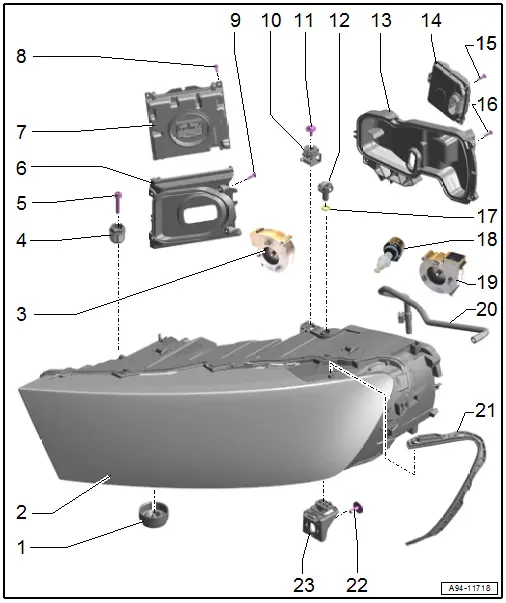
1 - Filter Membrane
- Removing and installing. Refer to → Chapter "Filter Membrane, Removing and Installing".
2 - Headlamp Housing
- Removing and installing. Refer to → Chapter "Headlamp Housing, Removing and Installing".
3 - Headlamp Fan 2
- Only for Matrix headlamps
- Left Headlamp Fan 2 -V463-, Right Headlamp Fan 2 -V464-
- Removing and installing. Refer to → Chapter "Left and Right Headlamp Fan 2 -V463-/-V464-, Removing and Installing".
4 - Adjusting Nut
- For the headlamp height adjustment
5 - Bolt
- 4.5 Nm
6 - Mount
- For the LED headlamp power output module 1
- Removing and installing. Refer to → Chapter "Left and Right Headlamp Fan 2 -V463-/-V464-, Removing and Installing".
7 - LED Headlamp Power Output Module 1
- For the headlamp electronics
- Left LED Headlamp Power Output Module 1 -A31-, Right LED Headlamp Power Output Module 1 -A27-
- Removing and installing. Refer to → Chapter "Right and Left LED Headlamp Power Output Module 1 -A27-/-A31-, Removing and Installing".
8 - Bolt
- 1.5 Nm
- Quantity: 4
9 - Bolt
- 1.5 Nm
- Quantity: 4
10 - Adjuster
- For adjusting the headlamp housing to the bumper contour
11 - Bolt
- 4.5 Nm
12 - Height Adjusting Screw
13 - Housing Cover
14 - Control Module for Lighting Control
- Left Light Control Module -J1018-, Right Light Control Module -J1023-
- Removing and installing. Refer to → Chapter "Left and Right Light Control Module -J1018-/-J1023-, Removing and Installing".
15 - Bolt
- 1.5 Nm
- Quantity: 4
16 - Bolt
- 1.5 Nm
- Quantity: 3
17 - Gasket
- Cannot be replaced separately If damaged replace the height adjustment
18 - Headlamp Beam Adjustment Motor
- Left Headlamp Beam Adjustment Motor -V48-, Right Headlamp Beam Adjustment Motor -V49-
- Removing and installing. Refer to → Chapter "Left and Right Headlamp Beam Adjustment Motor -V48-/-V49-, Removing and Installing".
19 - Headlamp Fan
- Left Headlamp Fan -V407-, Right Headlamp Fan -V408-
- Removing and installing. Refer to → Chapter "Headlamp Fan, Removing and Installing".
20 - Breather Hose
- For the headlamp housing
21 - Sealing Frame
- Removing and installing. Refer to → Chapter "Sealing Frame, Removing and installing".
22 - Bolt
- 4.5 Nm
23 - Headlamp Housing Bracket
- Quantity: 2
- Removing and installing. Refer to → Chapter "Headlamp Mount, Removing and Installing".

