Audi Q7: Overview - Sun Shade
Audi Q7 (4M) 2016-2025 Workshop Manual / Body / Body Interior / Interior Equipment / Overview - Sun Shade
Overview - Sun Shade, Side Window
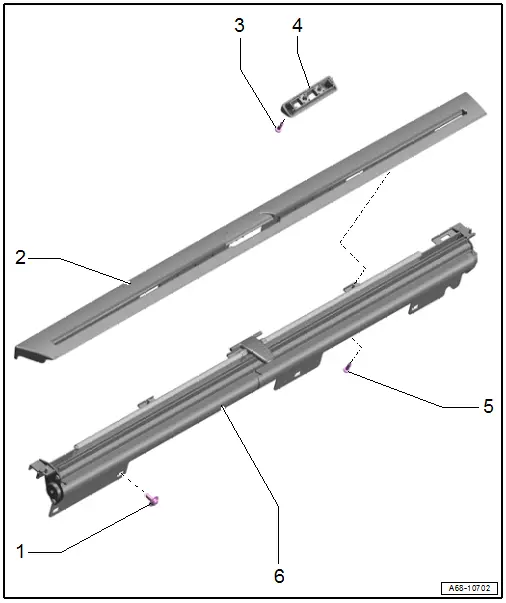
1 - Bolt
- 3.3 Nm
- Quantity: 4
2 - Sun Shade Cover
- Removing and installing. Refer to → Chapter "Sun Shade, Removing and Installing, Side Window".
3 - Bolt
- 1.7 Nm
- Quantity: 2
4 - Sun Shade Mounting Eye
- Removing and installing. Refer to → Chapter "Sun Shade Mounting Eye, Removing and Installing".
5 - Bolt
- 1.7 Nm
- Quantity: 4
6 - Sun Shade
- Removing and installing. Refer to → Chapter "Sun Shade, Removing and Installing, Side Window".
Overview - Sun Shade, Rear Window
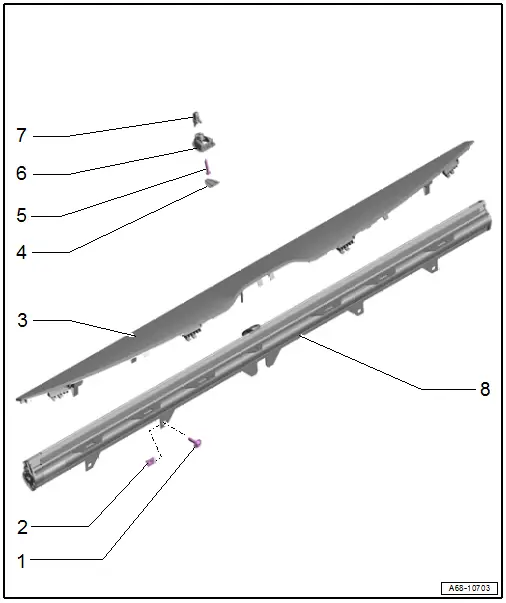
1 - Bolt
- 3 Nm
- Quantity: 4
2 - Spring Nut
- Quantity: 4
- Installed in the rear lid trim panel
- Replace any damaged or deformed spring nuts
3 - Sun Shade Cover
- Removing and installing. Refer to → Chapter "Sun Shade, Removing and Installing, Rear Window".
- Remove any remaining clips in the sun shade mounting points using the -T40280-. To install, insert into the trim panel.
- Replace damaged or deformed clips
- Press on until it engages audibly
4 - Cap
- Clipped in the mounting eye
5 - Bolt
- 2 Nm
6 - Sun Shade Mounting Eye
- Removing and installing. Refer to → Chapter "Sun Shade Mounting Eye, Removing and Installing".
7 - Expanding Nut
- Clip into rear lid
8 - Sun Shade
- Removing and installing. Refer to → Chapter "Sun Shade, Removing and Installing, Rear Window".
Overview - Luggage Compartment Roll Cover
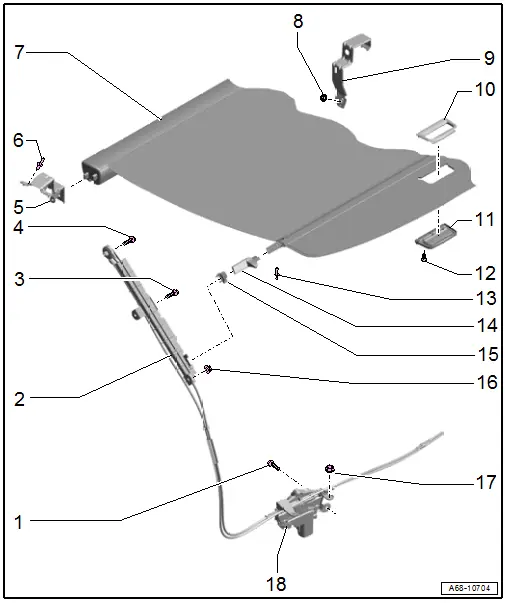
1 - Bolt
- 3.5 Nm
2 - Roll Cover Guide Rail
- Available only together with -18-
- Removing and installing. Refer to → Chapter "Luggage Compartment Cover Motor, Removing and Installing".
3 - Bolt
- 3.5 Nm
4 - Bolt
- 3.5 Nm
5 - Left Bracket
- Under the luggage compartment side trim panel
- Removing and installing. Refer to → Chapter "Roll Cover Bracket, Removing and Installing".
6 - Rivet
- Quantity: 3
7 - Luggage Compartment Roll Cover
8 - Nut
- 3.5 Nm
- Quantity: 2
9 - Right Bracket
- Under the luggage compartment side trim panel
- Removing and installing. Refer to → Chapter "Roll Cover Bracket, Removing and Installing".
10 - Frame
- For luggage compartment roll cover handle
- Not available separately from the repair kit. Refer to the Parts Catalog.
- Replacing. Refer to → Chapter "Luggage Compartment Roll Cover Handle, Removing and Installing".
11 - Handle
- For luggage compartment roll cover
- Not available separately from the repair kit. Refer to the Parts Catalog.
- Replacing. Refer to → Chapter "Luggage Compartment Roll Cover Handle, Removing and Installing".
12 - Bolt
- 0.35 Nm
- Quantity: 2
- Thread forming
- Position the bolt by hand and tighten it until it finds the old threads. Then tighten the bolt to the specification.
13 - Rivet
14 - Locking Pin
- Not available separately from the repair kit. Refer to the Parts Catalog.
- Riveted with roll cover
15 - Roll Cover Catch
- Clipped into the guide rails
- Removing and installing. Refer to → Chapter "D-Pillar Trim Panel, Removing and Installing".
16 - Nut
- 3.5 Nm
17 - Nut
- 3.5 Nm
- Quantity: 2
18 - Luggage Compartment Cover Motor 1 -V473-
- Available only together with -2-
- Removing and installing. Refer to → Chapter "Luggage Compartment Cover Motor, Removing and Installing".

