Audi Q7: Parking Lock Emergency Release Cable, Removing and Installing
Front Parking Lock Emergency Release Cable, Removing and Installing
Removing
 WARNING
The vehicle could start to roll and cause an accident.
Pull the parking brake button to activate the electro-mechanical parking brake.
- Remove the tunnel crossmember. Refer to → Chapter "Tunnel Crossmember, Removing and Installing".
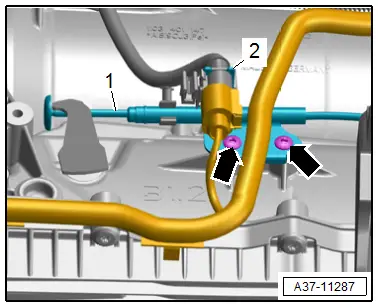
Vehicles with a 3.0L TFSI Engine
- Remove the bolts -arrows-.
- Free up the wire and push the bracket -2- with the connector to the side.
- Remove the front parking lock emergency release cable -1-.
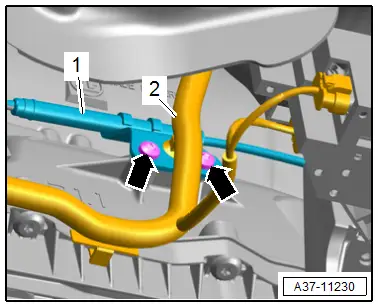
Vehicles with a 3.0L TDI Engine
- Free up the wiring harness -2-.
- Remove the bolts -arrows- and remove the front parking lock emergency release cable -1-.
Installing
Install in the reverse order of removal while noting the following:
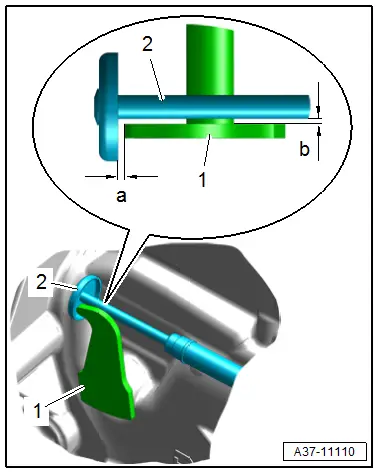
- Make sure that the distance between the emergency release cable -2- and lever -1- is maintained.
- Dimension -a- = minimum 1 mm.
- Dimension -b- = minimum 1 mm.
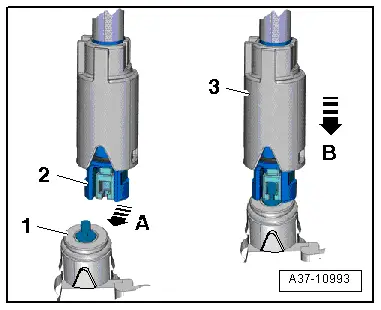
- Attach the rear emergency release cable -2- to the front emergency release cable -1- from the top in direction of -arrow A-
- Install the sleeve -3- until it engages in direction of -arrow B-.
 Caution
Make sure the sleeve fits securely.
- Install tunnel crossmember. Refer to → Chapter "Tunnel Crossmember, Removing and Installing".
- Check the parking lock emergency release. Refer to → Chapter "Emergency Release from P".
Tightening Specifications
- Refer to → Chapter "Overview - Parking Lock Emergency Release"
Rear Parking Lock Emergency Release Cable, Removing and Installing
Removing
 WARNING
The vehicle could start to roll and cause an accident.
Pull the parking brake button to activate the electro-mechanical parking brake.
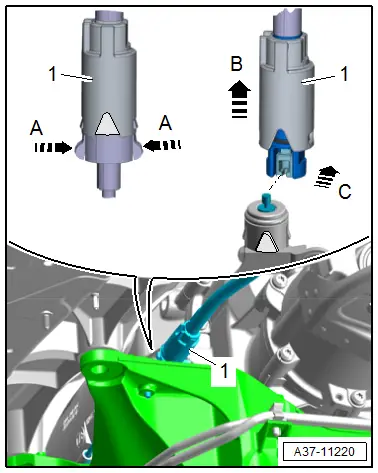
- Release the retainers in the direction of -arrows A- and slide the sleeve -1- on the emergency release cable in the direction of -arrow B-.
- Disengage the rear emergency release cable from the front emergency release cable in direction of -arrow C-.
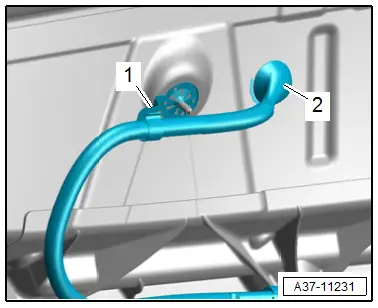
- Free up the rear emergency release cable on the bracket -1- and push the grommet -2- toward the inside.
- Move the driver seat in the rearmost and highest position.
- Remove the lower A-pillar trim panel. Refer to → Body Interior; Rep. Gr.70; Vehicle Interior Trim Panels; A-Pillar Trim Panel, Removing and Installing.
- Push the carpet in the driver footwell slightly upward.
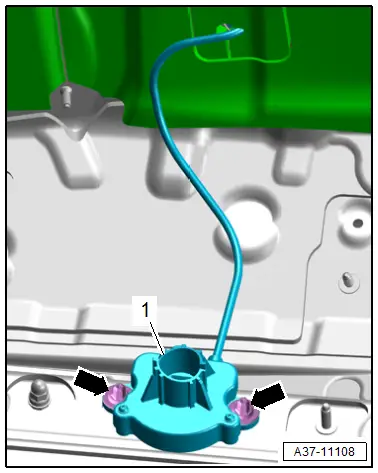
- Remove the nuts -arrow-.
- Guide the rear emergency release cable -1- through the hole in the center tunnel toward the inside, and remove it.
Installing
Install in the reverse order of removal while noting the following:
- Carefully guide the rear emergency release cable -1- through the hole in the center tunnel and tighten the nuts -arrows-.
 Note
Note
Pay attention to the tightening specification otherwise the stud bolts will break off.

- Install the grommet -2- in the hole in the center tunnel.
- The sealing lip on the grommet must seal the hole in the center tunnel all the way around.
- Engage the emergency release cable on the bracket -1-.

- Attach the rear emergency release cable -2- to the front emergency release cable -1- from the top in direction of -arrow A-
- Install the sleeve -3- until it engages in direction of -arrow B- and then check it for secure fit.
- Check the parking lock emergency release. Refer to → Chapter "Emergency Release from P".

Tightening Specifications
- Refer to → Chapter "Overview - Parking Lock Emergency Release".
- Refer to → Body Interior; Rep. Gr.70; Vehicle Interior Trim Panels; Overview - A-Pillar Trim Panel.

