Audi Q7: Radiator Grille/Front Trim
Overview - Radiator Grille
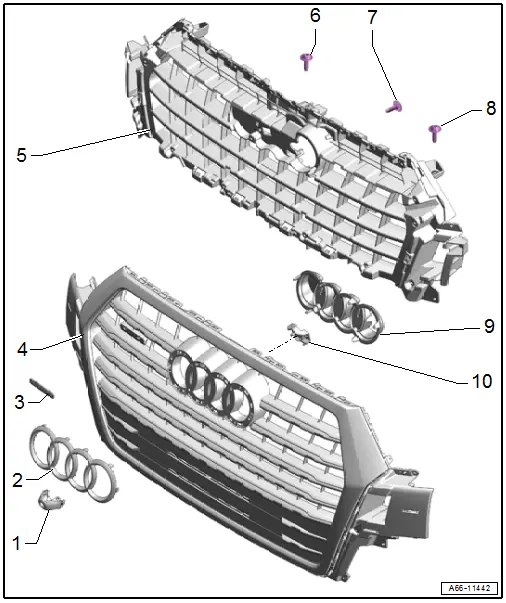
1 - Cover
- For the front camera
2 - Emblem
- Overview. Refer to → Chapter "Overview - Name Badges and Emblems".
3 - quattro Name Badge
- Overview. Refer to → Chapter "Overview - Name Badges and Emblems".
4 - Radiator Grille
- Removing and Installing. Refer to → Chapter "Radiator Grille, Removing and Installing".
5 - Reinforcement Brace
- For the radiator grille
- Removing and Installing. Refer to → Chapter "Reinforcement Brace, Removing and Installing".
6 - Bolt
- 3 Nm
7 - Bolt
- 1.5 Nm
- Quantity: 18
8 - Bolt
- 3 Nm
9 - Cover
- For the emblem
- There are different versions. Refer to the Parts Catalog.
- Removing and Installing. Refer to → Chapter "Radiator Grille Name Badges and Emblems, Removing and Installing".
10 - Mount
- For the front camera
- Removing and Installing. Refer to → Communication; Rep. Gr.91; Peripheral Camera; Component Location Overview - Peripheral Camera.
Radiator Grille, Removing and Installing
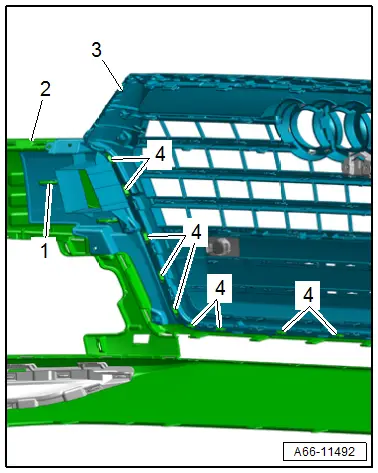
Removing
- Remove the reinforcement brace. Refer to → Chapter "Reinforcement Brace, Removing and Installing".
- Release the catches -1 and 4-.
- Remove the radiator grille -3- from the bumper cover -2-.
- If the radiator grille is to be replaced, also remove the following components:
- Front Airbag Crash Sensor -G283-. Refer to → Body Interior; Rep. Gr.69; Airbag Crash Sensors; Component Location Overview - Airbag Crash Sensors.
- Emblem. Refer to → Chapter "Radiator Grille Name Badges and Emblems, Removing and Installing".
Installing
Install in reverse order of removal.
Reinforcement Brace, Removing and Installing
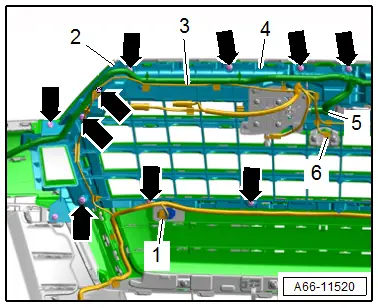
Removing
- Remove the front bumper cover. Refer to → Chapter "Bumper Cover, Removing and Installing".
- If equipped disconnect the washer fluid hose -5- from the night vision system spray nozzle.
- Free up the washer fluid hose -4- for the headlamp washer system.
- Disconnect the connector -1- and antenna wire -6- and free up the wiring harness -3-.
- Remove the bolts -arrows-.
- Remove the reinforcement brace -2- from the radiator grille.
Installing
Install in reverse order of removal.
Tightening Specifications
- Refer to → Chapter "Overview - Radiator Grille"
Front License Plate Bracket, Removing and Installing
- Front license plate bracket must be positioned at the top edge on the front bumper cover and bolted into the holes provided on the bumper cover.

