Audi Q7: Radiator/Radiator Fan
Overview - Radiator/Radiator Fan
Radiator
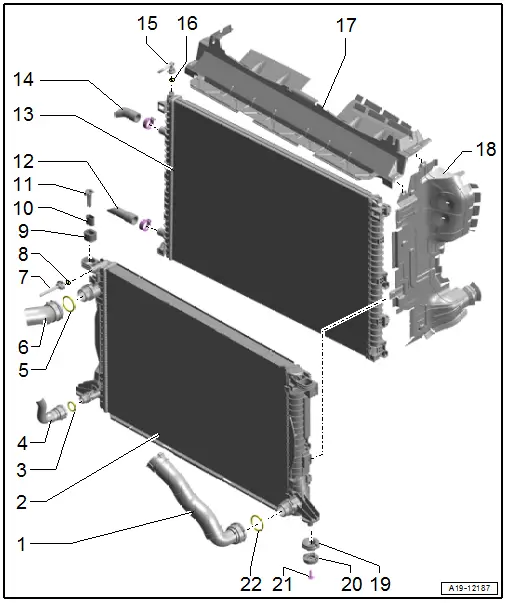
1 - Coolant Hose
- Lift the clamp to remove
- Connecting. Refer to → Fig. "Connect the Coolant Hose to the Connector Coupling".
2 - Radiator
- Removing and installing with the fan shroud. Refer to → Chapter "Radiator, Removing and Installing".
- Change the coolant after replacing
3 - O-Ring
- Replace after removing
4 - Coolant Hose
- Lift the clamp to remove
- Connecting. Refer to → Fig. "Connect the Coolant Hose to the Connector Coupling".
5 - O-Ring
- Replace after removing
6 - Coolant Hose
- Lift the clamp to remove
- Connecting. Refer to → Fig. "Connect the Coolant Hose to the Connector Coupling".
7 - Coolant Hose
- To the coolant expansion tank
- To remove, press the release ring
- Connecting. Refer to → Fig. "Connect the Coolant Hose to the Connector Coupling".
8 - O-Ring
- Replace after removing
9 - Rubber Bushing
- For the radiator
10 - Sleeve
11 - Retaining Pin
- Disengage and remove using the screwdriver
12 - Coolant Hose
13 - Charge Air Cooling Circuit Cooler
- Removing and installing together with the radiator. Refer to → Chapter "Radiator, Removing and Installing".
14 - Coolant Hose
15 - Coolant Hose
- To the coolant expansion tank
- To remove, press the release ring
- Connecting. Refer to → Fig. "Connect the Coolant Hose to the Connector Coupling".
16 - O-Ring
- Replace after removing
17 - Upper Air Duct
- There are different versions. Refer to the Parts Catalog.
18 - Side Air Duct
- There are different versions. Refer to the Parts Catalog.
19 - Rubber Bushing
- For the radiator
20 - Rubber Buffer
21 - Bolt
- 14 Nm
22 - O-Ring
- Replace after removing
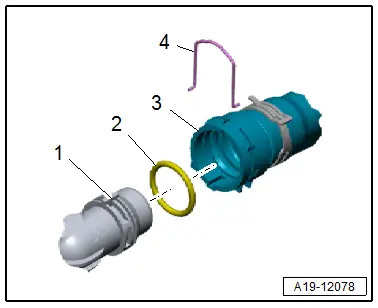
Connect the Coolant Hose to the Connector Coupling
 Note
Note
Replace the clip if damaged -4-.
- Remove the old O-ring -2- in the coolant hose -3-.
- Coat the new O-ring with coolant and insert it in the coolant hose.
- Press on the coolant hose until it engages audibly the clip -4- and the connection -1-.
- Press the coolant hose on again and pull to make sure the connector coupling is engaged correctly.
Fan Shroud, Radiator Fan
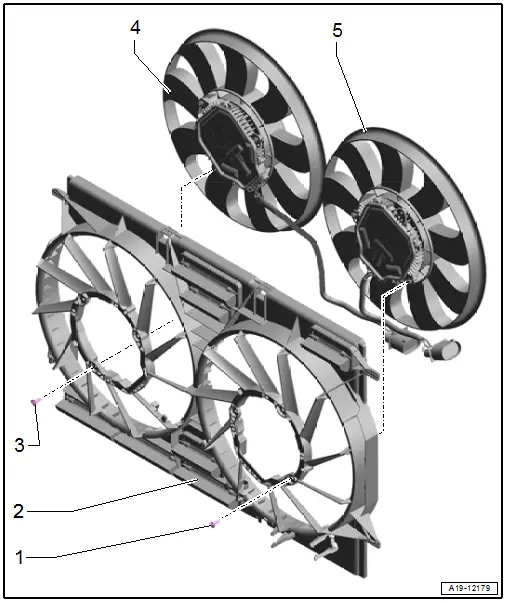
1 - Bolt
- 5 Nm
2 - Fan Shroud
- Removing and installing. Refer to → Chapter "Fan Shroud, Removing and Installing".
3 - Bolt
- 5 Nm
4 - Radiator Fan -V7-
- With Radiator Fan Control Module -J293-
- Removing and installing. Refer to → Chapter "Radiator Fan, Removing and Installing".
5 - Radiator Fan 2 -V177-
- With Radiator Fan Control Module 2 -J671-
- Removing and installing. Refer to → Chapter "Radiator Fan, Removing and Installing".
Radiator Shutter
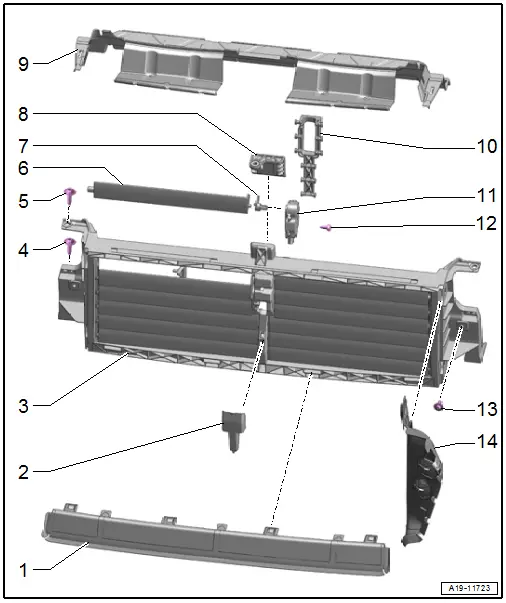
1 - Air Duct
2 - Cover
3 - Radiator Shutter
- Removing and installing. Refer to → Chapter "Radiator Shutter, Removing and Installing".
4 - Bolt
- 8 Nm
5 - Bolt
- 8 Nm
6 - Slat
7 - Driver
8 - Bracket
9 - Air Duct
10 - Connecting Panel
11 - Radiator Shutter Motor -V544-
- Removing and installing. Refer to → Chapter "Radiator Shutter Motor, Removing and Installing".
12 - Bolt
- 8 Nm
13 - Bolt
- 2.5 Nm
14 - Air Duct

