Audi Q7: Rear Outer Belt End Fitting, Removing and Installing
Removing
- Remove the luggage compartment side trim panel. Refer to → Chapter "Luggage Compartment Side Trim Panel, Removing and Installing".
- Remove the rear sill trim. Refer to → Chapter "Sill Panel, Removing and Installing".
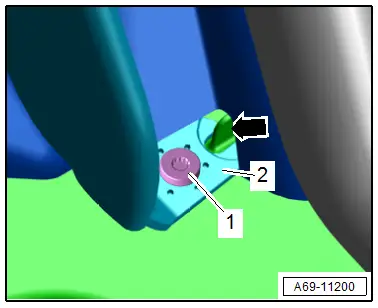
- Remove the bolt -1- on the belt end fitting -2-.
Installing
Install in reverse order of removal and note the following:
- The securing tabs -arrow- on the carpet must rest in the opening of the belt end fitting -2-.
Installation notes, for example tightening specifications, replacing components. Refer to → Chapter "Overview - Outer Rear Three-Point Seat Belt".
Rear Seat Belt Anchor in Center Seating Position, Removing and Installing
Removing
- Remove the second row cushion in the center. Refer to → Chapter "Cover and Cushion, Removing and Installing".
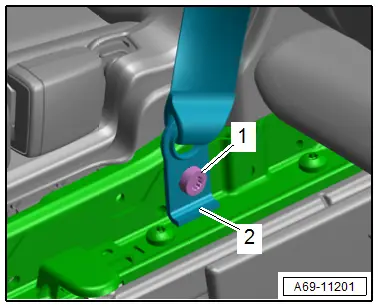
- Remove the bolt -1- on the belt end fitting -2-.
Installing
Install in reverse order of removal.
Installation notes, for example tightening specifications, replacing components. Refer to → Chapter "Overview - Rear Center Three-Point Seat Belt".
Third Row Rear Belt End Fitting, Removing and Installing
 Note
Note
The procedure is based on the market-specific North America.
Removing
- Remove the third row rear seat backrest.
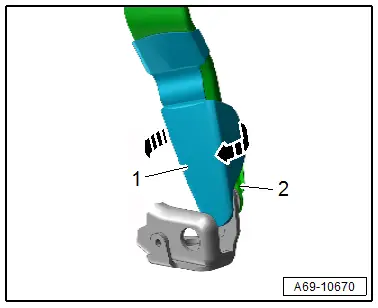
- Unclip the cover -1- on the belt end fitting -2--arrows- and push it upward.
 Caution
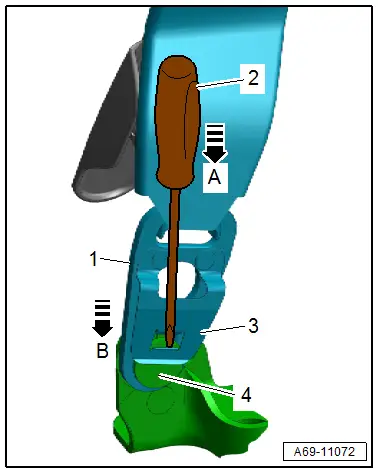
- The spring -3- will get bent if it is removed incorrectly. Replace the three-point seat belt if the spring gets bent.
- Move the spring -3- just far enough until it is possible to release the tab on the spring.
- Release the spring tab -3- by inserting a small screwdriver -2- in the opening in the spring in direction of -arrow A-.
- Push the belt end fitting -1- downward in direction of -arrow B- and disengage from the pin -4-.
Installing
Install in reverse order of removal.
Installation notes, for example tightening specifications, replacing components. Refer to → Chapter "Overview - Third Row Three-Point Seat Belt".

