Audi Q7: Rear Seat Backrest Locking Mechanism Handle, Removing and Installing, Seat High, Outer Second Row
Special tools and workshop equipment required
- Backrest Panel Tool -3370-
Removing
- Fold the seat forward.
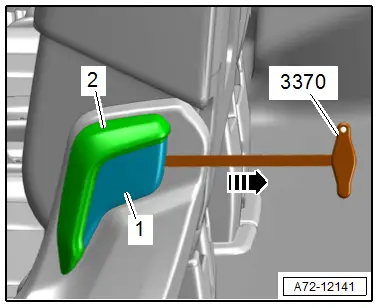
- Fix the -3370- on the trim -1- for the rear seat backrest locking mechanism -2- as shown.
- Remove the trim in the direction of -arrow-.
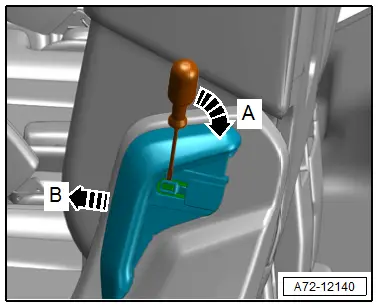
- Carefully lift up the fastener using a small screwdriver in direction of -arrow A-.
- At the same time, remove the handle from the shaft in direction of -arrow B-.
Installing
Install in reverse order of removal.
Installation instructions: for example, tightening specifications, replacing body parts. Refer to → Chapter "Overview - Bench Seat/Single Seat, Seat Low Trim Panels, Outer Second Row Seat", → Chapter "Overview - Bench Seat/Single Seat, Seat High Trim Panels, Outer Second Row Seat".
Rear Seat Backrest Contact Switch, Removing and Installing, Seat High, Outer Second Row
Removing
- Remove the seat rail trim panel on the side sill side. Refer to → Chapter "Seat Rail Trim Panel on Side Sill Side, Removing and Installing, Seat High, Outer Second Row".
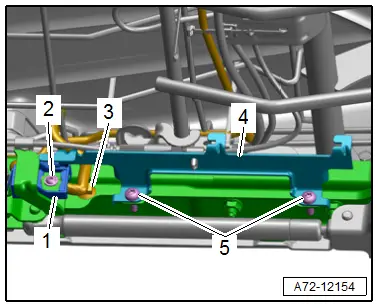
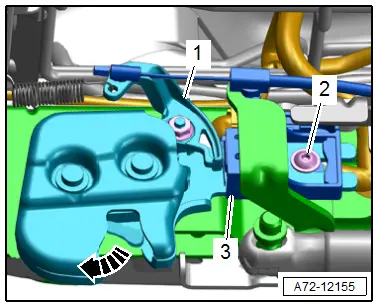
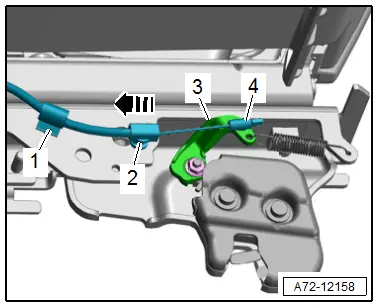
- Remove the bolts -5- and fold the trim panel bracket -4- to the side.
- Loosen the clip -3-.
- Remove the bolt -2-.
- Remove the rear seat backrest contact switch -1- and disconnect the connector.
Installing and Adjusting
Install in reverse order of removal and note the following:
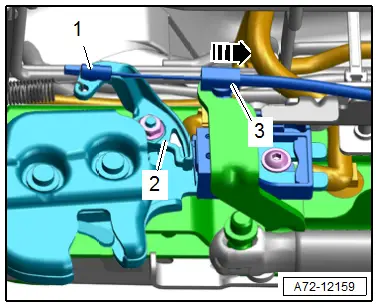
- Open the lock for the seat folding release -arrow-.
- Position the switch -3- so that the rocker switch is slightly vertical next to the release lever -1-.
- Tighten the bolt -2-.
 WARNING
There is risk of fingers being pinched and injury when closing the seat folding lock.
Close the seat folding lock with a screwdriver, for example.
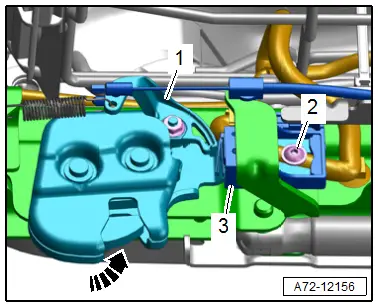
- Close the seat folding lock on both sides using a screwdriver, for example -arrow-.
- The release lever must release the rocker switch.
- If necessary, loosen the bolt -2- and slide the switch -3- correspondingly.
Installing
Install in reverse order of removal.
Installation instructions: for example tightening specifications, replacing components. Refer to → Chapter "Overview - Bench Seat/Single Seat, Seat Frame High, Outer Second Row Seat".
Gas-Filled Strut, Removing and Installing, Seat High, Outer Second Row
Removing
 WARNING
Risk of injury when the gas-filled strut is tensioned.
The gas-filled strut may only be removed when the seat is folded forward.
- Fold the outer seat forward.
- Support the seat or secure it against falling.
- Using a small screwdriver, lift the securing spring -arrow- slightly and remove the gas-filled strut -1- from the ball stud -2-.
- Repeat the same procedure on the second ball stud.
- Carefully fold the seat toward the rear.
- Vent the gas-filled strut for disposal. Refer to → Chapter "Gas-Filled Strut, Venting".

Installing
Install in reverse order of removal.
Installation notes, for example tightening specifications, replacing components. Refer to → Chapter "Overview - Bench Seat/Single Seat, Seat Frame High, Outer Second Row Seat".
Gas-Filled Strut, Venting
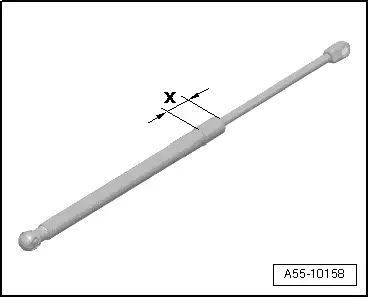
- Clamp the gas-filled strut in a vise in the area -x- = 50 mm.
 WARNING
- Clamp only within this area, otherwise there is an accident risk!
- Wear protective eyewear when sawing.
 Note
Note
Cover the cut area with a cleaning cloth to absorb oil spraying out.
- Saw on the gas-filled strut cylinder within the first third of the overall cylinder length starting from the edge on the piston rod side.
Release Cable for Seat Folding Release, Removing and Installing, Seat High, Outer Second Row
Removing
- Remove the cushion. Refer to → Chapter "Cover and Cushion, Removing and Installing, Second Row Seat Pan High".
- Remove the tunnel-side seat side trim. Refer to → Chapter "Seat Side Trim on Tunnel Side, Removing and Installing, Outer Second Row Seat".
- Remove the seat rail trim panel on the tunnel-side. Refer to → Chapter "Seat Rail Tunnel-Side Trim Panel, Removing and Installing, Seat High, Outer Second Row".
- Remove the seat rail trim panel on the side sill side. Refer to → Chapter "Seat Rail Trim Panel on Side Sill Side, Removing and Installing, Seat High, Outer Second Row".
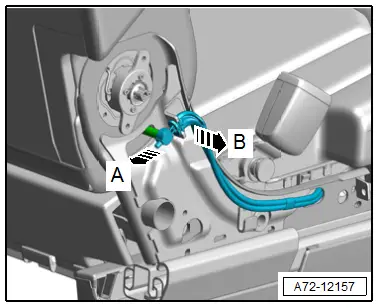
- Disengage the release cable bracket in direction of -arrow B-.
- Disengage the release cable nipple in direction of -arrow A-.
- Disengage the release cable nipple -4- from the release lever on the tunnel-side -3-.
- Disengage the support bracket -2- in the direction of -arrow-.
- Unclip the release cable sheath -1-.
- Disengage the release cable nipple -1- from the release lever on the side sill side -2-.
- Disengage the support bracket -3- in the direction of -arrow-.
- Free up the release cable and remove it.
Installing and Adjusting
Install in reverse order of removal and note the following:
 WARNING
There is risk of fingers being pinched and injury when closing the seat folding lock.
Close the seat folding lock with a screwdriver, for example.
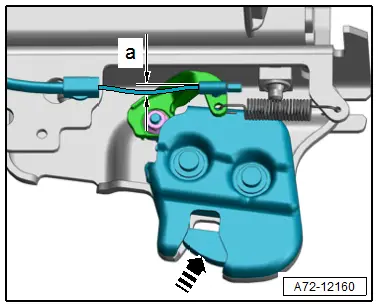
- Close the seat folding lock on both sides using a screwdriver, for example -arrow-.
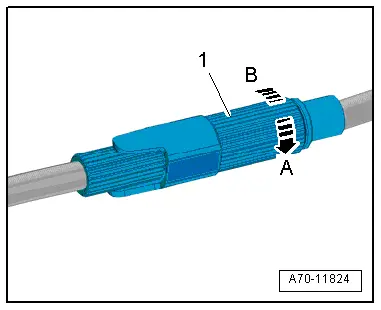
- The release cable must have little play -a-.
- Dimension -a- = approximately 1 mm.
- If required, adjust the release cable on the adjuster -1-.
- To do so, turn the adjuster in the direction of -arrow A- or -arrow B-.
Installation notes, for example tightening specifications, replacing components. Refer to → Chapter "Overview - Bench Seat/Single Seat, Seat Frame High, Outer Second Row Seat".