Audi Q7: Rear Window Wiper System
Overview - Component Location Rear Window Wiper System
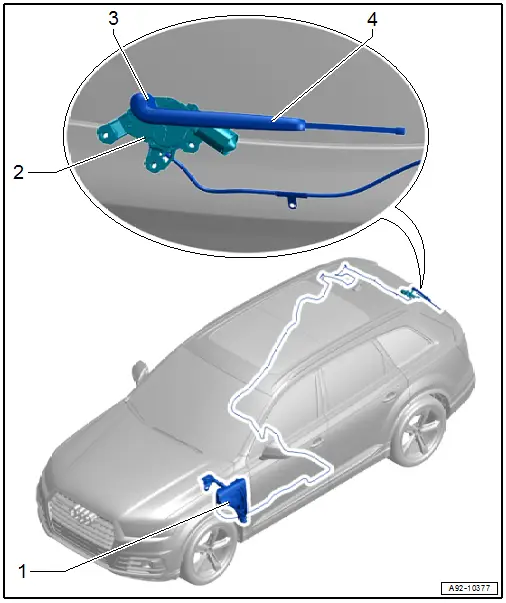
1 - Washer Fluid Reservoir
- Overview. Refer to → Chapter "Overview - Rear Window Washer System".
2 - Rear Window Wiper Motor -V12-
- Overview. Refer to → Chapter "Overview - Rear Window Wiper System".
3 - Washer Nozzle
- Overview. Refer to → Chapter "Overview - Rear Window Washer System".
4 - Windshield Wiper Arm
- Overview. Refer to → Chapter "Overview - Rear Window Wiper System".
Overview - Rear Window Wiper System
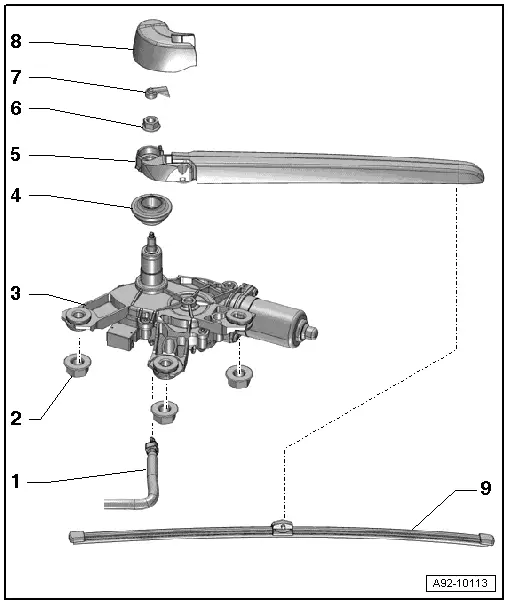
1 - Washer Fluid Hose
- For the rear window washer system
2 - Nut
- 8 Nm
3 - Rear Window Wiper Motor -V12-
- Removing and installing. Refer to → Chapter "Rear Window Wiper Motor -V12-, Removing and Installing".
4 - Rubber Seal
- Replace if damaged.
- Removing and installing. Refer to → Chapter "Grommet, Removing and Installing".
5 - Windshield Wiper Arm
- Removing and installing. Refer to → Chapter "Windshield Wiper Arm, Removing and Installing".
6 - Nut
- 12 Nm
7 - Washer Nozzle
8 - Rear Window Cap
9 - Wiper Blade
- Replacing. Refer to → Chapter "Wiper Blade, Removing and Installing".
Wiper Blade, Removing and Installing
Removing
- Remove the wiper arm from the rear window.
- Pull the wiper blade -1- down out of the wiper arm -2- in direction of -arrow-.
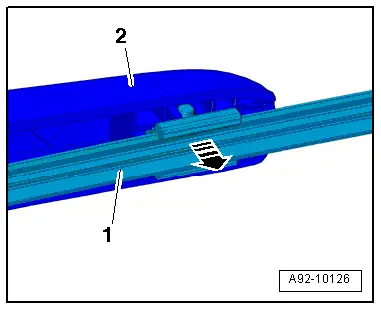
Installing
Install in the reverse order of removal while noting the following:
- The wiper blade must audibly engage in the wiper arm.
Windshield Wiper Arm, Removing and Installing
Special tools and workshop equipment required
- Puller - Wiper Arm Kit -T10369-
Removing
- Turn on the ignition.
- Activate "rear wiping" and let the wiper arm run to end position.
- Switch off the ignition and all electrical equipment. Place the ignition key outside of the vehicle.
- Carefully expand the cap in direction of -arrows- and remove.
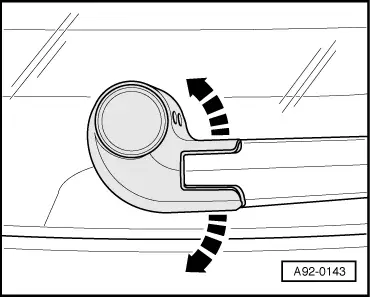
- Carefully remove the spray nozzle -2-.
- Loosen the nut -1- one turn.
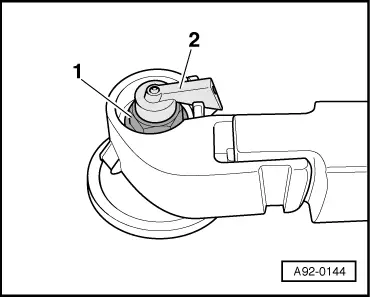
- Install an M6 nut -4- on the nut.
- Position the Puller - Wiper Arm Kit - Puller 1 -T10369/1- on the wiper arm -1- as shown.
- Position the thrust piece -2- on the windshield wiper axle.
- Turn the bolt -3- clockwise until the windshield wiper arm is removed from the windshield wiper axle.
- Remove the nut completely and remove the wiper arm.

Installing
Install in the reverse order of removal while noting the following:
- Adjust the wiper arm. Refer to → Chapter "Wiper Arm, Adjusting".
Wiper Arm, Adjusting
Procedure
- Remove the wiper arm. Refer to → Chapter "Windshield Wiper Arm, Removing and Installing".
- Turn on the ignition.
- Activate "rear wiping" and let the wiper arm run to end position.
- Turn off the ignition.
- Position the wiper arm with wiper blade installed at the windshield wiper axle and align wiper blade at the rear window as follows:
- Dimension -a- = 19 + 5 mm.
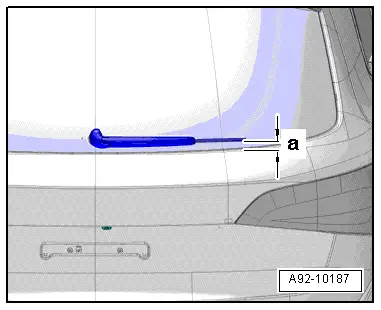
TIP
The dimension is the distance between the wiper blade tip and the lower edge of the window.
- Tighten the wiper arm nut.
- Turn on the ignition.
- Activate "rear wiping" and let the wiper arm run to end position.
- Check the wiper arm adjustment again and correct if necessary.
Tightening Specifications
- Refer to → Chapter "Overview - Rear Window Wiper System"
Rear Window Wiper Motor -V12-, Removing and Installing
Rear Window Wiper Motor -V12-, Removing and Installing
Removing
- Remove the wiper arm. Refer to → Chapter "Windshield Wiper Arm, Removing and Installing".
- Remove the lower rear lid trim panel. Refer to → Body Interior; Rep. Gr.70; Luggage Compartment Trim Panels; Rear Lid Lower Trim Panel, Removing and Installing.
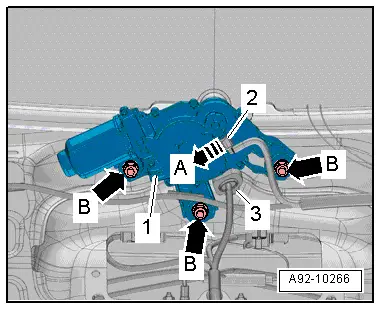
- Disconnect the connector -3-.
- Remove the clip in direction of -arrow A- and remove the washer fluid line -2- from the spray nozzle connecting pipe.
- Remove the nuts -arrows B- and remove the Rear Window Wiper Motor -V12--1-.
Installing
Install in the reverse order of removal while noting the following:
- The washer fluid hose must engage audibly into the spray nozzle connection.
- Adjust the wiper arm. Refer to → Chapter "Wiper Arm, Adjusting".
Tightening Specifications
- Refer to → Chapter "Overview - Rear Window Wiper System"
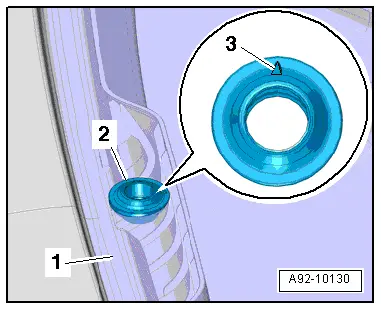
Grommet, Removing and Installing
Removing
- Remove the rear window wiper motor. Refer to → Chapter "Rear Window Wiper Motor -V12-, Removing and Installing".
- Carefully pry the grommet out of the rear window.
Installing
Install in the reverse order of removal while noting the following:
- Install the grommet -2- into the rear window -1-.
- The marking -3- must face upward.