Audi Q7: Seat Anchor Trim Panel, Removing and Installing, Seat High, Outer Second Row
Special tools and workshop equipment required
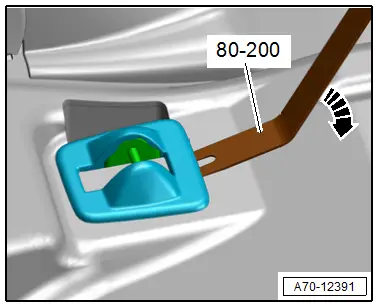
- Pry Lever -80-200-
Removing
- Fold the seat forward.
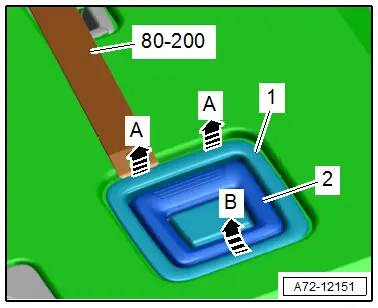
- Place the -80-200- on the trim panel and pry it off in direction of -arrow-.
Installing
Install in reverse order of removal.
Installation notes, for example tightening specifications, replacing components. Refer to → Chapter "Overview - Bench Seat/Single Seat, Seat High Trim Panels, Outer Second Row Seat".
Rear Cover, Removing and Installing, Seat High, Second Row
Removing
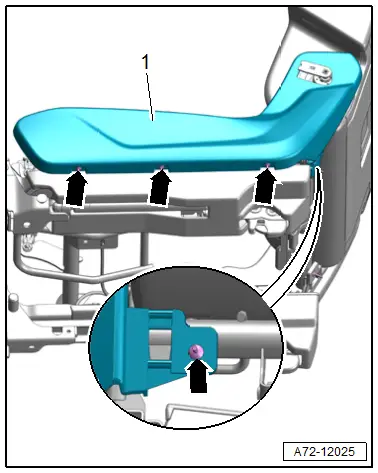
- Remove the seat cushion. Refer to → Chapter "Cover and Cushion, Removing and Installing, Second Row Seat Pan High".
- Outer seat: fold the seat forward.
- Center seat: fold the backrest forward.
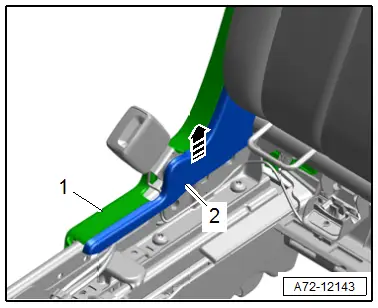
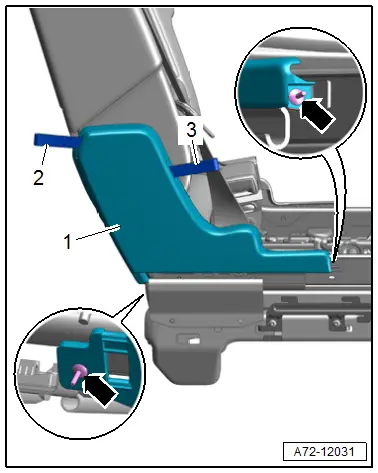
- Remove the rear molding for the seat cover -1- from the rear cover -2- in direction of -arrow-.
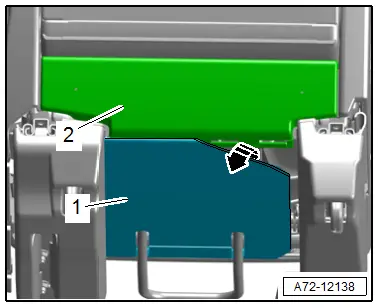
- If required, loosen the front molding for the cover from the seat frame in direction of -arrow-.
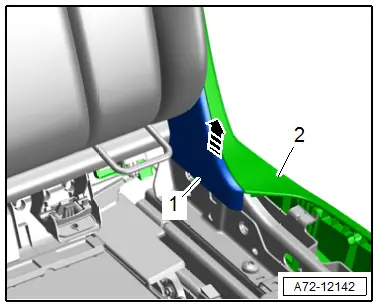
- Fold the seat or backrest toward the rear.
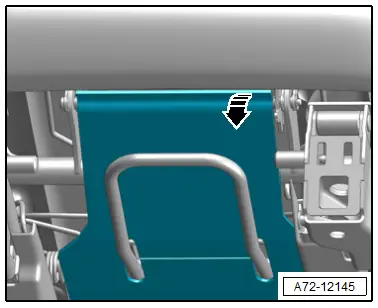
- Press the left and right hooks together and disengage the cover -1- upward in direction of -arrow-.
Installing
Install in reverse order of removal.
Installation notes, for example tightening specifications, replacing components. Refer to → Chapter "Overview - Bench Seat/Single Seat, Seat High Trim Panels, Outer Second Row Seat".
Seat Side Trim on Tunnel Side, Removing and Installing, Outer Second Row Seat
Removing
- Seat Low: remove the cushion. Refer to → Chapter "Cover and Cushion, Removing and Installing, Second Row Seat Pan Low".
- Seat High: remove the rear cover. Refer to → Chapter "Rear Cover, Removing and Installing, Seat High, Second Row".
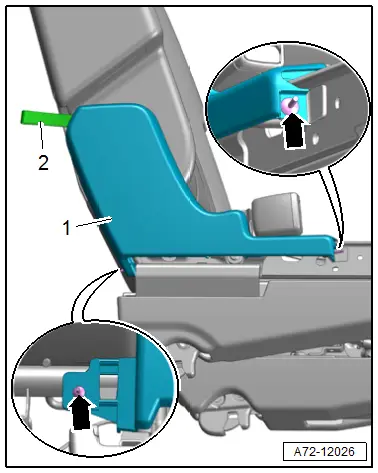
- Remove the seat side trim inner piece -2- from the outer piece -1- in direction of -arrow-.
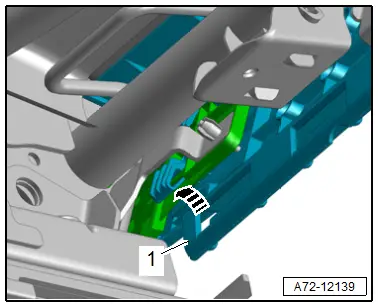
- Remove the expanding clips -arrows-, disengage the seat side trim outer piece -1- upward and remove it.
2 - Pull loop for backrest release
Installing
Install in reverse order of removal and note the following:
- Guide the pull loop -2- for the rear seat backrest locking mechanism through the slot on the seat side trim.
- Align the seat side trim in the mounts before inserting the clips.
Installation notes, for example tightening specifications, replacing components. Refer to → Chapter "Overview - Bench Seat/Single Seat, Seat High Trim Panels, Outer Second Row Seat".
Seat Side Trim on Side Sill Side, Removing and Installing, Outer Second Row Seat
Removing
- Remove the rear seat backrest locking mechanism handle. Refer to → Chapter "Rear Seat Backrest Locking Mechanism Handle, Removing and Installing, Seat High, Outer Second Row".
- Seat High: remove the rear cover. Refer to → Chapter "Rear Cover, Removing and Installing, Seat High, Second Row".
- Remove the seat side trim inner piece -1- from the outer piece -2- in direction of -arrow-.
- Remove the expanding clips -arrows-, disengage the seat side trim outer piece -1- upward and remove it.
Installing
- Align the seat side trim in the mounts before inserting the clips.
Installation notes, for example tightening specifications, replacing components. Refer to → Chapter "Overview - Bench Seat/Single Seat, Seat High Trim Panels, Outer Second Row Seat".
Seat Side Trim, Removing and Installing, Center Second Row Seat
Removing
- Remove the cushion. Refer to → Chapter "Cover and Cushion, Removing and Installing".
- Seat High: remove the rear cover. Refer to → Chapter "Rear Cover, Removing and Installing, Seat High, Second Row".
- Remove the seat side trim inner piece -2- from the outer piece -1- in direction of -arrow-.
- Remove the expanding clips -arrows-, disengage the seat side trim outer piece -1- upward and remove it.
2 and 3 - Pull loop for backrest release
Installing
Install in reverse order of removal and note the following:
- Tunnel-side seat side trim: Guide the pull loops -2 and 3- for the backrest release through the slot on the seat side trim.
- Align the seat side trim in the mounts before inserting the clips.
Installation instructions: for example, tightening specifications, replacing body parts. Refer to → Chapter "Overview - Bench Seat/Single Seat, Seat Low Trim Panels, Center Second Row Seat" and → Chapter "Overview - Bench Seat/Single Seat, Seat High Trim Panels, Center Second Row Seat".
Net Partition Trim, Removing and Installing, Outer Second Row Seat
Special tools and workshop equipment required
- Pry Lever -80-200-
Removing
- Fold the backrest forward.
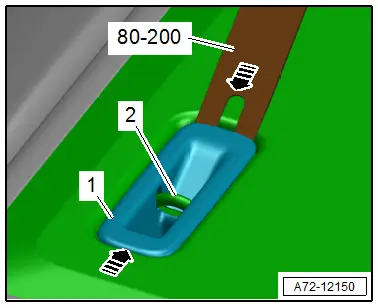
- Release the catches using the -80-200--arrows- and pry the cover -1- upward from the backrest.
- Carefully pull and remove the cover from the anchor -2-.
Installing
Install in reverse order of removal.
Installation notes, for example tightening specifications, replacing components. Refer to → Chapter "Overview - Rear Seat Backrest, Second Row Backrest without Center Armrest".
Seat Folding Release Handle, Removing and Installing, Seat High, Outer Second Row
Special tools and workshop equipment required
- Pry Lever -80-200-
Removing
- Fold the backrest forward.
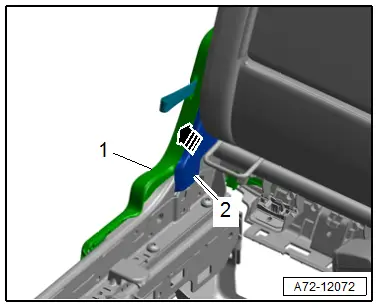
- Release the catches using the -80-200- in direction of -arrows A- and pry the cover -1- upward from the backrest.
- Pull the release handle -2- at the same time and disengage the rear cover on the backrest in direction of -arrow B-.
- Disconnect the inner and outer shells for the release handle -1- using the -80-200- in direction of -arrow-.
- Remove the inner and outer release handle shell from the metal bracket.

Installing
Install in reverse order of removal.
Installation notes, for example tightening specifications, replacing components. Refer to → Chapter "Overview - Rear Seat Backrest, Second Row Backrest without Center Armrest".

