Audi Q7: Sliding Sunroof Tilting Mechanism, Removing and Installing
Removing
- Remove the front glass panel. Refer to → Chapter "Glass Panel, Removing and Installing, Front".
- Remove the wind deflector. Refer to → Chapter "Wind Deflector, Removing and Installing".
- Remove the front interior lamp/reading lamp. Refer to → Electrical Equipment; Rep. Gr.96; Controls; Front Interior Lamp/Reading Lamp, Removing and Installing.
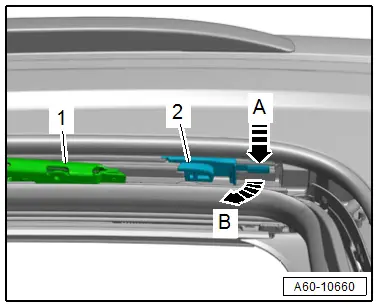
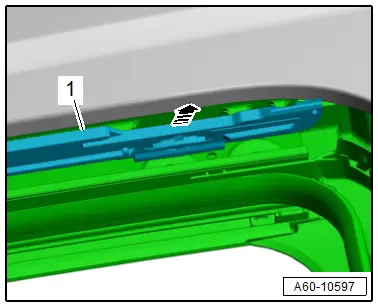
- Use the sliding sunroof emergency operation crank to move the tilting mechanism -1- toward the rear, until the stop -2- stands alone at the front.
- Release the retainer -arrow A- and push out the stop -arrow B-.
- Remove the stop from the guide rail.
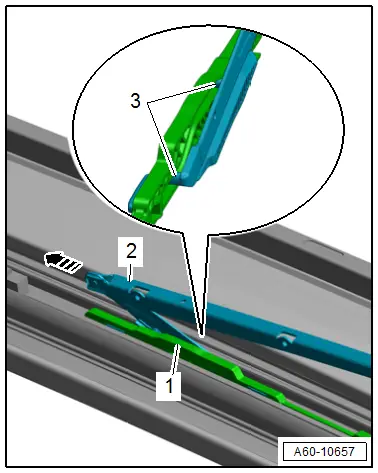
- Use the sliding sunroof emergency operation crank to move the guide -2- for the tilting mechanism -3- forward up to where the opening starts in the outer guide rail -6-.
- The guide must be flush with the outer guide rail -broken line-.
- On the outside, push the tilting mechanism slightly toward the inside. While doing so, guide the slider -4- upward past the seal -5- for the roof opening.
- Guide the tilting mechanism actuating arm -1- upward and out at the opening -arrow- for the tilting mechanism guide rail.

- Use the sliding sunroof emergency operation crank to move the tilting mechanism guide -3- up to where the inner guide rail -4- starts.
- The guide must be flush with the inner guide rail -broken line-.
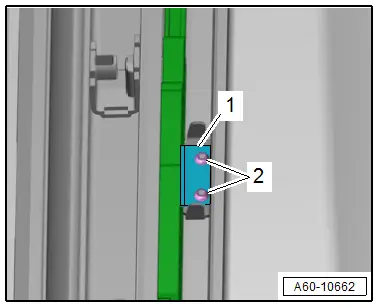
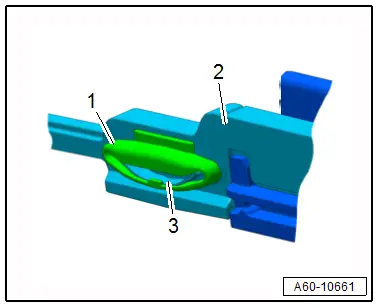
- Pull the sliding shoe -1- outward from the guide rail -2- and remove it to the side.
- Pivot the tilting mechanism upward.

- Slide the tilting mechanism -2- toward the rear -arrow- and remove.
- The rear sliders -3- are guided out of the tilting mechanism guide -1- at the same time.
Installing
Install in reverse order of removal and note the following:
- Perform an adaptation. Refer to → Chapter "Power Sunroof Control Module -J245-, Programming".
Tilting Mechanism Guide Rail, Removing and Installing
Special tools and workshop equipment required
- 5 mm Socket
- 5 mm Open End Wrench
Removing
- Remove the sliding sunroof tilting mechanism. Refer to → Chapter "Sliding Sunroof Tilting Mechanism, Removing and Installing".
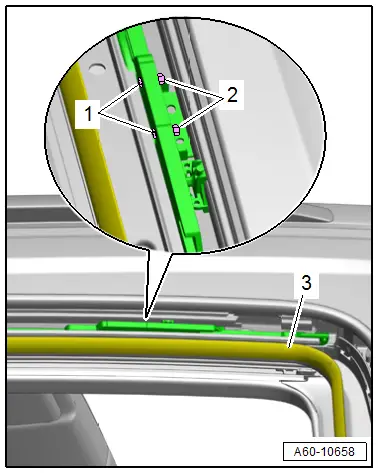
- Remove the inner seal -3- from the sunroof frame near the retaining bracket.
Depending on Version:
- Loosen the threaded connection -1- using the 5 mm Socket by counterholding the nuts -2- with a 5 mm open end wrench.
 Note
Note
The nuts can also be counterheld using needle nose pliers.
- Remove the nuts -2- using the 5 mm Socket.
- Remove the support bracket -1- upward.
Continuation for All:
- Tilt the tilting mechanism guide -1- out of the inner guide rail and remove it upward -arrow-.
Installing
Install in reverse order of removal and note the following:
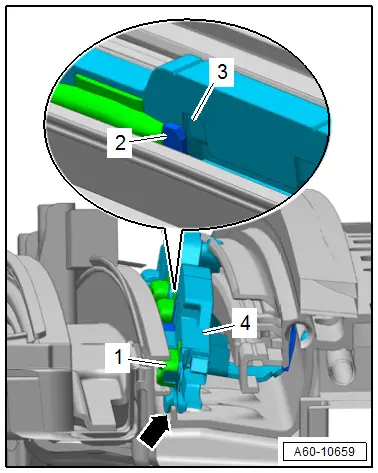
- Check if all sliding pieces -1- with springs -3- are on the tilting mechanism guide -2-.
- Insert the bottom of the tilting mechanism guide -4- into the mount for the guide rail -arrow-. While doing so, the arm -2- must engage in the opening -3-.
- Press the entire length of the tilting mechanism guide into the inner guide rail. The sliding pieces -1- must slide into place at the same time.
Power Sunroof Control Module -J245-, Removing and Installing
Removing
- Switch off the ignition.
- Remove the left and right sun visors. Refer to → Body Interior; Rep. Gr.68; Equipment; Sun Visor, Removing and Installing.
- Remove the front interior lamp/reading lamp. Refer to → Electrical Equipment; Rep. Gr.96; Controls; Front Interior Lamp/Reading Lamp, Removing and Installing.
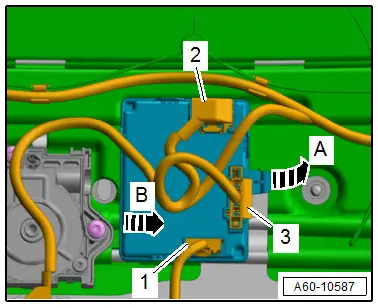
- Disconnect the connectors -1, 2 and 3-.
- Release the tab -arrow A- and push the Power Sunroof Control Module -J245- to the right side of the vehicle from the bracket -arrow B-.
Installing
Install in reverse order of removal and note the following:
- Perform an adaptation. Refer to → Chapter "Power Sunroof Control Module -J245-, Programming".
Power Sunroof Control Module -J245-, Programming
Sunroof Motor -V1-, Programming
After installing the Sunroof Motor -V1-, an adaptation must be performed.
 NOTICE
Moving the slotted guide rail guide increases the risk of damaging the sliding sunroof components.
- Move the slotted guide rail guide only when the glass panel is installed.
- Connect the Vehicle Diagnostic Tester.
- Switch the ignition on.
- Select and start the Diagnostic operating mode.
- Select the Test plan tab.
- Select the Select individual test button and select the following tree structure consecutively:
- Body
- Body Assembly
- 01 - OBD-capable systems
- CA - Power Sunroof Control Module J245
- CA - Power Sunroof Control Module J245 Functions
- CA - Basic Setting
- CA - Power Sunroof Control Module J245, no sliding sunroof basic setting
- Start the selected program and follow the instructions on the Vehicle Diagnostic Tester display.
Power Sunroof Control Module -J245-, Activating
If the Power Sunroof Control Module -J245- was replaced, it must be activated after installing.
- Connect the Vehicle Diagnostic Tester.
- Switch the ignition on.
- Select and start the Diagnostic operating mode.
- Select the Test plan tab.
- Select the Select individual test button and select the following tree structure consecutively:
- Body
- Body Assembly
- 01 - OBD-capable systems
- CA - Power Sunroof Control Module J245
- CA - Power Sunroof Control Module J245 Functions
- CA - Control module, replacing
- Start the selected program and follow the instructions on the Vehicle Diagnostic Tester display.

