Audi Q7 Owners & Service Manuals

Audi Q7: Speaker Trim in Door Trim Panel, Removing and Installing

Audi Q7 (4M) 2016-2025 Workshop Manual / Body / Body  Interior / Interior Trim / Speaker Trim in Door Trim Panel, Removing and Installing

Special tools and workshop equipment required

  • Drill
  • Drill 3.0 mm diameter, 6.5 mm diameter
  • Protective Eyewear

Removing

- Remove the door trim panel. Refer to → Chapter "Front Door Trim Panel, Removing and Installing".

- Place the trim panel on a soft surface.

- Remove the insulation mat.

- Disconnect the connector if equipped.

  Caution

Risk of damaging the door trim panel.

Be extremely careful when drilling.

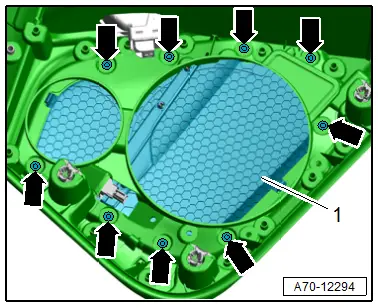
- Using a 6.5mm drill bit, drill out the speaker trim attachment points -arrows- from the door trim panel, just until the speaker trim begins to loosen from the door trim panel.

- Carefully loosen the attachment points one after another and remove the speaker trim -1- from the door trim panel.

A70-12294

Installing

Install in reverse order of removal and note the following:

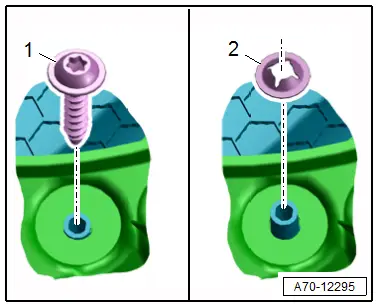
- When using a speaker trim that has already been welded, drill the screw holes to a 3.0 mm diameter and secure with a screw -1-.

- Insert the new speaker trim into the door trim panel and secure the plastic domes with lock washers -2-.

Installation notes, for example tightening specifications, replacing components. Refer to → Chapter "Overview - Front Door Trim Panel".

A70-12295

    READ NEXT:

     Front Door Trim Panel, Removing and Installing

    Special tools and workshop equipment required Wedge Set -T10383- Removing - Switch off the ignition. - Unclip the trim -1- using the -T10383/1--arrow-, disengage the trim at the door t

     Interior Door Mechanism, Removing and Installing

    Removing - Remove the door trim panel. Refer to → Chapter "Front Door Trim Panel, Removing and Installing". - Remove the trim molding. Refer to → Chapter "Trim Molding, Remov

     Overview - Rear Door Trim Panel

    1 - Liner Mat Insert in the door pocket. 2 - Clip For door trim panel Quantity: 8 Insert in the trim panel 3 - Rear Reflector Vehicles with a Left Rear Door W

    SEE MORE:

     Timing Chain Cover

    Overview - Timing Chain Cover 1 - Bolt Tightening specification and sequence. Refer to → Fig. "Lower Timing Chain Cover - Tightening Specification and Sequence". Replace after removing 2 - Lower Timing Chain Cover Removing and installing. Refer to → Chapter

     Timing Chain Cover, Removing and Installing

    Left Timing Chain Cover, Removing and Installing Special tools and workshop equipment required Hand Drill with Plastic Brush Attachment Protective Eyewear Sealant. Refer to the Parts Catalog.   Caution This procedure contains mandatory replaceable parts. Refer to component overview pri

    © 2019-2025 Copyright www.a-q7.com