Audi Q7: Vehicle Interior Forced Air Extraction, Removing and Installing
Removing
- Remove the rear bumper cover. Refer to → Body Exterior; Rep. Gr.63; Rear Bumper; Bumper Cover, Removing and Installing.
 Note
Note
For vehicles without a cover in the luggage compartment side trim panel, the side trim panel (left and/or right) is to be removed (so that the tabs -C- from the vent frame -A- can be loosened to remove) if the forced air extraction vent frame -A- is going to be reused after removing. Luggage compartment side trim panel, removing. Refer to → Body Interior; Rep. Gr.70; Luggage Compartment Trim Panels; Overview - Luggage Compartment Side Trim Panel.
If the removed vent frame is not going to be reused.
- Remove the vent frame -A- from the opening from the outside (doing so destroys the vent frame).
If the removed vent frame is going to be reused.
- Remove the left and / or right luggage compartment side trim panel (the luggage compartment trim does not currently have a cap). Refer to → Body Interior; Rep. Gr.70; Luggage Compartment Trim Panels; Overview - Luggage Compartment Side Trim Panel.
- Release the retainers -C- and push the forced air extraction ventilation vent frame -A- outward from the body opening.
Installing
Install in reverse order of removal. Note the following:
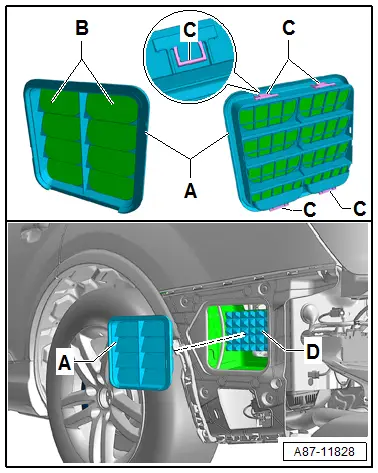
- Check the forced air extraction dampers -D- (left and right) for correct bonding.
- Check the seal on the vent frame -A- for damage.
- Install the vent frame -A- on the proper side so that the sealing lips -B- close correctly.
- Push in the vent frame of the forced air extraction -A- until it clicks into place and push all tabs -C- in the opening in the body.
 Note
Note
The vent frame -B- can only be installed in one position to ensure that the sealing lips -C- close correctly. The large radius -arrow- is at the top on these vehicles.
 Note
Note
During installation, ventilation frame -A- should be pressed into the opening on the rear lid end piece until all retaining tabs -C- of ventilation frame -A- engage securely in the body.
Vehicle Interior Forced Air Extraction, Checking
Check Forced Air Extraction Vent Frames from the Outside
- Remove the rear bumper cover. Refer to → Body Exterior; Rep. Gr.63; Rear Bumper; Bumper Cover, Removing and Installing.
- Make sure the left and right ventilation frames -A- are not obstructed and that the sealing lips -B- function properly.
 Note
Note
- Stuck sealing lips -B- or loose or dampers -D - in front of the vent frame -A- can lead to damage to the windshield, rear window and the door windows.
- The ventilation frames -A- can only be installed in one position to ensure the sealing lips -B- close correctly.
- In this illustration, the left ventilation frame -A- is depicted with rear bumper cover removed.
- If one of the bonded dampers -D- (left or right) is loosened from the vehicle, this can lead to problems with the forced air extraction. To check the dampers -D- remove the rear bumper cover and the vent frame from the forced air extraction -A- (left and right) or loosen the luggage compartment side trim panel (left and right) from the vehicle and remove. Refer to → Body Interior; Rep. Gr.70; Luggage Compartment Trim Panels; Luggage Compartment Side Trim Panel, Removing and Installing.

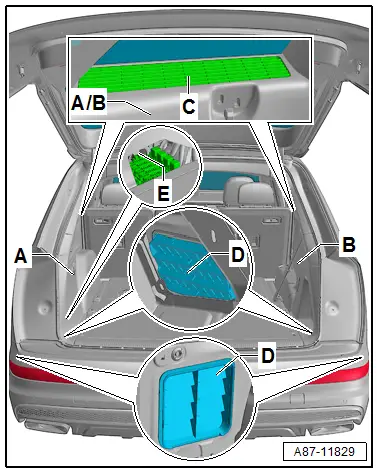
Check Forced Air Extraction Vent Frames from Inside
- Loosen or remove the luggage compartment side trim panel (left -A- and right -B-). Refer to → Body Interior; Rep. Gr.70; Luggage Compartment Trim Panels; Luggage Compartment Side Trim Panel, Removing and Installing.
 Note
Note
Depending on the version an opening -E- can be installed in the luggage compartment side trim panel (left -A- and /or right -B-). Via this opening the vent frame -D- can for example be checked with an endoscope without removing the corresponding luggage compartment side trim panel.
- Make sure left and right ventilation frames -D- are not obstructed.
 Note
Note
- The sealing lips in ventilation frame -D- must move freely and close automatically. Stuck sealing lips can result in fogging of the windshield, rear window, and the door windows. The same is also true for closed or blocked air ducts to ventilation frames -D-.
- To ensure that the sealing lips close correctly, ventilation frame -D- must be installed on the correct side.