Audi Q7: Plenum Chamber Water Drain, Removing and Installing
Removing
- Turn off the ignition.
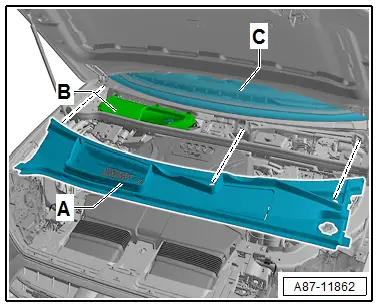
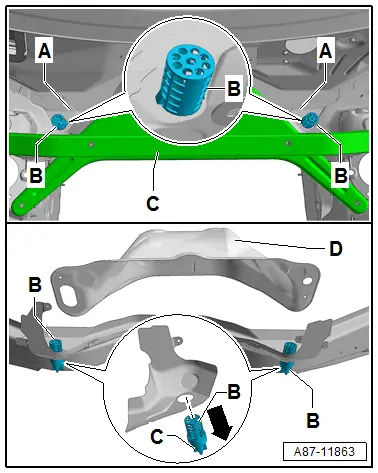
- Remove the plenum chamber cover -A-. Refer to → Body Interior; Rep. Gr.50; Bulkhead; Plenum Chamber Cover, Removing and Installing.
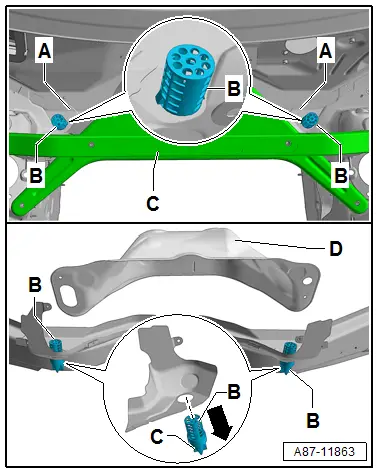
- Depending on the engine and the vehicle version, if necessary loosen the lower plenum chamber bulkhead -D- from the vehicle and pivot it completely to the side (do not open the coolant circuit). Refer to → Body Exterior; Rep. Gr.50; Bulkhead; Plenum Chamber Cover, Removing and Installing.
 Note
Note
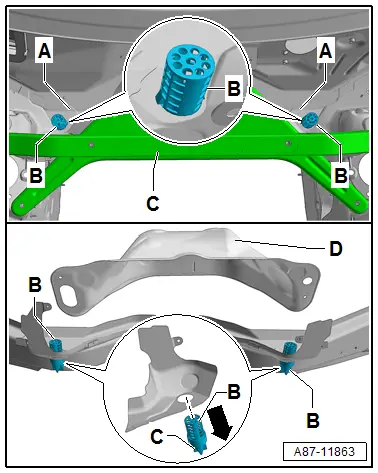
- The water drains -B- are snapped into the opening of the plenum chamber from below.
- Depending on the engine and the vehicle version the water drains -B- on the installed lower plenum chamber bulkhead -D- is not accessible.
- Remove the water drains -B- downward from the openings of the plenum chamber.
Installing
Installation is done is reverse order, observe the following:
- Check the valves -C- of the water drains -B- these must not stick and must completely open.
- Check the plenum chamber -A- for debris and clean if necessary.
- Install the water drains -B- downward in the openings of the plenum chamber.
- Reinstall removed components in the reverse order and reattach detached components.
Plenum Chamber Water Drain, Checking
Procedure
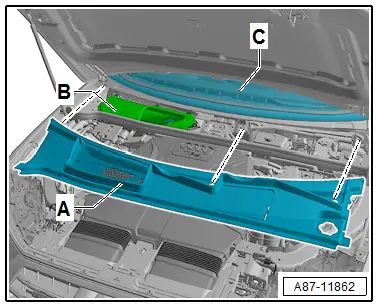
- Remove the plenum chamber cover -A-. Refer to → Body Interior; Rep. Gr.50; Bulkhead; Plenum Chamber Cover, Removing and Installing.
 Note
Note
- To prevent water from running via intake shaft -B- into the heater and A/C unit when plenum chamber cover -A- is installed, plenum chamber cover -A- must not be damaged. In addition the plenum chamber cover -A- must be correctly and completely engaged in the windshield frame -C-.
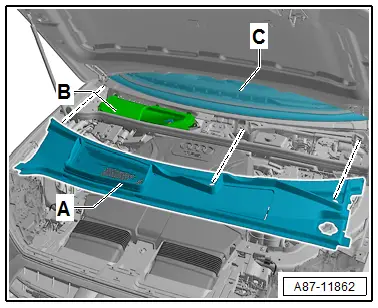
- The draining of water from plenum chamber -A- may be impaired by deposits (leaves, various tree needles, etc.) accumulating in the water drains -B- of the plenum chamber -A-. The water level in plenum chamber -A- then rises if the vehicle is taken to an automatic car wash or in the event of heavy rain. Water enters via the intake shaft into the heater and A/C unit and is blown by the Fresh Air Blower -V2- together with the conveyed air into the dust and pollen filter and onto the evaporator.
- If valves -C- of the water drains -B- (right and left in plenum chamber) are blocked by leaves and pine needles, it may cause the drains to freeze up in winter and water can no longer drain out. After a short drive, heat emitted from engine and exhaust system melts the ice in the drains again and water may drain off again before vehicle arrives at the workshop.
- The water drains -B- are snapped into the opening of the plenum chamber from below. Refer to → Chapter "Plenum Chamber Water Drain, Removing and Installing" for removing and installing.
Plenum Chamber Water Drain, Cleaning
Procedure
- Turn off the ignition.
- Remove the plenum chamber cover -A-. Refer to → Body Interior; Rep. Gr.50; Bulkhead; Plenum Chamber Cover, Removing and Installing.
- Clean debris (leaves, pine tree needles) and other contamination out of plenum channel -A-.
 Note
Note
- To check the water drains -B- that are difficult to reach, use a commercially available and illuminated endoscope, for example. It is best to use one that has a flexible waterproof head.
- Use a commercially available flexible gripping tool to clean, for example coarse dirt from difficult to reach water drains -B-. Then clean the remaining dirt through the valves -C-.
- Check the valves -C- of the water drains -B- for proper functioning (valves -C- must not stick or be obstructed by dirt).
