Audi Q7: Windshield Wiper System
Overview - Component Location Windshield Wiper System
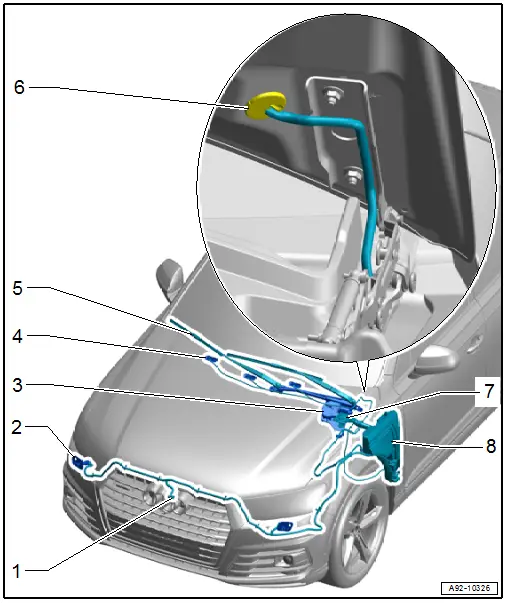
1 - Night Vision System Camera -R212- Washer Nozzle
- Overview. Refer to → Chapter "Overview - Headlamp Washer System".
2 - Headlamp Washer System Washer Nozzle
- Overview. Refer to → Chapter "Overview - Headlamp Washer System".
3 - Windshield Wiper Motor -V-
- With Wiper Motor Control Module -J400-
- Overview. Refer to → Chapter "Overview - Windshield Wiper System".
4 - Washer Nozzle
- Overview. Refer to → Chapter "Overview - Windshield Washer System".
5 - Windshield Wiper Arm
- Overview. Refer to → Chapter "Overview - Windshield Wiper System".
6 - Grommet
- For the washer fluid hose in the hood
7 - Filler Tube
- For the washer fluid reservoir
- Overview. Refer to → Chapter "Overview - Windshield Washer System".
8 - Washer Fluid Reservoir
- Overview. Refer to → Chapter "Overview - Windshield Washer System".
Overview - Windshield Wiper System
Overview - Windshield Wiper System
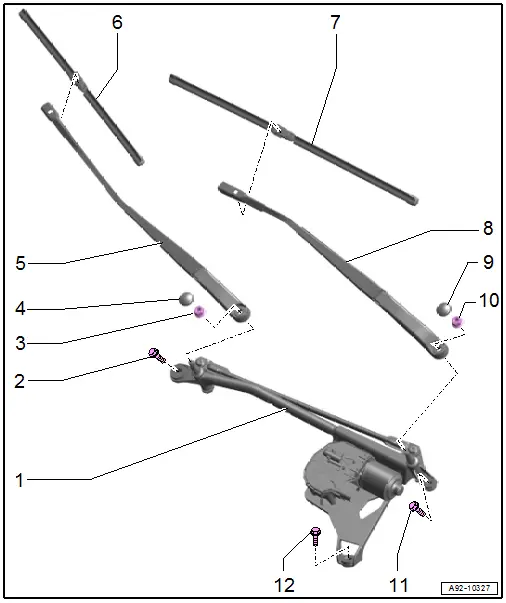
1 - Windshield Wiper Motor -V-
- With Wiper Motor Control Module -J400-
- Removing and installing. Refer to → Chapter "Windshield Wiper Motor -V-, Removing and Installing".
2 - Bolt
- Tightening sequence. Refer to → Fig. "Windshield Wiper Motor - Tightening Specification and Sequence".
3 - Nut
- 32 Nm
4 - Cap
5 - Front Passenger Side Windshield Wiper Arm
- There are different lengths. Refer to the Parts Catalog.
- Removing and installing. Refer to → Chapter "Windshield Wiper Arms, Removing and Installing".
- Adjusting. Refer to → Chapter "Windshield Wiper Arms, Adjusting".
6 - Front Passenger Side Wiper Blade
- There are different lengths. Refer to the Parts Catalog.
- Replacing. Refer to → Chapter "Wiper Blade, Removing and Installing".
7 - Driver Side Wiper Blade
- There are different lengths. Refer to the Parts Catalog.
- Replacing. Refer to → Chapter "Wiper Blade, Removing and Installing".
8 - Driver Side Windshield Wiper Arm
- There are different lengths. Refer to the Parts Catalog.
- Removing and installing. Refer to → Chapter "Windshield Wiper Arms, Removing and Installing".
- Adjusting. Refer to → Chapter "Windshield Wiper Arms, Adjusting".
9 - Cap
10 - Nut
- 32 Nm
11 - Bolt
- Tightening sequence. Refer to → Fig. "Windshield Wiper Motor - Tightening Specification and Sequence".
12 - Bolt
- Tightening sequence. Refer to → Fig. "Windshield Wiper Motor - Tightening Specification and Sequence".
Windshield Wiper Motor - Tightening Specification and Sequence
- Tighten the bolts in steps according to the sequence shown:

Overview - Windshield Wiper System, Rain/Light Recognition Sensor
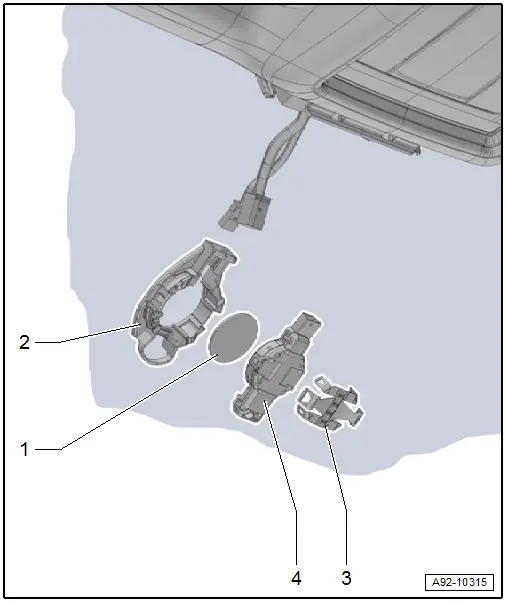
1 - Silicone Pad
- There are different versions. Refer to the Parts Catalog.
- Replace after removal
2 - Baseplate
- For Rain/Light Recognition Sensor -G397-
- Attached to the windshield
3 - Clip
4 - Rain/Light Recognition Sensor -G397-
- There are different versions. Refer to the Parts Catalog.
- Removing and installing. Refer to → Chapter "Rain/Light Recognition Sensor, Removing and Installing".
- Replacing. Refer to → Chapter "Rain/Light Recognition Sensor, Removing and Installing".
Windshield Wiper, Bringing into Service Position
If the windshield wiper motor is to be run during the procedure, the front lid must be completely closed, otherwise the power supply to the wiper motor will be interrupted.
- Make sure the wiper blades are not frozen if there is a risk for frost.
- Turn on the ignition.
- Activate the menu item windshield wiper "on" using the multimedia system control head. Refer to the Owner's Manual.
- The windshield wipers run in "service position".
- Turn off the ignition.
 NOTICE
Risk of damaging the front lid by moving the windshield wipers back to the basic setting.
- Never maneuver a vehicle with the windshield wiper arms folded up.
TIP
At a speed of 6 km/h when operating the windshield wiper switch the windshield wiper drive back into the basic setting.
Wiper Blade, Removing and Installing
Removing
- Bring the windshield wiper into service position. Refer to → Chapter "Windshield Wiper, Bringing into Service Position".
- Lift the windshield wiper arm off the windshield.
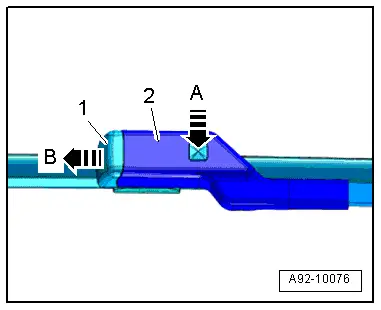
- Press the clip in direction of -arrow A- and slide the wiper blade -1- off of the windshield wiper arm -2- in direction of -arrow B-.
- Remove the wiper blade.
Installing
Install in the reverse order of removal while noting the following:
- Pay attention to the different lengths of the wiper blades for the driver and front passenger side.
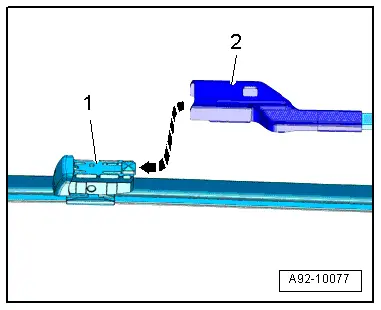
- Guide the wiper blade -1- parallel into the windshield wiper arm -2- in direction of -arrow-. Make sure that the wiper blade is slid into the windshield wiper arm until the clip audibly engages.
- To leave the "Service position", either press the windshield wiper switch or drive faster than 6 km/h.
Windshield Wiper Arms, Removing and Installing
Special tools and workshop equipment required
- Puller - Wiper Arm Kit -T10369-
- Puller - Wiper Arm Kit - Puller 1 -T10369/1-
Removing
- To prevent damage to the windshield wiper axles only loosen using the -T10369/1-.
- If the windshield wiper motor is to be run during the work procedure, the front lid must be closed. Otherwise, the power supply to the wiper motor will be interrupted.
- Bring the windshield wiper into service position. Refer to → Chapter "Windshield Wiper, Bringing into Service Position".
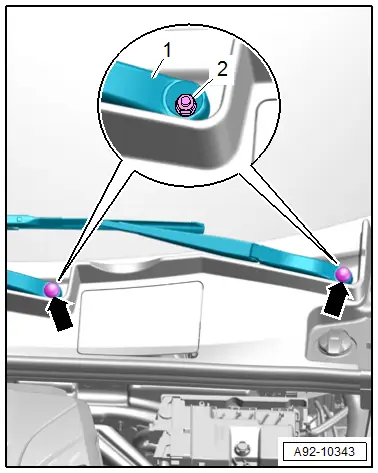
- Pry the caps -arrows- off of the windshield wiper arms -1- with a screwdriver.
- Loosen the nuts -2- several turns.

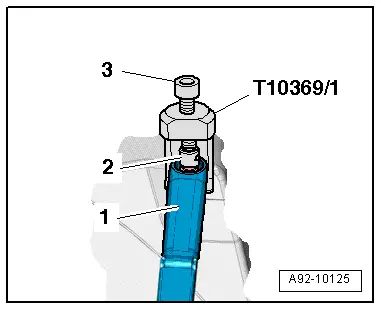
- Position the -T10369/1- on the windshield wiper arm -1- as shown.
- Position the thrust piece -2- on the windshield wiper axle.
- Turn the bolt -3- clockwise until the windshield wiper arm is removed from the windshield wiper axle.
- Remove the nuts completely and remove the windshield wiper arms.
Installing
Install in the reverse order of removal while noting the following:
- Pay attention to the different lengths of the wiper blades for the driver and front passenger side.
- Adjust the windshield wiper arms. Refer to → Chapter "Windshield Wiper Arms, Adjusting".
Windshield Wiper Arms, Adjusting
Procedure
TIP
If the windshield wiper motor is to be run during the procedure, the front lid must be completely closed, otherwise the power supply to the wiper motor will be interrupted.
- Remove the windshield wiper arms. Refer to → Chapter "Windshield Wiper Arms, Removing and Installing".
- Turn on the ignition.
- Activate "one-touch wiping" and let the windshield wiper motor run into its end position.
TIP
- Every second time the windshield wiper motor is switched off, it returns to a lower rest position, thus tipping the wiper blade lip the other way.
- To do so, the windshield wiper motor moves downward past the end position and then goes back up again slightly. This lower rest position must not be used to align the windshield wiper crank.
- Only use the end position where the windshield wiper motor runs directly into the end position with no under-stroke. If necessary, activate "one-touch wiping" again.
- Turn off the ignition.
- Position the wiper arm with wiper blade installed at the wiper axle.
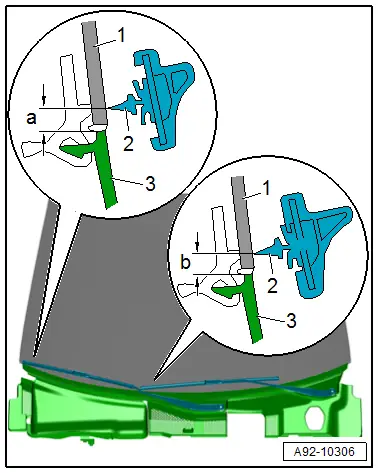
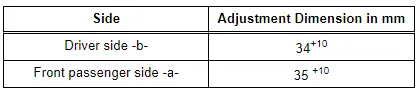
- Align the wiper blade tip -2- on the lower edge of the windshield -1- to the cowl panel trim -3-:
- Tighten the nuts -2- for the windshield wiper arms -1-.
- Turn on the ignition.
- Activate "one-touch wiping" and let the windshield wiper arms run into their end position.
- Turn off the ignition.
- Check the wiper arm adjustment one more time and adjust if necessary.
- Press the caps -arrows- onto the windshield wiper arms.
Tightening Specifications
- Refer to → Chapter "Overview - Windshield Wiper System"
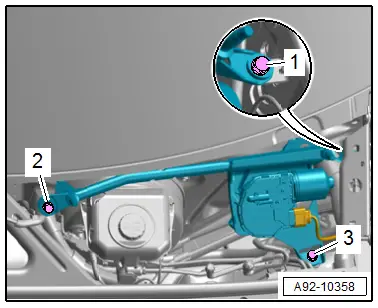
Windshield Wiper Motor -V-, Removing and Installing
- If replacing the control module, select the "Replace control module" function for the corresponding control module on the Vehicle Diagnostic Tester.
Removing
- Remove the windshield wiper arms. Refer to → Chapter "Windshield Wiper Arms, Removing and Installing".
- Remove the plenum chamber cover. Refer to → Body Exterior; Rep. Gr.50; Bulkhead; Plenum Chamber Cover, Removing and Installing.
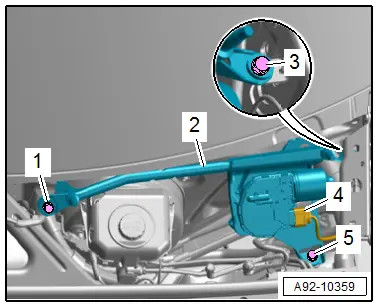
- Remove the expanding rivet -1-.
- Pivot the filler neck -2- upward but do not remove the washer fluid reservoir and the body opening -3-.
- Remove the bolts -1, 3 and 5-.
- Remove the windshield wiper frame -2- with the linkage and remove the windshield wiper motor from the plenum chamber.
- Disconnect the connector -4-.
Installing
Install in the reverse order of removal while noting the following:
- Insert the windshield wiper motor with the windshield wiper frame into the vehicle.
- Tighten the bolts. Refer to → Fig. "Windshield Wiper Motor - Tightening Specification and Sequence".
- Adjust the windshield wiper arms. Refer to → Chapter "Windshield Wiper Arms, Adjusting".
Tightening Specifications
- Refer to → Fig. "Windshield Wiper Motor - Tightening Specification and Sequence"

