Audi Q7: Air Ducts and Vents in the Rear Vehicle Interior, "Low" A/C System
 Note
Note
- Depending on vehicle equipment, there are different versions of the A/C system for the Audi Q7. Make sure to use the correct version and pay attention to the allocation of different components. Refer to → Chapter "A/C System Versions" and Parts Catalog.
- To remove the rear air ducts depending on the component location of the air duct, the vent, the center console, and the rear carpet must be removed. Refer to → Body Interior; Rep. Gr.68; Center Console; Center Console, Removing and Installing and → Body Interior; Rep. Gr.70; Vehicle Interior Trim Panels; Carpet, Removing and Installing.
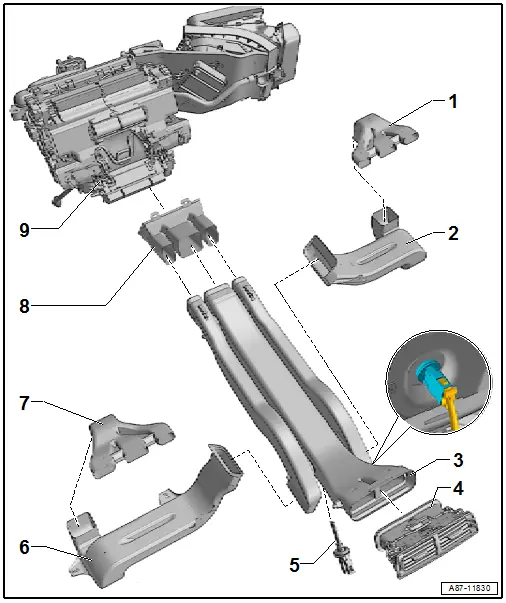
1 - Footwell Vent under the Right Seat (Front Passenger Seat)
- To remove, remove the carpet on the front passenger side. Refer to → Body Exterior; Rep. Gr.70; Vehicle Interior Trim Panels; Carpet, Removing and Installing.
2 - Air Duct to the Footwell Vent under the Right Seat (Front Passenger Seat)
- To remove, remove the carpet on the front passenger side. Refer to → Body Exterior; Rep. Gr.70; Vehicle Interior Trim Panels; Carpet, Removing and Installing.
3 - Rear Air Duct
- From the air duct (from the front heater and A/C unit) to the rear footwell vents
- To remove, remove the center console. Refer to → Body Interior; Rep. Gr.68; Center Console; Center Console, Removing and Installing.
4 - Rear Vent in the Center Console
- There are different versions. Refer to the Parts Catalog.
- Removing and installing. Refer to → Body Interior; Rep. Gr.68; Center Console; Overview - Center Console.
5 - Rear Upper Body Vent Temperature Sensor -G537-
- Removing and installing. Refer to → Chapter "Rear Upper Body Vent Temperature Sensor -G537-, Removing and Installing".
6 - Air Duct to the Footwell Vent under the Left Seat (Driver Seat)
- To remove, remove the carpet on the driver side. Refer to → Body Exterior; Rep. Gr.70; Vehicle Interior Trim Panels; Carpet, Removing and Installing.
7 - Footwell Vent Under The Left Seat (Driver Seat)
- To remove, remove the carpet on the driver side. Refer to → Body Exterior; Rep. Gr.70; Vehicle Interior Trim Panels; Carpet, Removing and Installing.
8 - Air Duct
- From the heater and A/C unit to the rear air duct
- To remove, remove the center console and rear air duct. Refer to → Body Interior; Rep. Gr.68; Center Console; Center Console, Removing and Installing.
9 - Front Heater and A/C Unit with Air Intake Housing
- Different versions. Refer to → Chapter "Overview - Heater and A/C Unit" and the Parts Catalog.
- Refer to → Chapter "Heater and A/C Unit, Removing and Installing"
- Air intake, air vents and air routing in the heater and A/C unit. Refer to → Chapter "Air Duct in Front Heater and A/C unit ".
Air Ducts and Vent in rear Vehicle Interior, "Mid" or "Mix" A/C System
 Note
Note
- Depending on vehicle equipment, there are different versions of the A/C system for the Audi Q7. Make sure to use the correct version and pay attention to the allocation of different components. Refer to → Chapter "A/C System Versions" and Parts Catalog.
- To remove the rear air ducts depending on the component location of the air duct, the vent, the B-pillar trim panel, and the rear carpet must be removed. Refer to → Body Interior; Rep. Gr.70; Vehicle Interior Trim Panels; B-Pillar Trim Panel, Removing and Installing and → Body Interior; Rep. Gr.70; Vehicle Interior Trim Panels; Carpet, Removing and Installing.
- Removing and installing the vents and air ducts in the "B" pillars. Refer to → Body Interior; Rep. Gr.70; Vehicle Interior Trim Panels; B-Pillar Trim Panel, Removing and Installing.
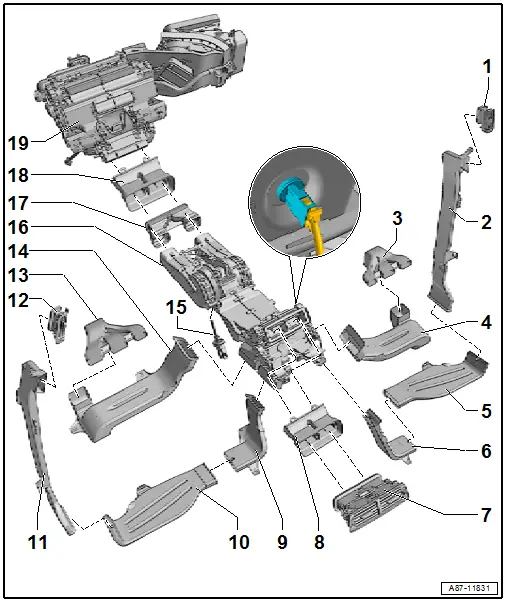
1 - Vent in the Right B-Pillar
- Removing and installing. Refer to → Body Interior; Rep. Gr.70; Vehicle Interior Trim Panels; B-Pillar Trim Panel, Removing and Installing.
2 - Air Duct in the Right B-Pillar
- There are different versions. Refer to the Parts Catalog.
- Removing and installing. Refer to → Body Interior; Rep. Gr.70; Vehicle Interior Trim Panels; B-Pillar Trim Panel, Removing and Installing. Free up the additional wiring harness.
 Note
Note
- On vehicles without an opening to install the Front Passenger Side Rear Ionizer -J1108-. Refer to → Chapter "Front Passenger Side Rear Ionizer -J1108-, Removing and Installing".
- In the case of vehicles without a Front Passenger Side Rear Ionizer -J1108- , seal the installation opening in the air duct in an air-tight manner, for example, with adhesive tape.
3 - Footwell Vent under the Right Seat (Front Passenger Seat)
- To remove, remove the carpet on the front passenger side. Refer to → Body Exterior; Rep. Gr.70; Vehicle Interior Trim Panels; Carpet, Removing and Installing.
4 - Air Duct to the Footwell Vent under the Right Seat (Front Passenger Seat)
Removing and installing
- Remove the carpet on the front passenger side. Refer to → Body Interior; Rep. Gr.70; Vehicle Interior Trim Panels; Carpet, Removing and Installing.
- Remove the expanding rivet and free up the air duct.
5 - Air Duct to the Vent in the Right B-Pillar
Removing and installing
- Remove the rear carpet. Refer to → Body Interior; Rep. Gr.70; Vehicle Interior Trim Panels; Carpet, Removing and Installing.
- Remove the air duct in the right B-pillar -item 2-.
- Remove the expanding rivet.
6 - Air Duct from the A/C Unit to the Vent in the Right B-Pillar
Removing and installing
- Remove the rear carpet. Refer to → Body Interior; Rep. Gr.70; Vehicle Interior Trim Panels; Carpet, Removing and Installing.
- Remove the air duct to the vent in the right B-pillar -item 5-.
7 - Rear Vent in the Center Console
- There are different versions. Refer to the Parts Catalog.
- Removing and installing. Refer to → Body Interior; Rep. Gr.68; Center Console; Center Console, Removing and Installing.
8 - Air Duct
- From the rear air distribution housing to the rear center console vent
- To remove, remove the rear trim and air duct. Remove the rear trim. Refer to → Body Interior; Rep. Gr.68; Center Console; Center Console Rear Trim, Removing and Installing.
9 - Air Duct from the A/C Unit to the Vent in the Left B-Pillar
Removing and installing
- Remove the rear carpet. Refer to → Body Interior; Rep. Gr.70; Vehicle Interior Trim Panels; Carpet, Removing and Installing.
- Remove the air duct to the vent in the left B-pillar -item 10-.
10 - Air Duct to the Vent in the Left B-Pillar
Removing and installing
- Remove the rear carpet. Refer to → Body Interior; Rep. Gr.70; Vehicle Interior Trim Panels; Carpet, Removing and Installing.
- Remove the air duct in the left B-pillar -item 11-.
- Remove the expanding rivet.
11 - Air Duct in the Left B-Pillar
- There are different versions. Refer to the Parts Catalog.
- Removing and installing. Refer to → Body Interior; Rep. Gr.70; Vehicle Interior Trim Panels; B-Pillar Trim Panel, Removing and Installing. Free up the additional wiring harness.
12 - Vent in the Left B-Pillar
- Removing and installing. Refer to → Body Interior; Rep. Gr.70; Vehicle Interior Trim Panels; B-Pillar Trim Panel, Removing and Installing.
13 - Footwell Vent Under The Left Seat (Driver Seat)
- To remove, remove the carpet on the driver side. Refer to → Body Exterior; Rep. Gr.70; Vehicle Interior Trim Panels; Carpet, Removing and Installing.
14 - Air Duct to the Footwell Vent Under the Left Seat (Driver Seat)
Removing and installing
- Remove the carpet on the driver side. Refer to → Body Interior; Rep. Gr.70; Vehicle Interior Trim Panels; Carpet, Removing and Installing.
- Remove the mount for the Data Bus on Board Diagnostic Interface -J533-. Refer to → Electrical Equipment; Rep. Gr.97; Control Modules; Data Bus on Board Diagnostic Interface J533, Removing and Installing.
- Remove the expanding rivet and free up the air duct.
15 - Rear Upper Body Vent Temperature Sensor -G537-
- Removing and installing. Refer to → Chapter "Rear Upper Body Vent Temperature Sensor -G537-, Removing and Installing".
16 - Rear Air Distribution Housing
- Removing and installing. Refer to → Chapter "Heater and A/C Unit, Removing and Installing, Mid or Mix A/C System".
- Refer to → Chapter "Air Duct in Rear Air Distribution Housing, Mid or Mix A/C System"
- Refer to → Chapter "Rear Air Distribution Housing Components, Mid or Mix A/C System"
17 - Rear Air Duct
- From the air duct (from the front heater and A/C unit) to the rear air distribution housing
- To remove, remove the center console. Refer to → Body Interior; Rep. Gr.68; Center Console; Center Console, Removing and Installing.
18 - Rear Air Duct
- from the front heater and A/C unit (to the air duct) to the rear air distribution housing
- To remove, remove the center console. Refer to → Body Interior; Rep. Gr.68; Center Console; Center Console, Removing and Installing.
19 - Front Heater and A/C Unit with Air Intake Housing
- Different versions. Refer to → Chapter "Overview - Heater and A/C Unit" and the Parts Catalog.
- Refer to → Chapter "Heater and A/C Unit, Removing and Installing"
- Air intake, air vents and air routing in the heater and A/C unit. Refer to → Chapter "Air Duct in Front Heater and A/C unit ".
Air Ducts and Vents in the Rear Vehicle Interior, "High" A/C System
 Note
Note
- Depending on vehicle equipment, there are different versions of the A/C system for the Audi Q7. Make sure to use the correct version and pay attention to the allocation of different components. Refer to → Chapter "A/C System Versions" and Parts Catalog.
- To remove the rear air ducts depending on the component location of the air duct, the vent, the B-pillar trim panel, and the rear carpet must be removed. Refer to → Body Interior; Rep. Gr.70; Vehicle Interior Trim Panels; B-Pillar Trim Panel, Removing and Installing and → Body Interior; Rep. Gr.70; Vehicle Interior Trim Panels; Carpet, Removing and Installing.
- Removing and installing the vents and air ducts in the "B" pillars. Refer to → Body Interior; Rep. Gr.70; Vehicle Interior Trim Panels; B-Pillar Trim Panel, Removing and Installing.
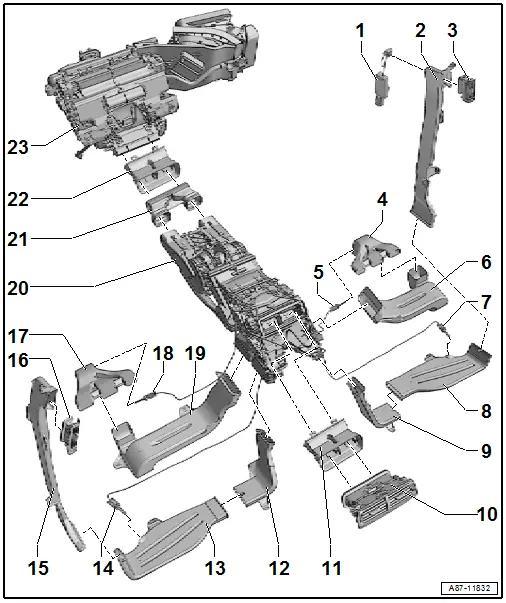
1 - Front Passenger Side Rear Ionizer -J1108-
- Equipped on some models
- Removing and installing. Refer to → Chapter "Front Passenger Side Rear Ionizer -J1108-, Removing and Installing".
2 - Air Duct in the Right B-Pillar
- There are different versions. Refer to the Parts Catalog.
- Equipment level with Front Passenger Side Rear Ionizer -J1108-. Without an ionizer the installation opening in the air duct must be sealed with airtight adhesive tape.
- Removing and installing. Refer to → Body Interior; Rep. Gr.70; Vehicle Interior Trim Panels; B-Pillar Trim Panel, Removing and Installing. Free up the additional wiring harness.
3 - Vent in the Right B-Pillar
- Removing and installing. Refer to → Body Interior; Rep. Gr.70; Vehicle Interior Trim Panels; B-Pillar Trim Panel, Removing and Installing.
4 - Footwell Vent under the Right Seat (Front Passenger Seat)
- With installation opening for the Right Rear Footwell Vent Temperature Sensor -G638-
Removing and installing
- Remove the carpet on the front passenger side. Refer to → Body Interior; Rep. Gr.70; Vehicle Interior Trim Panels; Carpet, Removing and Installing.
- Remove the expanding rivet and free up the air duct.
- Disconnect the connector for the Right Rear Footwell Vent Temperature Sensor -G638-.
5 - Right Rear Footwell Vent Temperature Sensor -G638-
- Removing and installing. Refer to → Chapter "Right Rear Footwell Vent Temperature Sensor -G638-, Removing and Installing".
6 - Air Duct to the Footwell Vent under the Right Seat (Front Passenger Seat)
Removing and installing
- Remove the carpet on the front passenger side. Refer to → Body Interior; Rep. Gr.70; Vehicle Interior Trim Panels; Carpet, Removing and Installing.
- Remove the expanding rivet and free up the air duct.
7 - Right Rear Upper Body Vent Temperature Sensor -G636-
- Removing and installing. Refer to → Chapter "Right Rear Upper Body Vent Temperature Sensor -G636-, Removing and Installing".
8 - Air Duct to the Vent in the Right B-Pillar
- With installation opening for the Right Rear Upper Body Vent Temperature Sensor -G636-
Removing and installing
- Remove the rear carpet. Refer to → Body Interior; Rep. Gr.70; Vehicle Interior Trim Panels; Carpet, Removing and Installing.
- Remove the air duct in the right B-pillar -item 2-.
- Remove the expanding rivet.
- Disconnect the connector for the Right Rear Upper Body Vent Temperature Sensor -G636-.
9 - Air Duct from the A/C Unit to the Vent in the Right B-Pillar
Removing and installing
- Remove the rear carpet. Refer to → Body Interior; Rep. Gr.70; Vehicle Interior Trim Panels; Carpet, Removing and Installing.
- Remove the air duct to the vent in the right B-pillar -item 8-.
10 - Rear Vent in the Center Console
- There are different versions. Refer to the Parts Catalog.
- With a Position Sensor in Left Rear Upper Body Vent -G630- and Position Sensor in Right Rear Upper Body Vent -G631-. Refer to the Parts Catalog.
- Removing and installing. Refer to → Body Interior; Rep. Gr.68; Center Console; Center Console, Removing and Installing.
 Note
Note
After replacement of the potentiometer (for adapting the end stops), adapt the Front A/C Display Control Head -E87-. Refer to Vehicle Diagnostic Tester in the "Guided Fault Finding" function.
11 - Air Duct
- From the rear air distribution housing to the rear center console vent
- To remove, remove the rear trim and air duct. Remove the rear trim. Refer to → Body Interior; Rep. Gr.68; Center Console; Center Console Rear Trim, Removing and Installing.
12 - Air Duct from the A/C Unit to the Vent in the Left B-Pillar
Removing and installing
- Remove the rear carpet. Refer to → Body Interior; Rep. Gr.70; Vehicle Interior Trim Panels; Carpet, Removing and Installing.
- Remove the air duct to the vent in the left B-pillar -item 13-.
13 - Air Duct to the Vent in the Left B-Pillar
- With opening for the Left Rear Upper Body Vent Temperature Sensor -G635-
Removing and installing
- Remove the rear carpet. Refer to → Body Interior; Rep. Gr.70; Vehicle Interior Trim Panels; Carpet, Removing and Installing.
- Remove the air duct in the left B-pillar -item 15-.
- Remove the expanding rivet.
- Disconnect the connector for the Left Rear Upper Body Vent Temperature Sensor -G635-.
14 - Left Rear Upper Body Vent Temperature Sensor -G635-
- Removing and installing. Refer to → Chapter "Left Rear Upper Body Vent Temperature Sensor -G635-, Removing and Installing".
15 - Air Duct in the Left B-Pillar
- There are different versions. Refer to the Parts Catalog.
- Removing and installing. Refer to → Body Interior; Rep. Gr.70; Vehicle Interior Trim Panels; B-Pillar Trim Panel, Removing and Installing.
16 - Vent in the Left B-Pillar
- Removing and installing. Refer to → Body Interior; Rep. Gr.70; Vehicle Interior Trim Panels; B-Pillar Trim Panel, Removing and Installing.
17 - Footwell Vent Under The Left Seat (Driver Seat)
- With installation opening for the Left Rear Footwell Vent Temperature Sensor -G637-
Removing and installing
- Remove the carpet on the driver side. Refer to → Body Interior; Rep. Gr.70; Vehicle Interior Trim Panels; Carpet, Removing and Installing.
- Disconnect the connector for the Left Rear Footwell Vent Temperature Sensor -G637-.
18 - Left Rear Footwell Vent Temperature Sensor -G637-
- Removing and installing. Refer to → Chapter "Left Rear Footwell Vent Temperature Sensor -G637-, Removing and Installing".
19 - Air Duct to the Footwell Vent under the Left Seat (Driver Seat)
Removing and installing
- Remove the carpet on the driver side. Refer to → Body Interior; Rep. Gr.70; Vehicle Interior Trim Panels; Carpet, Removing and Installing.
- Remove the mount for the Data Bus on Board Diagnostic Interface -J533-. Refer to → Electrical Equipment; Rep. Gr.97; Control Modules; Data Bus on Board Diagnostic Interface J533, Removing and Installing.
- Remove the expanding rivet and free up the air duct.
20 - Rear Heater and A/C Unit
- Removing and installing. Refer to → Chapter "Heater and A/C Unit, Removing and Installing, High A/C System".
- Refer to → Chapter "Air Duct in the Rear Heater and A/C Unit, High A/C System"
- Refer to → Chapter "Component Location Overview - Rear Adjustment Motor"
21 - Rear Air Duct
- From the air duct (from the front heater and A/C unit) to the rear heater and A/C unit
- To remove, remove the center console. Refer to → Body Interior; Rep. Gr.68; Center Console; Center Console, Removing and Installing.
22 - Rear Air Duct
- From the front heater and A/C unit (to the air duct) to the rear heater and A/C unit
- To remove, remove the center console. Refer to → Body Interior; Rep. Gr.68; Center Console; Center Console, Removing and Installing.
23 - Front Heater and A/C Unit with Air Intake Housing
- Different versions. Refer to → Chapter "Overview - Heater and A/C Unit" and the Parts Catalog.
- Refer to → Chapter "Heater and A/C Unit, Removing and Installing"
- Air intake, air vents and air routing in the heater and A/C unit. Refer to → Chapter "Air Duct in Front Heater and A/C unit ".

